These twelve coffee bar ideas are tested in actual small kitchens and corner setups — apartments under 600 square feet, rentals without dedicated counter space, kitchens where the coffee maker shares real estate with the toaster. None require renovation; most build on existing furniture (a credenza, a console, a small bar cart) plus $50 to $150 in styling additions. Every idea comes with exact dimensions, materials, and the brand recommendations that consistently deliver warmth without clutter.
Coffee bars succeed or fail on one thing: how easy they make the morning. Beautifully styled coffee bars that hide the bean grinder in a cabinet, force you to dig out filters, and require seven steps before your first cup don't get used. The setups below all prioritize friction-free use over photo-perfect display.
By the end of this guide, you'll know exactly which surface to claim, how to style it so it photographs well and works mornings, and the three small lighting and styling additions that turn a corner into the most-used spot in the kitchen.
WHAT'S INSIDE
- The 32-inch surface that's plenty for a complete coffee setup — credenza, bar cart, or counter stretch
- Why mugs should hang on hooks, not stack in cabinets — the small move that changes morning flow
- The lamp height (24 inches) that turns a counter into atmospheric pre-dawn light
- How to style with what you actually use, so the coffee bar reads honest, not staged
A coffee station is the rare bit of styling that has to work at 6am before you've had any coffee. Function first, beauty second.
— Apartment Therapy [citation needed — verify before publish]
What is a coffee bar?
A coffee bar is a dedicated small zone — a counter run, a cart, a credenza, or a cabinet — that holds everything you need to make coffee in one spot, styled so it looks intentional rather than like clutter. It pulls the machine, grinder, mugs, and beans off the main counter and gives the morning ritual a home.
The good ones share a logic: the working parts <em>are</em> the styling. A glass jar of beans, mugs on hooks, a worn wooden tray, a small warm lamp — nothing is a prop you have to move to actually make coffee. That's what separates a coffee bar you use from one you photograph once and abandon.
More in Cozy Corners you may love
See allWhy coffee bars are everywhere in 2026
Home coffee culture kept growing, and the coffee bar became the kitchen's version of a cozy corner — a small, personal ritual zone in a room that's otherwise all function. Pinterest's "coffee bar ideas" and "cozy coffee corner" searches are among the platform's biggest home terms, and the "coffee bar cabinet" — a version that hides behind doors — is climbing fast.
It's also the rare project that's high-impact and low-cost. A thrifted credenza, a few hooks, and a lamp turn dead counter space into the spot you look forward to every morning. No renovation, just a small claimed corner and a little styling.
24 coffee bar ideas for real kitchens
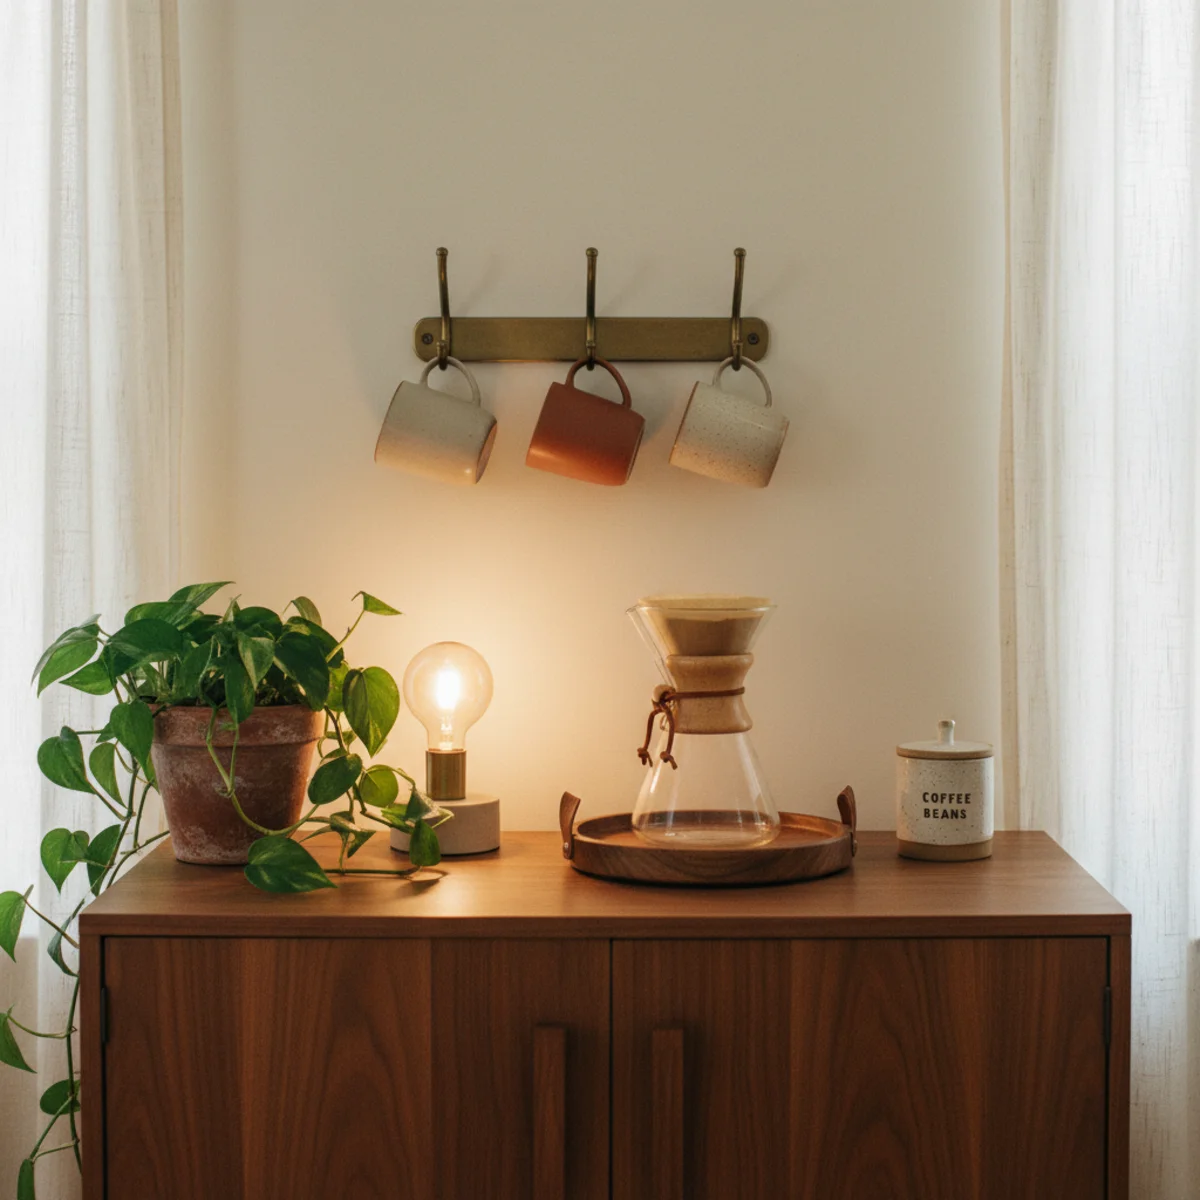
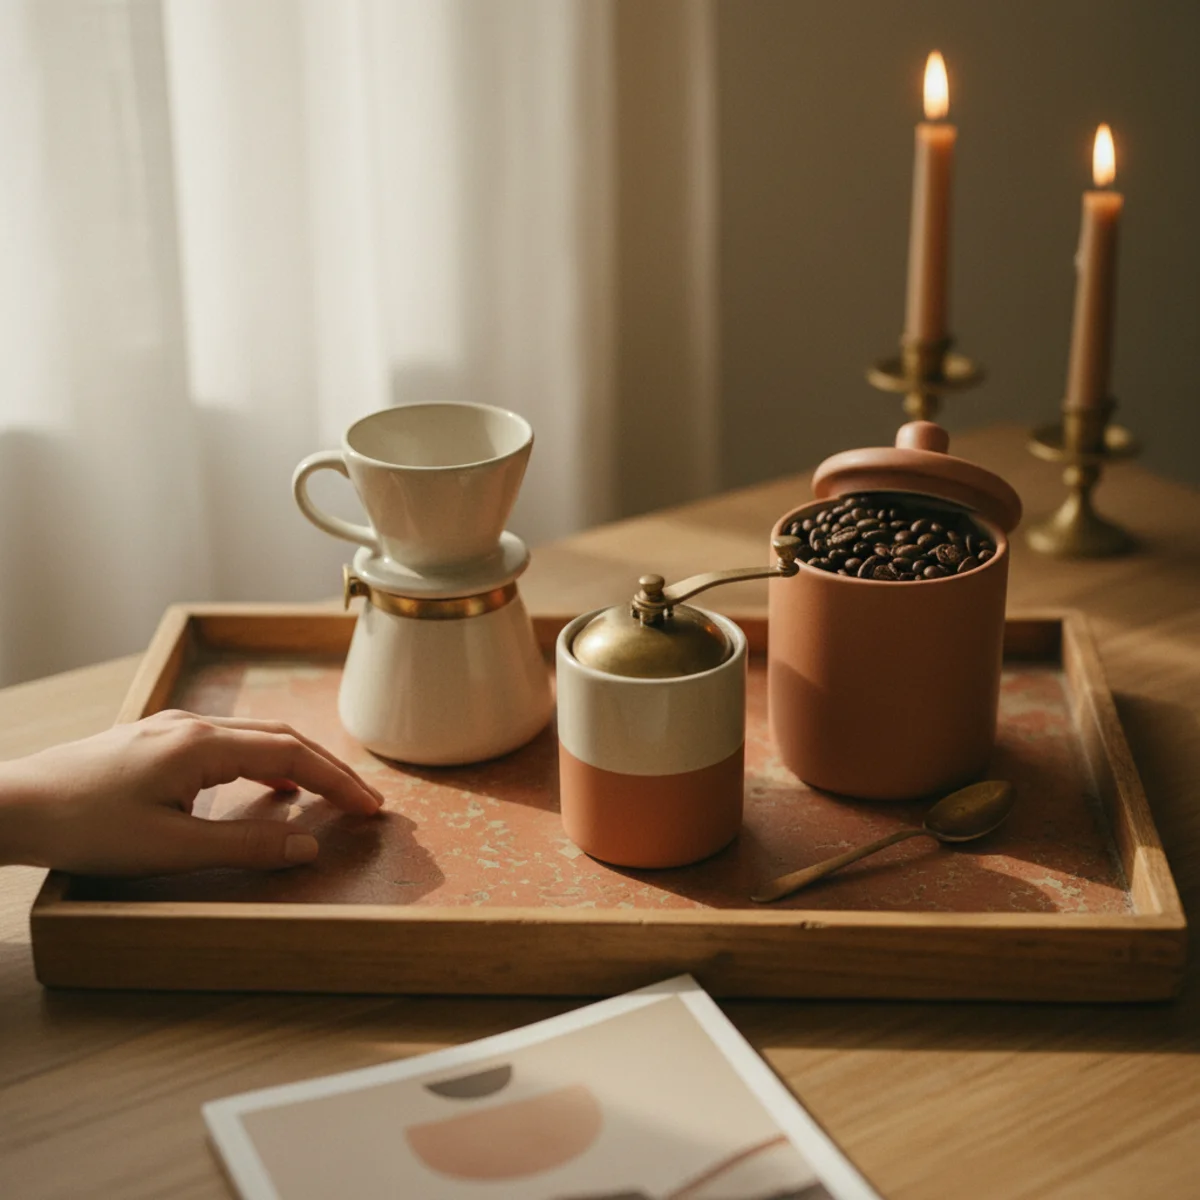
01Claim a Credenza, Cart, or Counter Stretch
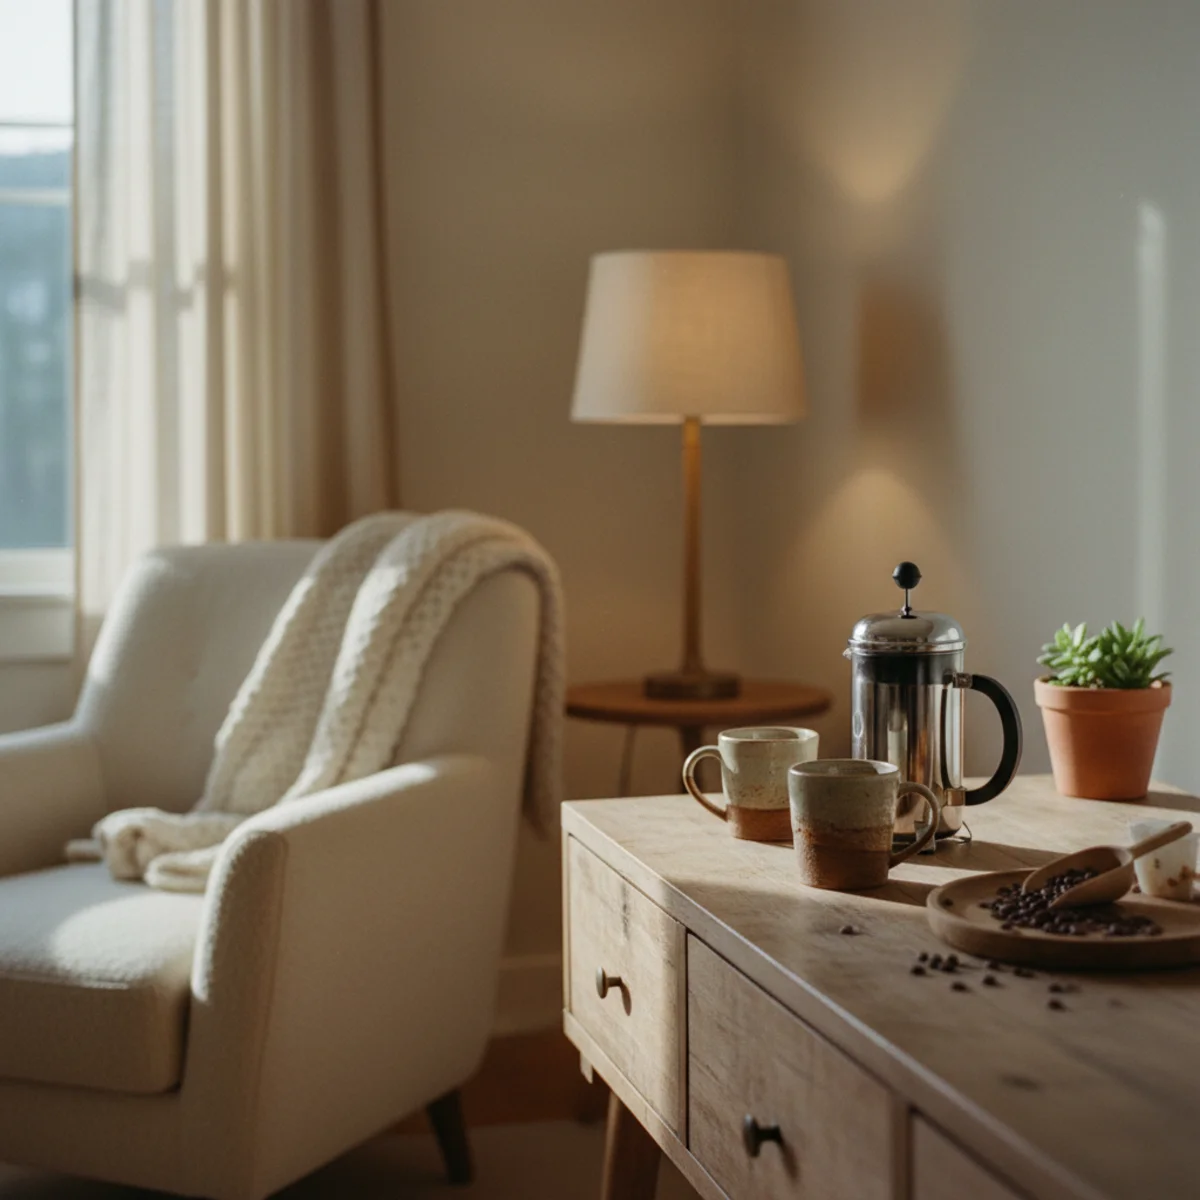
Before any styling, claim the surface. A coffee bar needs roughly 32 to 48 inches of continuous flat surface — enough for the machine, a small canister set, mugs within reach, and elbow room to actually pour. A vintage credenza, a bar cart, an underused section of countertop, or a small cabinet works. The surface should be 34 to 38 inches off the floor (standard counter height) so you're not bending. Once the surface is claimed, every other decision becomes easier.
Options ranked by ease: an existing 36-inch section of kitchen counter (free, easiest); a vintage credenza at $80 to $250 from Marketplace (warm wood, storage below); a slim console table at $100 to $300 (West Elm, Article); a bar cart at $80 to $250 (West Elm, IKEA RÅSKOG at $40). Avoid pieces deeper than 18 inches (you'll lose forward reach to the espresso machine) and shallower than 14 inches (no room for the bean canister). Position near a wall outlet (the espresso machine needs power) and near the kitchen sink for water refills.
AFFILIATE SLOTFURNITURE32-48 inch surface: credenza, bar cart, or counter stretchAdd affiliate URL when configuredWhy it works
Because every coffee bar in real homes is constrained by its surface, not its equipment list. A beautiful $800 espresso machine on a 24-inch counter feels cramped; a $200 machine on a 40-inch credenza reads spacious and considered. The surface determines the spaciousness, the ritual ease, and the photographic quality more than any single piece of gear. Surface first, gear second.
Pro tip — Measure your current available surface with a tape measure before buying any new credenza or cart — the difference between a 32-inch credenza fitting against a wall and not fitting is often two inches that retailers don't advertise. Always measure twice; assume the listing photo lies about scale.
Forty inches of credenza, all the gear, room to pour — the foundation any coffee bar needs. See also: vintage credenza
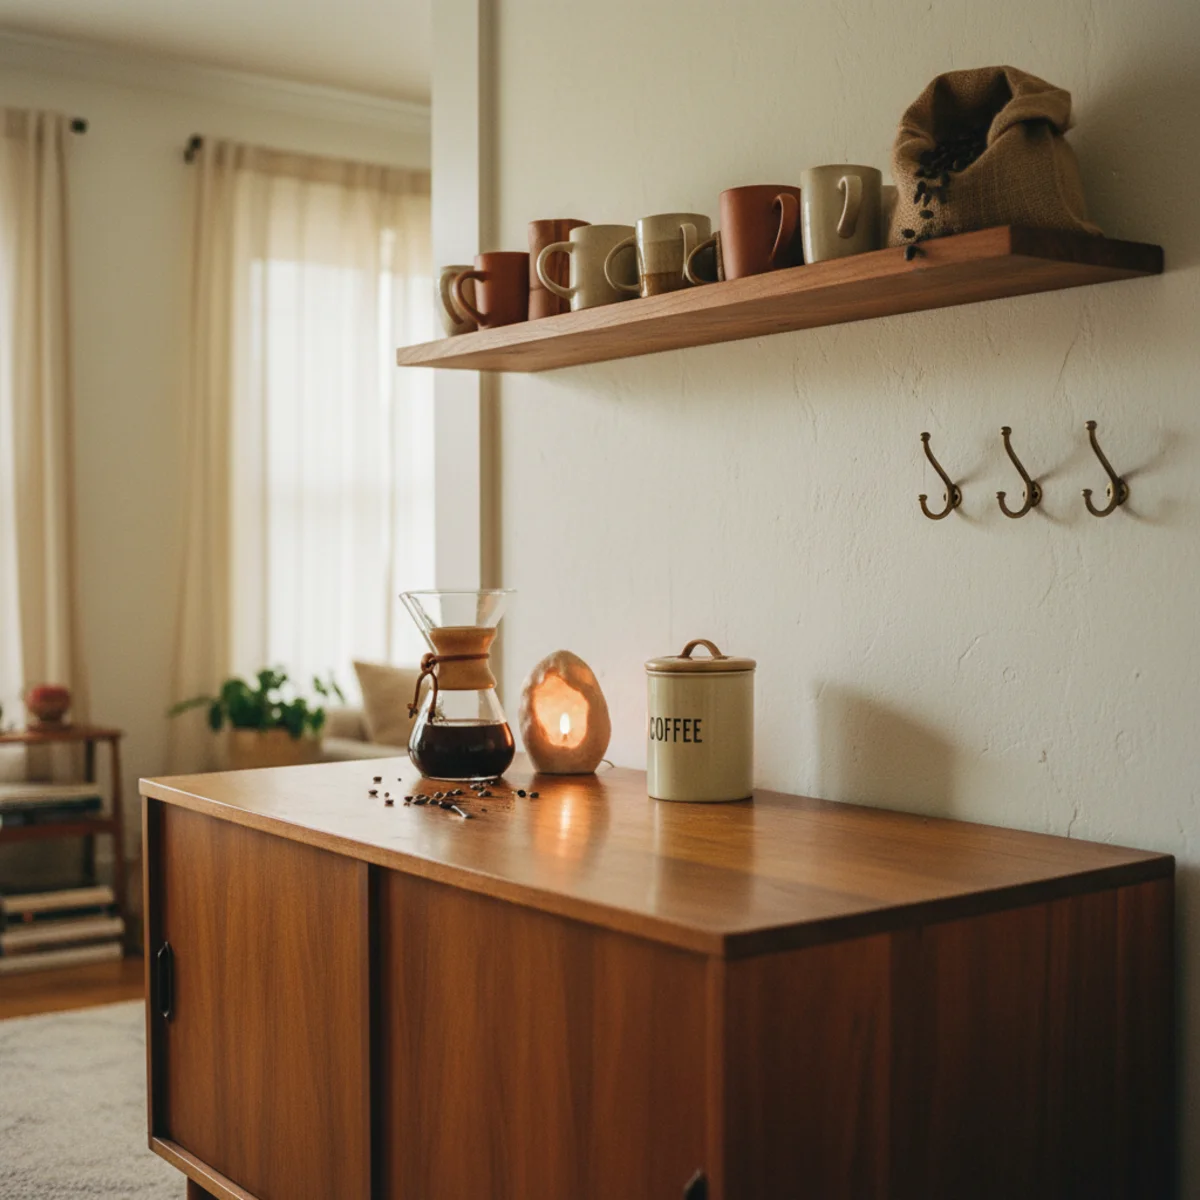
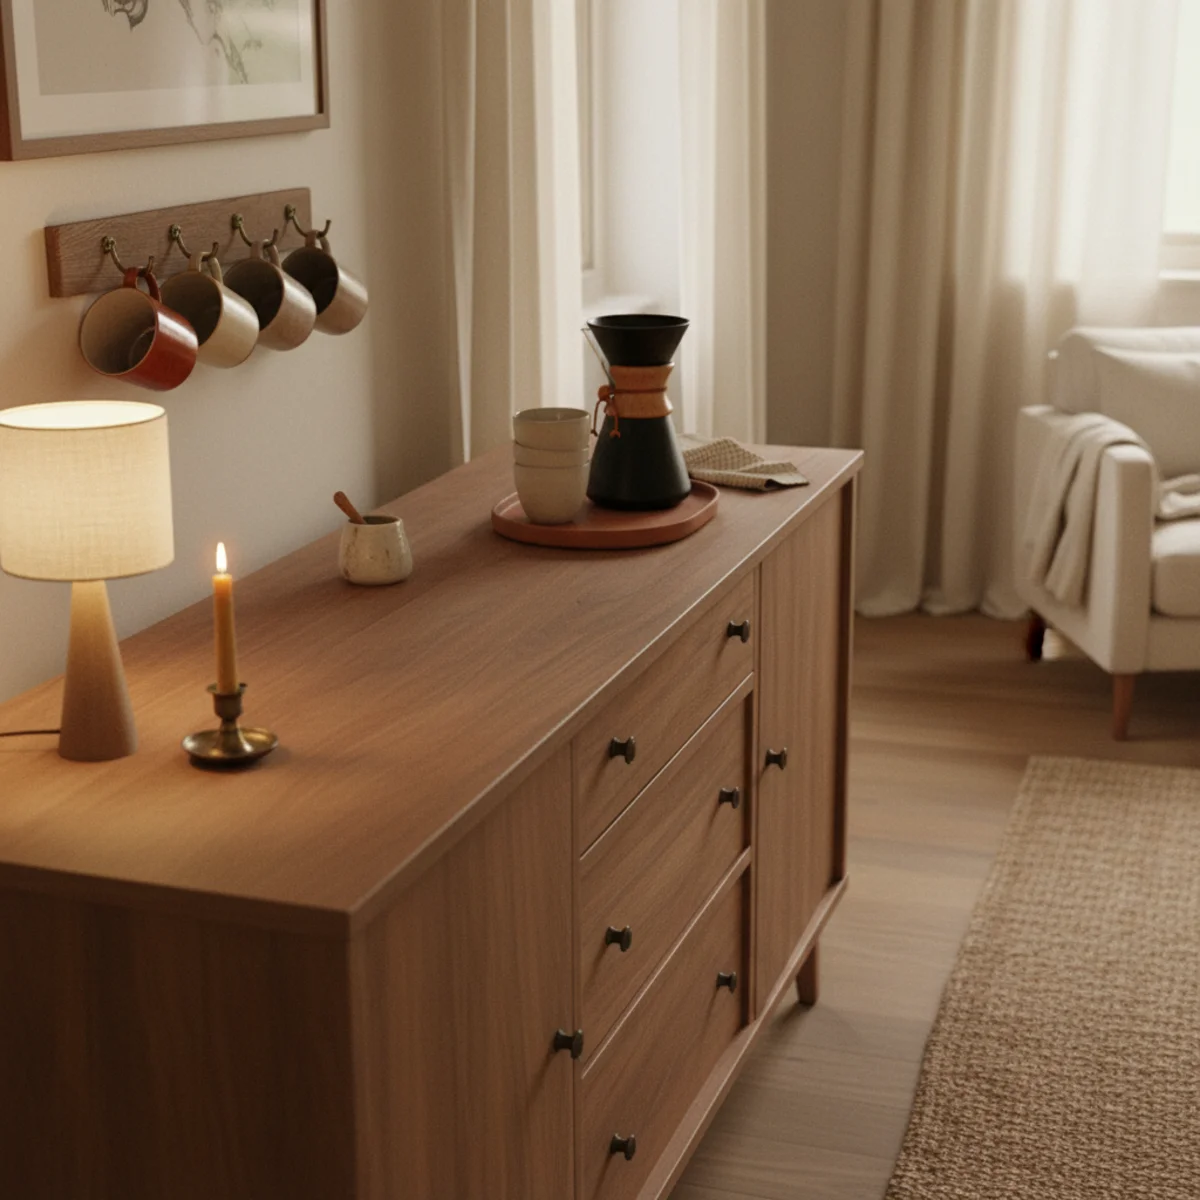
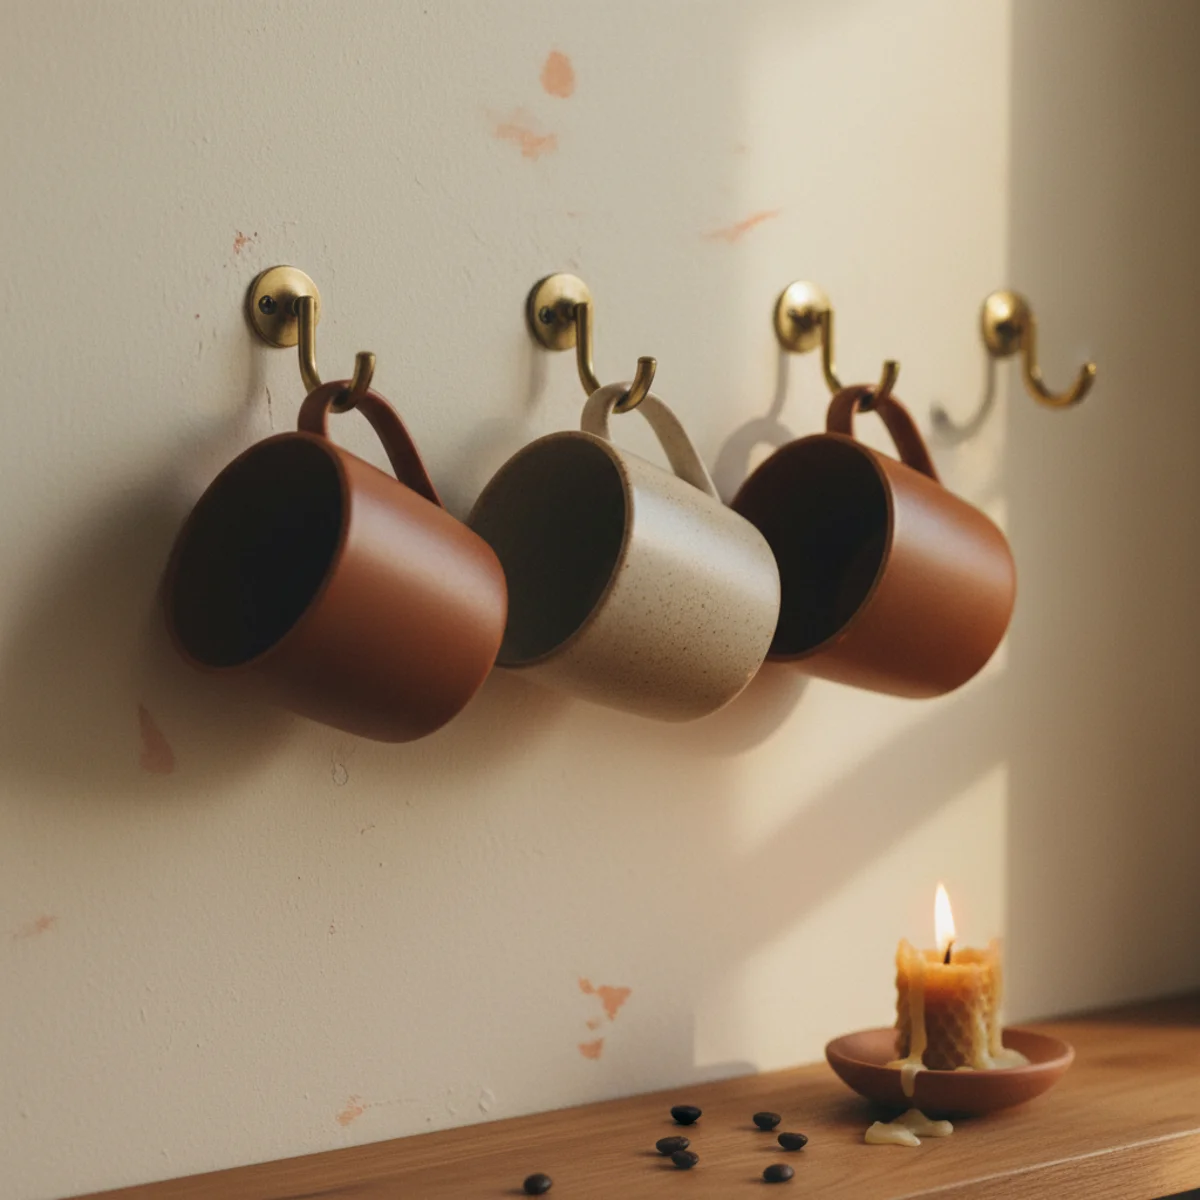
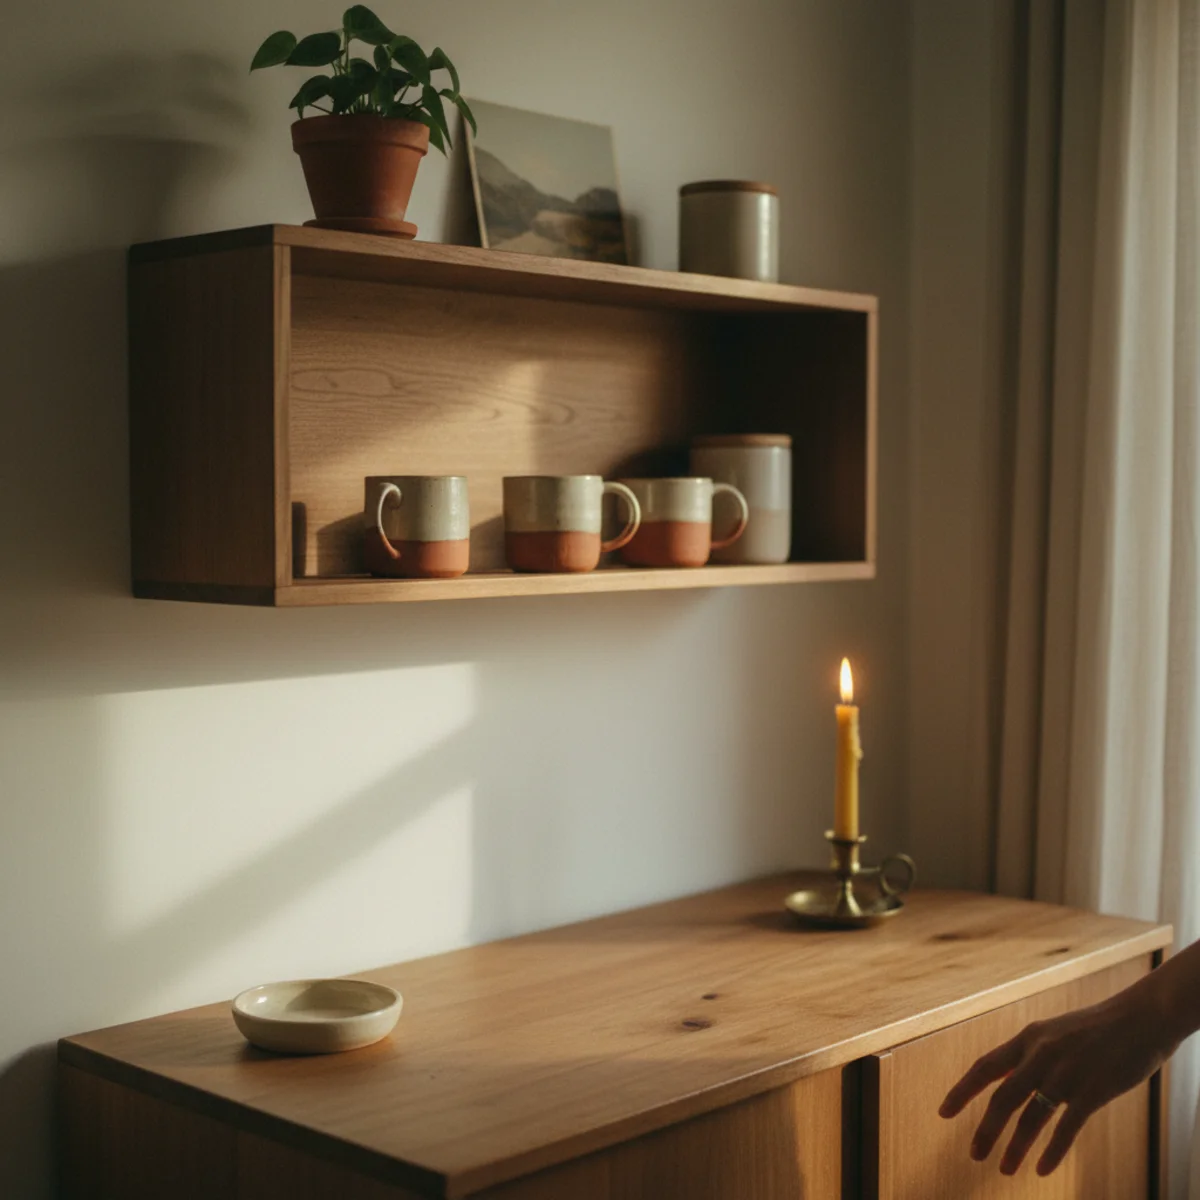
02Hang the Mugs on Hooks, Not Stacked in Cabinets
Stacked mugs in a cabinet are mugs you have to reach for, and reaching twice (cabinet then bar) at 6:30am breaks the ritual. The fix is the small move that changes morning coffee bar use entirely: mug hooks under a shelf or directly on the wall above the coffee bar. Four to six hooks, mug handles facing out, ready to grab. The hooks also turn mugs into part of the visual styling, which beats hiding them in upper cabinets.
Install 4 to 6 hooks under a shelf (J-hooks at $2 each, screwed into shelf bottom 3 inches apart) or directly on the wall (cup hooks 8 to 10 inches apart, screwed into a stud or anchor). Hang mugs handle-out, lip-down, at the level just above your coffee bar surface. Mix mug styles: thrifted ceramic mugs, hand-thrown stoneware, vintage diner mugs. Avoid matching sets; variety reads as a collection. Total cost: $8 in hooks plus $0 to $40 in mugs depending on sources. The visual effect is immediate.
AFFILIATE SLOTSTORAGE4-6 mug hooks (J-hooks or cup hooks) + 6-8 mismatched mugsAdd affiliate URL when configuredWhy it works
Because morning rituals run on friction reduction — the fewer steps between waking and coffee, the more reliably the ritual happens. Mugs on hooks remove one cabinet open-and-close motion every morning, plus the visual styling layer of varied mugs replacing blank cabinet doors adds character without taking storage space. The mugs become decoration and tool simultaneously.
Pro tip — Use vintage diner mugs and hand-thrown stoneware in warm earth tones — they hang prettiest, photograph best, and the slight irregularity of hand-thrown shapes reads as collected over years. Avoid identical printed mugs (matching sets fight the casual aesthetic) and brittle bone china (impractical for daily morning use).
Hooks under the shelf, mugs handle-out, ready to grab — friction-free mornings start here. See also: hand-thrown stoneware
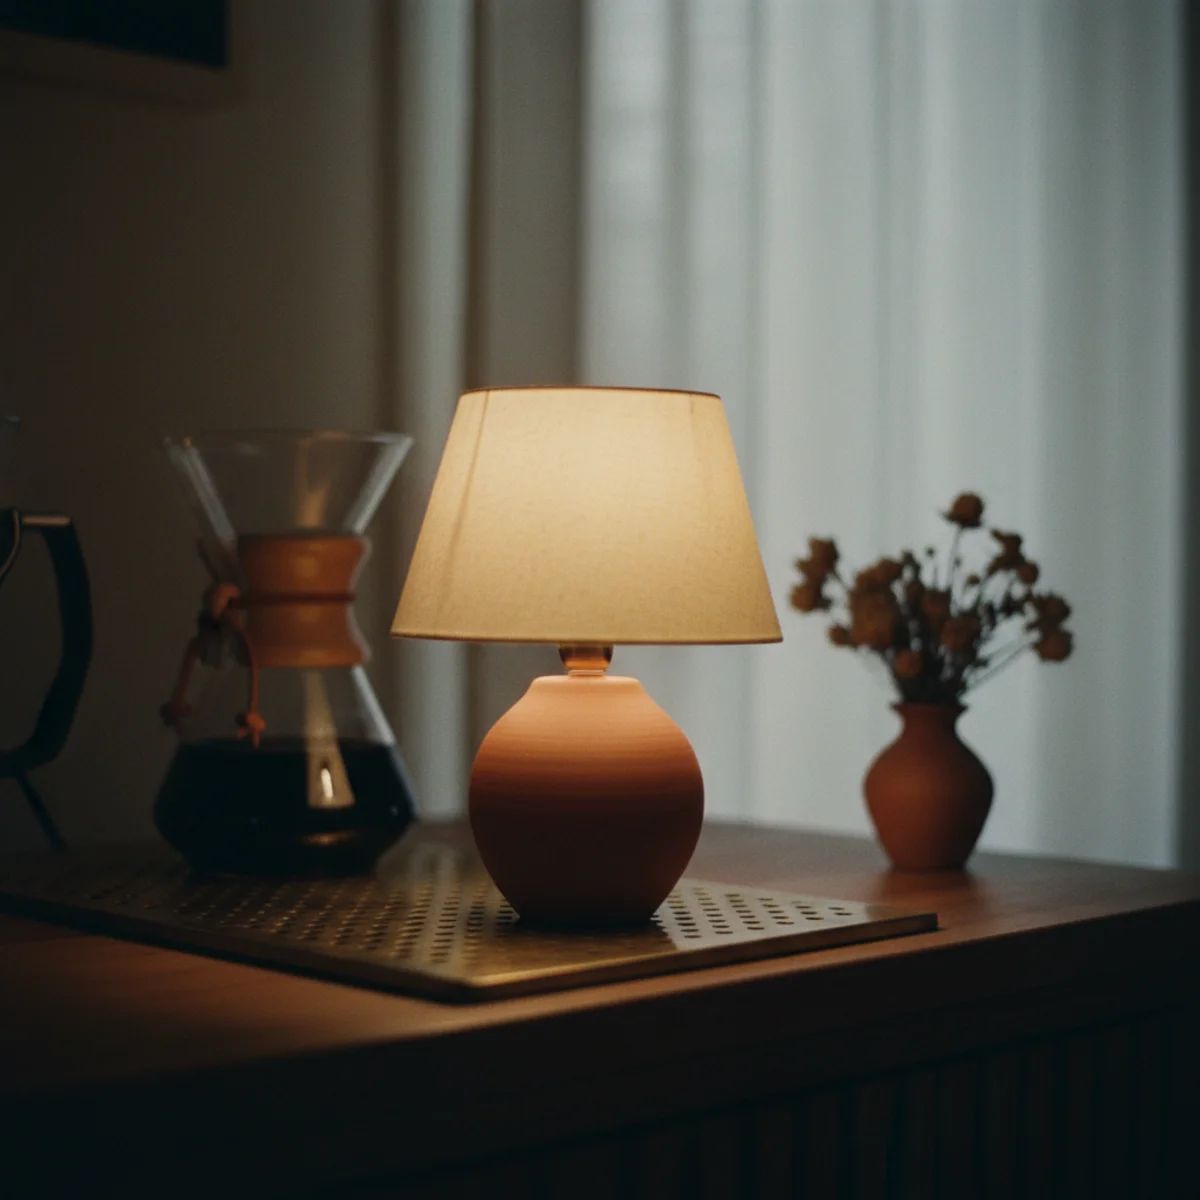
03Add a Small Warm Lamp for Pre-Dawn Light
The kitchen overhead light at 6:00am is the wrong light. Bright, cool-toned, harsh — the opposite of what early mornings should feel like. A small 2700K lamp on the coffee bar surface gives the corner its own warm glow before the rest of the room wakes up. The first ten minutes of the morning, lit just by this one lamp and the kettle's blue ring, become a small ritual worth getting up for.
Choose a small lamp 18 to 26 inches tall, with a brass, ceramic, or oak base and a linen or paper shade. Bulb: 2700K LED at 400 to 600 lumens (warmer and dimmer than your living room lamps — this is meant for low-light pre-dawn). Options: IKEA SVALLET small clip lamp at $15, thrifted brass lamp at $20 to $40, West Elm small ceramic at $79. Position at the back of the coffee bar so light spills forward across the working surface. Pair with a battery-puck uplight ($12 from Govee) under a shelf for indirect warm glow.
AFFILIATE SLOTLIGHTINGSmall lamp 18-26 inches with 2700K bulb at 400-600 lumensAdd affiliate URL when configuredWhy it works
Because the difference between flipping on the bright overhead and switching on one warm lamp is the difference between functional kitchen and cozy ritual space. The small lamp lets you make coffee at 5:30am without flooding the whole kitchen in cool light, preserving the quiet pre-dawn mood. The dim warm light also reads as evening's continuation rather than morning's harsh start.
Pro tip — Wire the lamp to a smart plug timed to turn on automatically 15 minutes before your usual wake-up. Walking into a pre-lit warm kitchen at 6:15am before coffee is one of the small daily luxuries that adds up — and costs $15 in hardware to set up once.
One small lamp, warm 2700K bulb — the only kitchen light you need before sunrise. See also: 2700K LED
04Style With What You Actually Use Daily
The coffee bars that look best in photographs and work best in mornings are the ones styled with what's actually used daily — not a curated display of objects pretending to be coffee gear. Real bean canister out, real mugs hung, real grinder visible, daily-use cloth folded nearby. The honesty reads as styling, and the styling reads as use. Hide nothing that's used more than three times a week; display nothing that isn't.
Visible essentials: the coffee machine (espresso, pour-over kettle, or drip), the bean canister or grinder, two to four mugs on hooks, a small cloth or linen towel folded once. Optional honest additions: a small ceramic dish for ground beans, a glass milk frother, a small jar of cinnamon or cardamom. What stays hidden: instant coffee packets (read low-effort), branded merchandise (reads corporate), accessories you bought hoping to use. Edit ruthlessly. A coffee bar with 5 visible items beats one with 15 every time.
AFFILIATE SLOTSTYLING5 visible items max: machine, beans, mugs, cloth, one optional small objectAdd affiliate URL when configuredWhy it works
Because the eye reads use as character, and curated display as performance. A coffee bar with a slightly worn bean canister and an almost-empty bag of beans beside the grinder reads as a tool that gets used; the same surface with pristine matching jars and unused accessories reads as a stage set. Use is the warmth; perfection is the coldness.
Pro tip — Photograph your coffee bar with morning light, then remove any object you didn't use that morning. The remaining objects are the honest coffee bar — and photographing what's left almost always looks more beautiful than the original arrangement, despite having fewer things on the surface.
Five visible items, all used daily — the honest styling that always photographs better than the curated kind. See also: edit ruthlessly
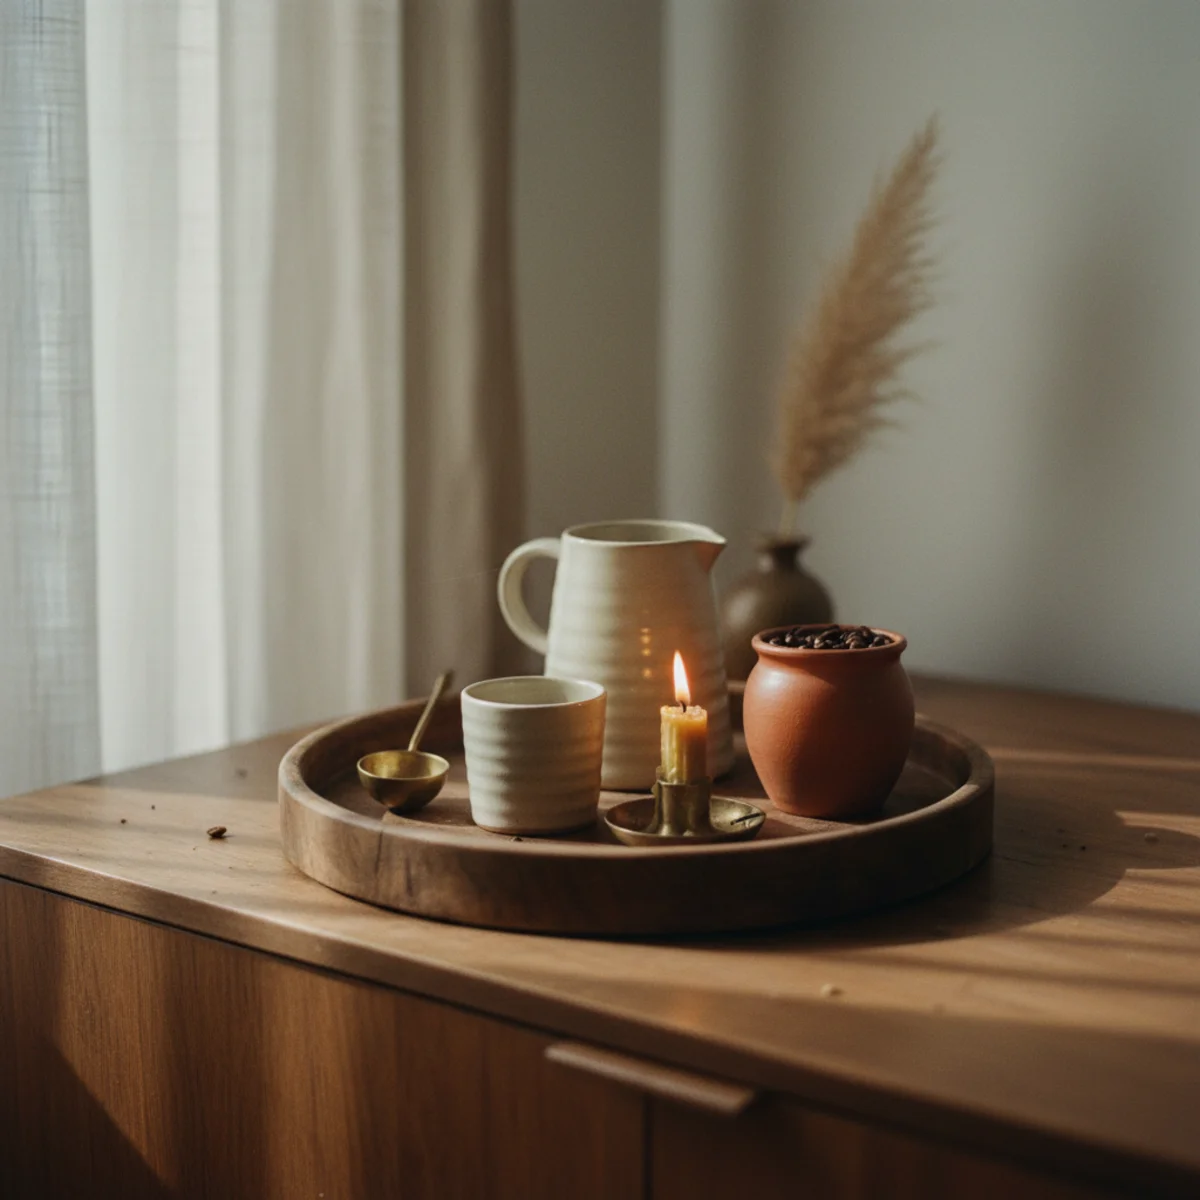
05Use a Tray to Define the Coffee Zone
A tray under the coffee machine and bean canister does for the coffee bar what a tray does for a coffee table — it visually contains the working zone within a defined rectangle, making the rest of the surface read as breathing room rather than crowded. A 16-by-22-inch wooden or brass tray, placed under the daily-use coffee gear, instantly turns a scattered counter into a styled coffee bar.
Choose a tray 16 to 22 inches long, 10 to 14 inches deep — large enough to hold the espresso machine or pour-over setup plus the bean canister, small enough to leave 30 to 50 percent of the coffee bar surface tray-free. Materials: oiled walnut or oak (most forgiving for spills), aged brass (warmest visual), large rattan (most casual). Sources: thrifted at $5 to $25 (Goodwill, ReStore), HomeGoods at $20 to $40, West Elm at $44 to $89. The tray also catches spilled grounds and milk drips — easier to wipe down than the bare counter underneath.
AFFILIATE SLOTSTYLINGWooden or brass tray, 16-22 by 10-14 inches, under daily-use gearAdd affiliate URL when configuredWhy it works
Because the tray defines the working zone — the eye reads everything within the tray as the coffee setup, everything outside as the surrounding styling. Without a tray, the counter reads as a jumble of objects; with one, the same objects read as a deliberate vignette. The visual containment also makes daily cleanup easier (wipe the tray, not the whole counter), reinforcing the styled-but-used aesthetic.
Pro tip — Pick a tray slightly larger than what fits your current gear — the extra inch or two on each side lets you add a small ceramic dish for grounds, a single ramekin for sugar, or a small spoon without cluttering. Trays should never look full to the edges.
Tray under the working gear — the visual containment that makes a coffee bar read as styled. See also: oiled walnut
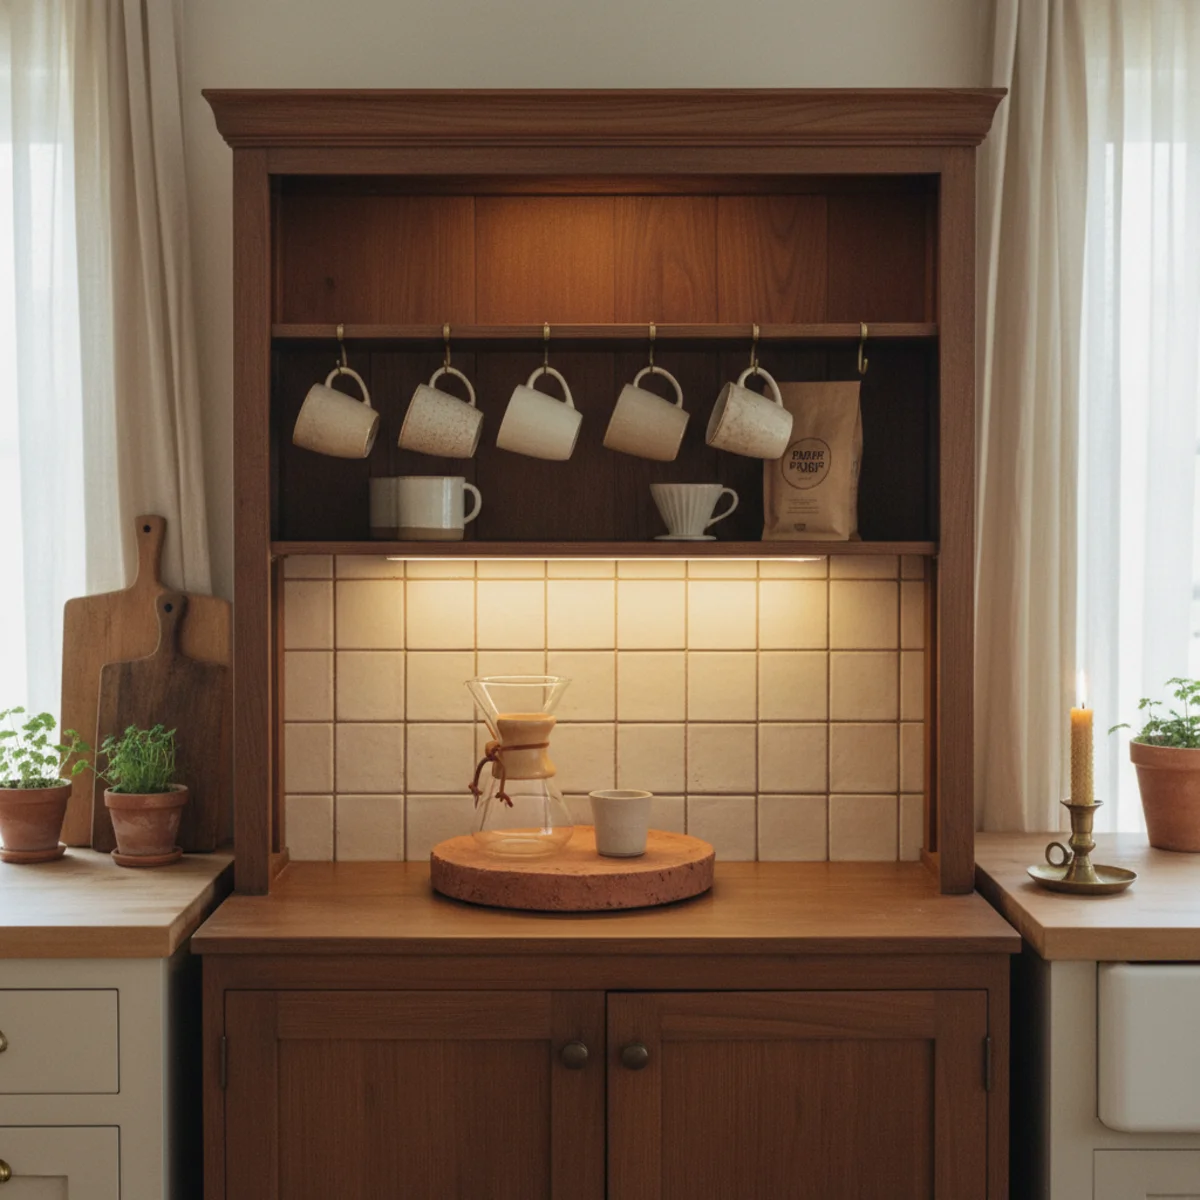
06Add Open Shelving Above for Storage and Style
The single shelf above the coffee bar is the difference between cramped and spacious. A 36-inch open wood shelf at 18 to 24 inches above the counter holds the bean canister set, a few decorative ceramics, a small framed piece of art, and the spare mugs that don't fit on the hooks below. Open shelving also catches light and adds vertical interest — exactly what a 32-inch coffee bar zone needs to escape feeling like a single horizontal stripe.
Install a single shelf 24 to 48 inches long (matching coffee bar width), 8 to 12 inches deep, in oak, walnut, or pine. Mount with metal brackets (IKEA EKBY 2-pack at $15) or shelf brackets ($15 to $40 from Schoolhouse for fancier versions). Position 18 to 24 inches above the coffee bar surface — high enough that the espresso machine fits underneath, low enough that you can reach the shelf contents without standing on a stool. Style with 5 to 8 items total: bean canister set (3 jars), 1 to 2 small ceramics, 1 small framed piece, 1 small plant or branch in a vase, 2 to 3 spare mugs.
AFFILIATE SLOTSTORAGESingle open shelf 24-48 inches wide, 8-12 inches deep, in matching woodAdd affiliate URL when configuredWhy it works
Because cabinets close off the vertical space visually, making a small coffee bar zone feel even more compressed. An open shelf preserves the openness — the eye can travel up the wall to the shelf and back down to the counter, which makes the whole zone read taller and more spacious. Open shelves also force you to keep stored items beautiful or hidden, which keeps the bar curated rather than crammed.
Pro tip — Use the same wood species for the shelf and the coffee bar surface — oak shelf above an oak credenza, walnut above walnut. The visual continuity reads as one designed system rather than two separate furniture pieces. If the species don't match, stain to align them.
One shelf at 22 inches above the counter — vertical space that small coffee bars desperately need. See also: open shelf
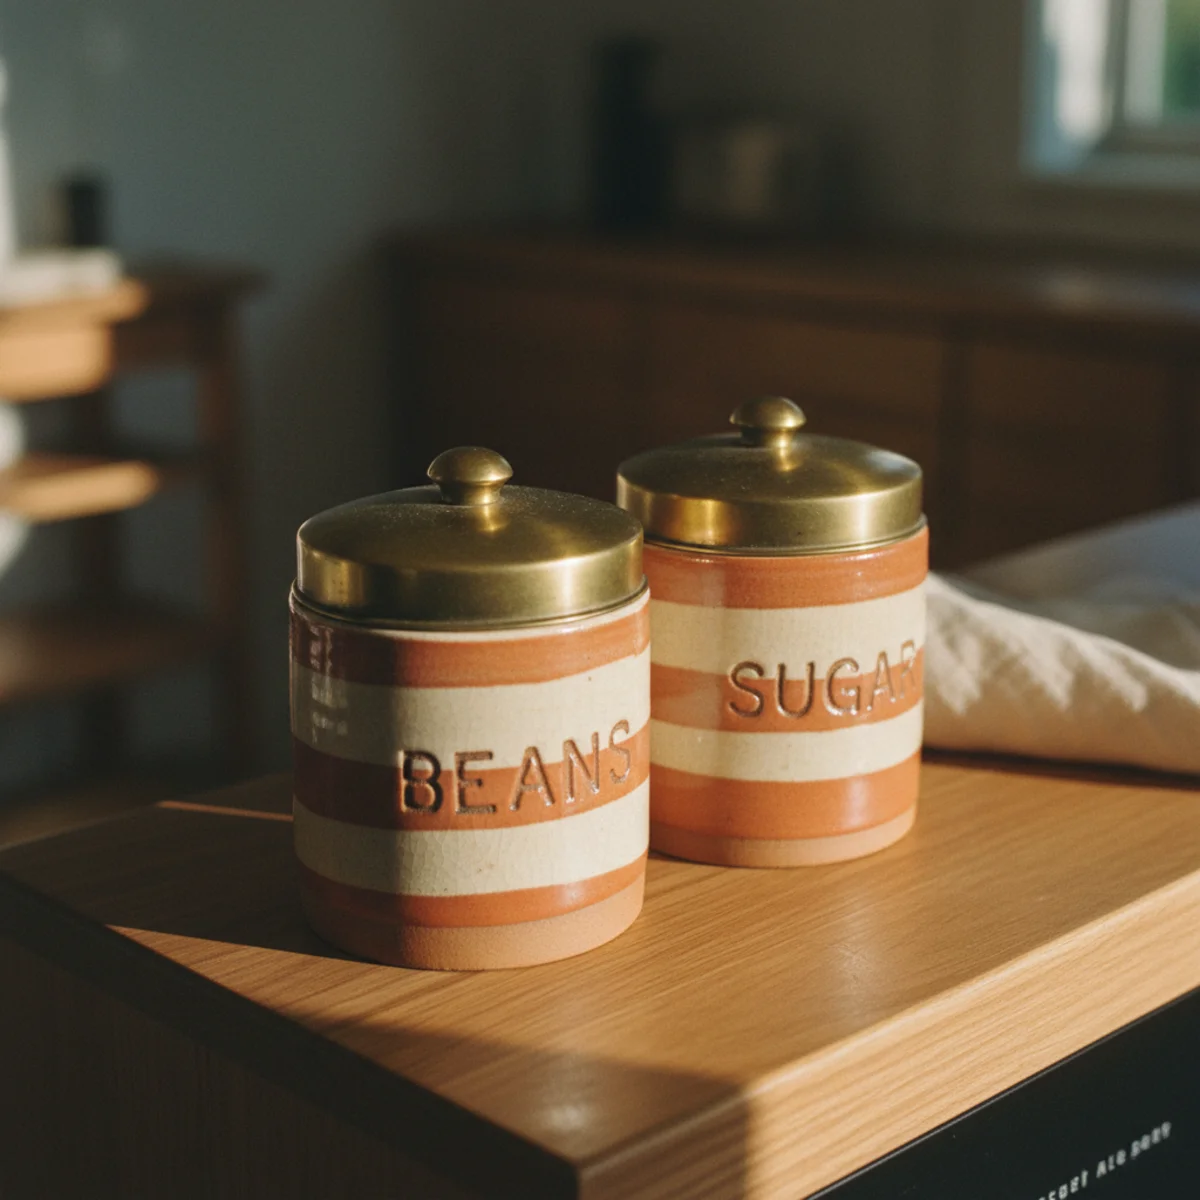
07Use a Matched Canister Set for Beans and Storage
Bagged coffee beans on a coffee bar read messy. The fix is a matched (or coordinated) canister set — three to five glass, ceramic, or wood canisters holding beans, ground coffee, sugar, optional tea, optional cinnamon. The canisters become part of the visual styling and solve the storage problem at the same time. Cost: $30 to $80 for a coordinated set; lasts forever if you buy real materials.
Choose three to five canisters in the same material family (glass with bamboo lids, matte stoneware with cork lids, oxidized brass) but in different sizes — varied heights read more collected than matching sets of identical jars. Sizes: 32 oz for whole beans, 16 oz for ground coffee, 8 oz for sugar or cardamom, plus 2 to 3 smaller jars for loose tea or accents. Brands: Weck glass jars at $8 each, Fellow Atmos vacuum canisters at $40, hand-thrown ceramic canisters from Etsy at $30 to $60 each. Label minimally (a small chalk-marker tag or none at all) and refresh contents weekly.
AFFILIATE SLOTSTORAGE3-5 canisters in coordinated material (glass, stoneware, or brass) at varied sizesAdd affiliate URL when configuredWhy it works
Because varied bagged or boxed coffee products create visual chaos on a small surface — different brand logos, different shapes, different colors all competing. Decanting into matched canisters strips the branding and creates one cohesive visual element instead of five mismatched ones. The canisters become part of the styling rather than products that interrupt it.
Pro tip — Buy one canister at a time over a few weeks rather than a matching set all at once — the slightly different finishes, lid styles, and shapes that come from gradual collection read more interesting than perfectly identical jars. Mix three sizes, three glass shapes, but stay in one material family.
Three glass canisters, three sizes, one material family — visual cohesion without matching set predictability. See also: Weck glass jars
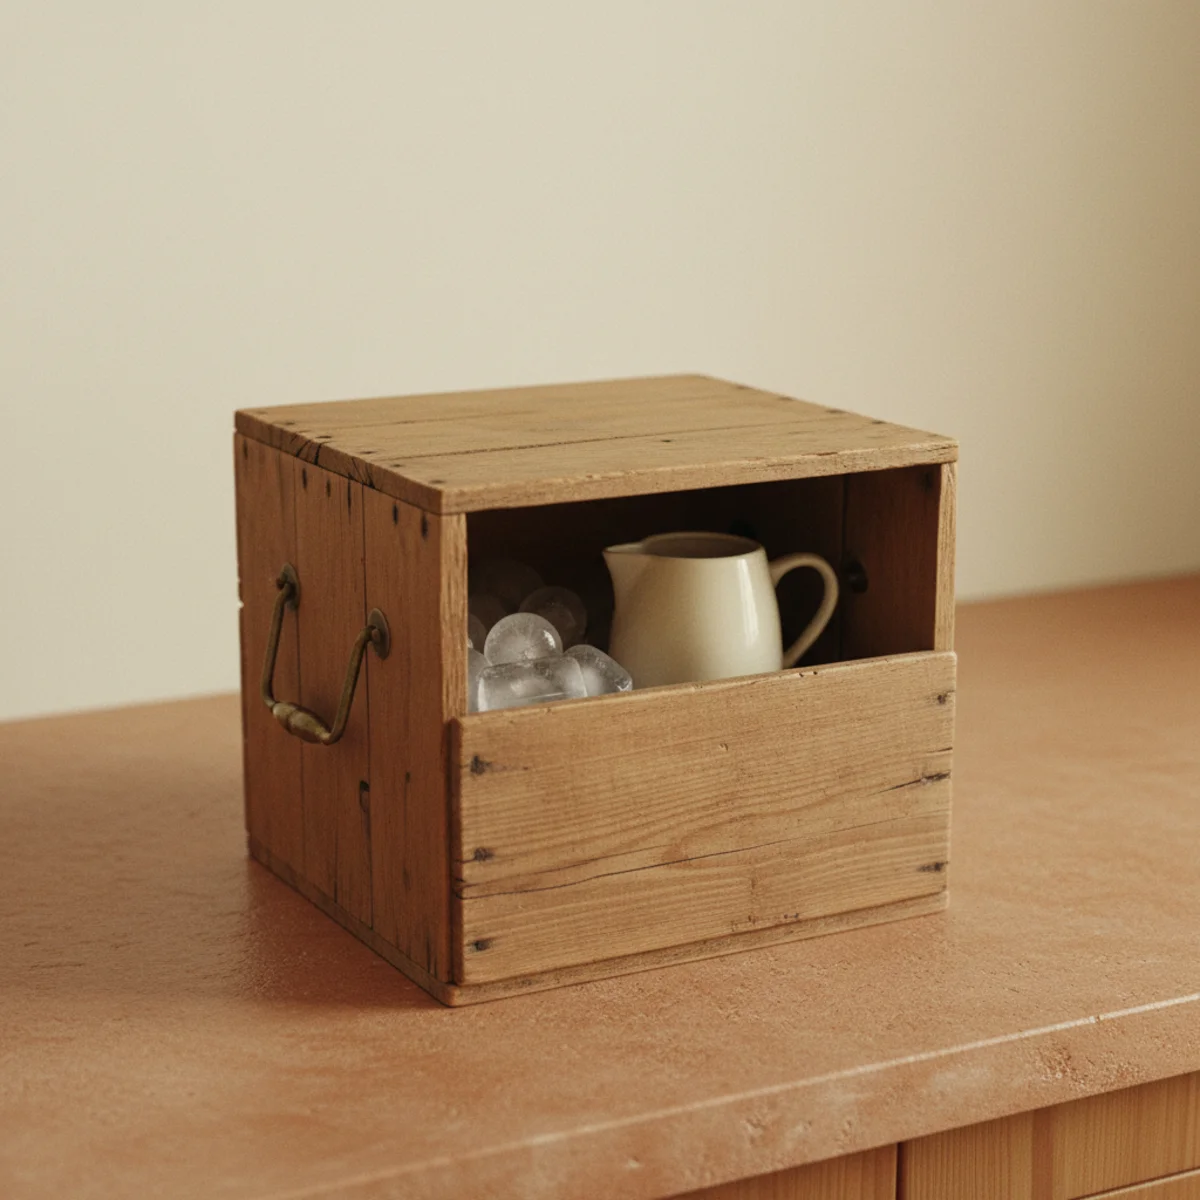
08Tuck a Mini Fridge or Crate for Milk Storage
Milk and cream are the practical bottleneck of any home coffee bar — they need refrigeration but constant retrieval from the main fridge breaks the flow. A mini fridge below or beside the coffee bar (or a small insulated crate if you can't fit one) solves the problem entirely. Small footprint, holds two days of milk, and turns the coffee bar into a self-contained station. Mini fridges run $80 to $200 new; $30 to $80 secondhand.
Look for compact dorm-size fridges 1.7 to 3.2 cubic feet, in stainless or white (or wrap a budget fridge in butcher paper or contact paper for warmer aesthetics). Sources: Costco at $130, Best Buy at $80 to $180, Marketplace at $30 to $80 used. Position under the coffee bar shelf, beside the credenza, or on a low shelf nearby. Stock: milk, cream, oat milk, cold brew bottles, occasional yogurt or fruit. If no fridge fits, use a small insulated crate ($25 from REI) refilled with ice every morning — a more pastoral solution that works in cabin and rental settings.
AFFILIATE SLOTAPPLIANCESMini fridge 1.7-3.2 cubic feet OR insulated crate with ice packsAdd affiliate URL when configuredWhy it works
Because every trip to the main kitchen fridge disrupts the morning flow, and over time those small disruptions become reasons to skip the coffee bar entirely and just make coffee in the kitchen. A small dedicated fridge keeps the whole ritual in one zone — bean to mug to milk to sit-down — without breaking the rhythm. The friction reduction is worth the small added energy cost.
Pro tip — If you can't fit a real mini fridge, get a small insulated cooler ($20) plus four reusable ice packs ($8). Rotate the ice packs in and out of your main freezer daily — keeps milk cold for 12+ hours and looks more pastoral than a mini fridge in some aesthetic setups (especially limewashed-wall, country-style kitchens).
Mini fridge below, milk always cold — the friction-removal that makes a coffee bar self-contained. See also: insulated cooler
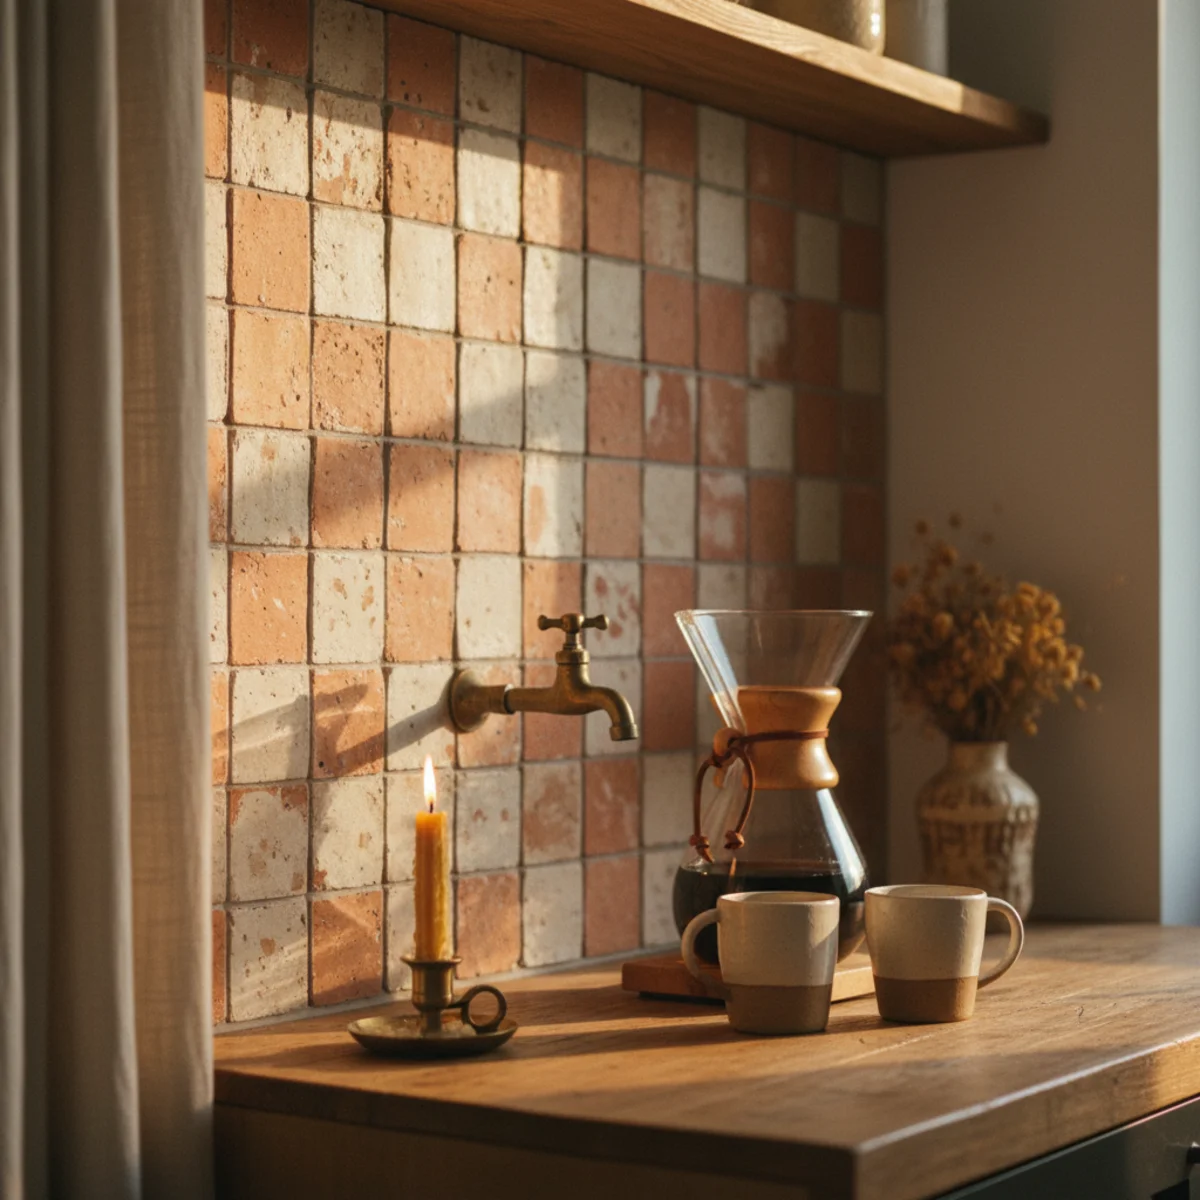
09Create a Small Backsplash Moment
The wall behind a coffee bar reads dead in most homes — bare white drywall, an outlet visible, an empty stretch above the counter. A small backsplash moment fixes it: peel-and-stick tile, a single wood plank, painted brick or stone, a hung textile, or even a piece of art leaning. Just 24 to 36 inches of treatment behind the coffee bar transforms a generic wall into a defined coffee zone, and the effort is mostly under an hour.
Easiest version: peel-and-stick subway tile or zellige-style tile (Smart Tiles at $12 per sheet, covers 10 sq ft) applied directly to drywall behind the coffee bar. Mid: a single 1x8 oak or walnut plank cut to 36 inches, sanded, oiled, and screwed flat against the wall as a wood backsplash ($30 to $50). Premium: a small piece of art (24x36 inches) leaning on the coffee bar surface against the wall (most flexible, no install). The treatment should extend 18 to 24 inches above the coffee bar surface to create the backsplash effect. Match the material to your existing kitchen (white tile for clean, wood for warm, art for personality).
AFFILIATE SLOTWALLPeel-and-stick tile, single wood plank, or art-leaning backsplash 24-36 inches wideAdd affiliate URL when configuredWhy it works
Because the bare wall behind a coffee bar creates a visual void — the eye sees the styled bar against an unstyled wall and reads incomplete. A small backsplash treatment, even just 36 inches of subway tile, completes the visual frame and turns the coffee bar into a contained zone rather than a styled stretch in front of a blank surface. The wall becomes part of the bar.
Pro tip — If you rent and can't install a real backsplash, lean one or two pieces of small art directly on the coffee bar surface against the wall — pulling double duty as both backsplash and styled object. A 16x20 piece of vintage thrifted art at $20 plus a small framed photograph at $0 creates a styled wall moment without putting a single hole in drywall.
Three feet of zellige tile behind the bar — the small backsplash that completes the zone. See also: peel-and-stick subway tile
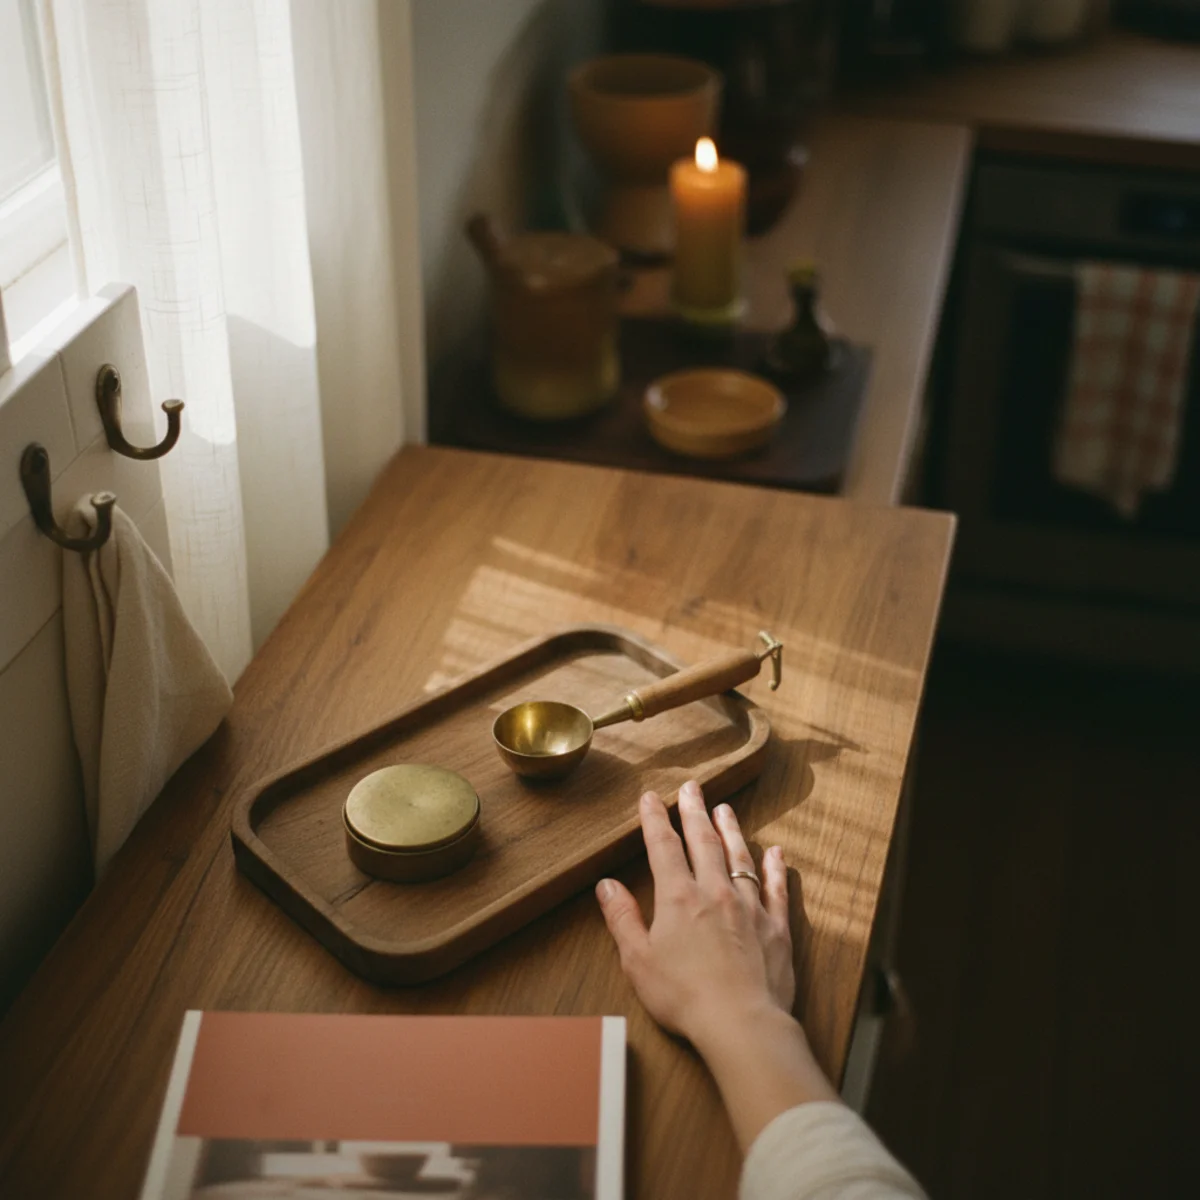
10Add Warm Wood and Brass Accents Throughout
Coffee bars styled in chrome and stainless steel read commercial; coffee bars styled in warm wood and aged brass read like home. A wood cutting board leaning, a small brass spoon or tongs, brass-handled drawer pulls if your credenza has drawers, a wooden tamper for espresso. Three to five small warm-toned accents transform the visual register from kitchen-appliance-cluster to styled-coffee-corner.
Add three to five small warm accents: brass espresso tamper ($15 to $60 from Etsy makers), wooden milk frother handle or wooden-handled tongs ($8 to $25), small olive wood spoon ($12), brass or wood pull on any drawers in your coffee bar setup ($4 to $20 each from Hardware Hut or House of Antique Hardware), wood cutting board leaning beside the espresso machine ($20 from John Boos secondhand). Avoid chrome handles, stainless steel tongs, and any plastic-handled accessories — they fight the warm-coffee aesthetic regardless of how nice the individual pieces are.
AFFILIATE SLOTACCENTS3-5 small warm-tone accents: brass tamper, wooden frother, olive wood spoon, brass pullsAdd affiliate URL when configuredWhy it works
Because chrome and stainless steel read clinical and commercial — they belong in coffee shop kitchens, not home coffee bars. Brass and wood read warm and personal — the materials of a slow, hand-made morning ritual. The aesthetic difference is enormous: a chrome milk frother handle versus a wooden one shifts the entire emotional register of the corner, even though both objects do the exact same job.
Pro tip — Search Etsy for brass coffee tamper or wooden coffee scoop — small makers list handmade versions at $15 to $50 that outperform mass-produced equivalents for both function and beauty. The slight irregularity of handmade pieces adds character that factory-made coffee gear cannot match.
Brass, olive wood, oak — three small accents that shift coffee bars from commercial to homey. See also: brass pull
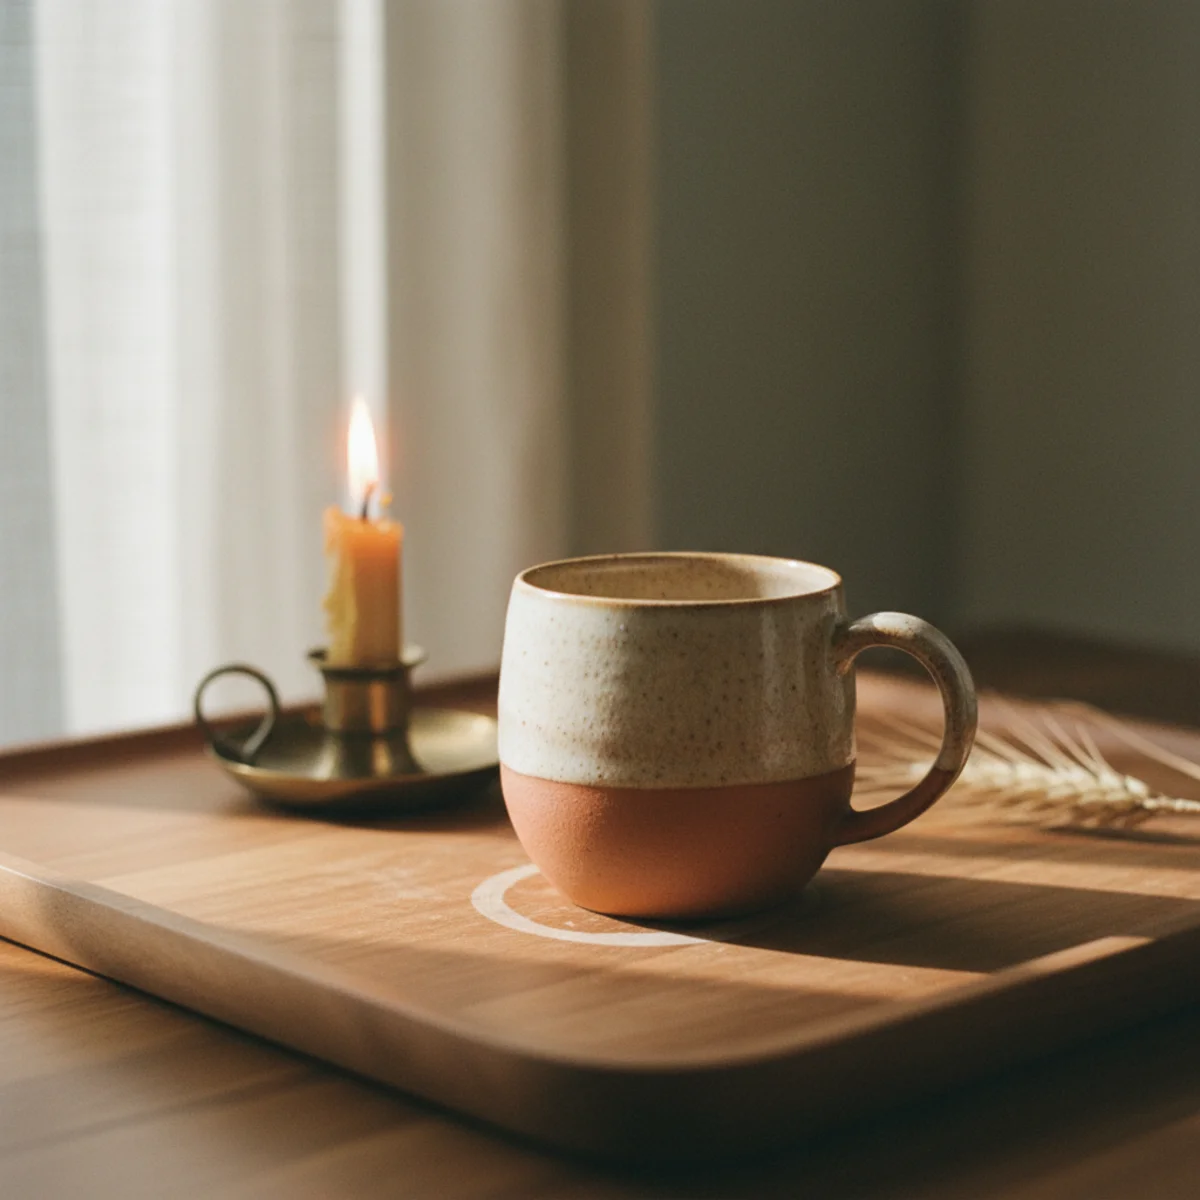
11Designate a Spot for the Daily Cup
Every great home coffee bar has one specific spot for the day's first cup — a small wooden tray, a fixed mug placement, a square of countertop reserved. Designating the spot turns making coffee into placing coffee, and the small ritual of setting the mug down at the same place every morning becomes one of the most quietly comforting moments of the day. Cost: nothing. Impact: outsized.
Pick a 6-by-8-inch zone on the coffee bar that's just for the morning cup. Mark it physically (a small wooden trivet or a single linen napkin folded as a coaster) or simply mentally. The spot should be the easiest reach from where you stand to pour, so you set the mug down without thinking. Some coffee bars use a small slab of marble or wood as a permanent mug-placement zone ($15 from Etsy). Others use a corner of the styling tray or a chalk-marked square on a wood credenza. The ritual matters more than the marker.
AFFILIATE SLOTSTYLINGSmall wooden or stone slab as designated daily-cup placement zoneAdd affiliate URL when configuredWhy it works
Because rituals are built on small repetitions, and the same physical placement every morning reinforces the moment as a moment rather than just a step. Setting the mug down at the exact same spot adds the quiet satisfaction of pattern to an otherwise functional act. The brain registers the small mark as completion of the ritual, and the morning settles around it.
Pro tip — Use a small piece of unfinished wood or stone as the placement zone, and let it develop ring marks and coffee stains over time — the visible record of daily mornings reads as evidence of habit, not damage. Refinishing or replacing it eventually becomes its own ritual marker.
One slab, one mug, one ritual — the small designation that turns coffee into ceremony. See also: ritual
12Lean a Small Piece of Art Against the Wall
The final styling addition that turns a coffee bar from functional to personal is one small piece of art leaning against the wall behind the espresso machine. Not framed huge, not hung; just leaning — informal, easy to swap, contributing personality without commitment. A 12x16 or 16x20 inch print, photograph, or thrifted oil painting in a simple wood or brass frame. Cost: $5 to $50. Impact: the coffee bar reads as inhabited by a specific person.
Choose a small framed piece 12x16 to 16x20 inches, in a warm-toned frame (oak, walnut, or aged brass). Subject can be anything personal: a black-and-white photograph from a trip, a thrifted vintage botanical print, a small abstract piece in warm tones, a child's drawing in a nice frame, a postcard from a meaningful place. Lean against the wall behind the coffee gear, not hung — the leaning posture reads casual and lets you swap the piece freely. Sources: thrifted oil paintings at $8 to $25, vintage prints from Etsy at $15 to $40, your own photographs printed at Mpix at $10 to $20.
AFFILIATE SLOTWALL ARTSingle small framed piece 12x16-16x20, leaning against the wall behind coffee gearAdd affiliate URL when configuredWhy it works
Because the coffee bar is a domestic space and domestic spaces need personality — and a small piece of personal art is the highest-density signal of personality you can add. It signals that someone specific makes coffee here, has memories elsewhere, brings their visual world into the morning ritual. Without a piece of art, the coffee bar reads as a styled showroom; with one, it reads as a particular person's particular kitchen.
Pro tip — Rotate the piece of art every few months — pull a different framed photograph from a drawer, swap in a different vintage print, lean a different small piece. The rotation keeps the coffee bar from becoming visual background and gives you something quietly different to notice each season.
One small framed piece, leaning casually — the personality that turns a styled bar into a lived-in one. See also: framed piece
How to build a coffee bar step by step
Function first, styling second. Build it where you'll actually use it.
- 1Pick the spot by the light and the outlet
Choose a surface near a power source and, ideally, morning light. The credenza or counter run should be out of the main cooking path.
- 2Place the machines first
Set the grinder, machine, and kettle in the order you use them, left to right, with clearance for the water reservoir and lid.
- 3Add storage above and beside
Hooks for mugs, a shelf for beans, a small drawer or tray for spoons and filters. Everything within one arm's reach.
- 4Style with the working parts
Decant beans into a jar, hang the mugs, add a lamp and a small plant. Leave a clear saucer-sized zone for the cup you're making.
Quick tips
- Mount a power strip behind the credenza so no cords trail across the counter.
- Keep a small bin or jar for spent grounds within reach of the machine.
- Decant beans into an airtight jar — it keeps them fresher and hides the bag.
- Use a tray with a lip under the grinder to catch the inevitable scatter.
- Hang a linen towel on a brass ring; it's the most-used object on the bar.
- Leave one clear surface zone — a working bar needs negative space, not just gear.
Coffee bars for different spaces
A rolling cart you can tuck away, or a single floating shelf with mugs on hooks beneath.
A freestanding credenza and removable backsplash tile — no holes, fully portable.
A coffee bar cabinet with doors that close on the morning mess; see our coffee bar cabinet guide.
A credenza that faces the living space, styled on the open side to read as furniture.
A coffee corner is the one piece of styling that pays you back before you've finished your first cup.
Frequently asked questions
How much space do I need for a home coffee bar?+
What should I have on a home coffee bar?+
How do I style a coffee bar without it looking cluttered?+
Where should I put a home coffee bar?+
Do I need a fancy espresso machine for a coffee bar?+
How can I make a coffee bar in a small kitchen?+
- Cozy CornersCozy Coffee Corner: 20 Warm Ways to Style Your Coffee Nook (2026)
- DIYDIY Coffee Bar: How to Build a Cozy Coffee Station in a Weekend (2026)
- EntertainingCoffee Bar Cabinet Ideas: Cozy, Hidden Coffee Stations for 2026
- Shopping GuidesThe Best Candles for a Cozy Home, Tested and Compared (2026)
Build it where the morning light lands and the outlet already is, set the machines in the order you use them, then style with the working parts — mugs on hooks, beans in a jar, one warm lamp. We'd start with a thrifted credenza and a row of brass hooks; it's a forty-dollar project that becomes the corner you look forward to every single morning, which is more than most furniture can claim.