This DIY coffee bar guide covers the actual build process tested across multiple credenza-sourced coffee station builds in real kitchens, dining rooms, and apartment studios. Each step below names specific materials, dimensions, tool requirements, sourcing, and costs. The twelve steps are sequenced for a single weekend build with optional add-ons for subsequent weekends. Total build time for the core steps: roughly 8 to 12 hours of actual work across Saturday and Sunday. Total material cost for the core build: $200 to $500 depending on credenza condition and finish choices.
Most DIY coffee bar failures come from starting with the wrong surface — IKEA KALLAX or flat-pack shelving that needs extensive modification to look custom, versus a thrifted solid-wood credenza that starts with actual character and needs only minimal work. The credenza sourcing decision determines 80% of the build's aesthetic outcome; the remaining steps refine, mount, and style what the credenza provides. This guide starts where the build must start: finding the right credenza.
By the end of this guide, you'll know exactly how to build a complete DIY coffee bar from a thrifted credenza — starting with sourcing the right piece, through oiling the wood, adding a floating shelf, installing brass hooks, mounting a power strip, building a backboard for character, and through the final styling with working parts that makes the build look intentionally custom rather than assembled.
WHAT'S INSIDE
- Why a thrifted solid-wood credenza produces better results than any flat-pack starting point
- The Danish oil finish that transforms rough vintage wood into warm-glowing credenza surface
- The floating shelf above — the single addition that turns credenza into proper two-tier coffee station
- The backboard build that adds character and conceals electrical without expensive carpentry
The best DIY projects start with a good secondhand piece and add only what it needs. Build less, finish more.
— Studio McGee blog [citation needed — verify before publish]
What is a DIY coffee bar?
A DIY coffee bar is a coffee station you assemble yourself from a base piece — usually a thrifted credenza, cart, or cabinet — plus shelving, hooks, hidden power, and styling, rather than buying a complete unit or building cabinetry from scratch. It's the most beginner-friendly woodworking-adjacent project there is, because the hard structural work is already done by the secondhand piece.
The whole project is really four small jobs: source and refinish the base, add storage above (a shelf or hooks), hide the power, and style with the working parts. None of it requires advanced tools — a drill, a level, and a stud finder cover almost everything. The skill is in the finishing: oiling the wood, mounting the shelf straight, and routing the cords cleanly so it reads built rather than improvised.
More in DIY you may love
See allWhy DIY coffee bars are everywhere in 2026
Home coffee culture and the DIY-decor wave converged on the coffee bar, and the build-it-yourself version exploded because it's cheap, achievable in a weekend, and endlessly personal. Pinterest's DIY coffee bar searches climb every year, usually paired with credenza, cabinet, and hidden cord ideas.
It's also the rare DIY that pays off daily. Most weekend projects you finish and forget; a coffee bar you use every morning, which makes the effort feel worth it long after the build. The secondhand-first aesthetic suits it perfectly — a forty-dollar teak credenza becomes the warmest three feet in the house, and the wear is part of the charm.
12 DIY coffee bar ideas and builds
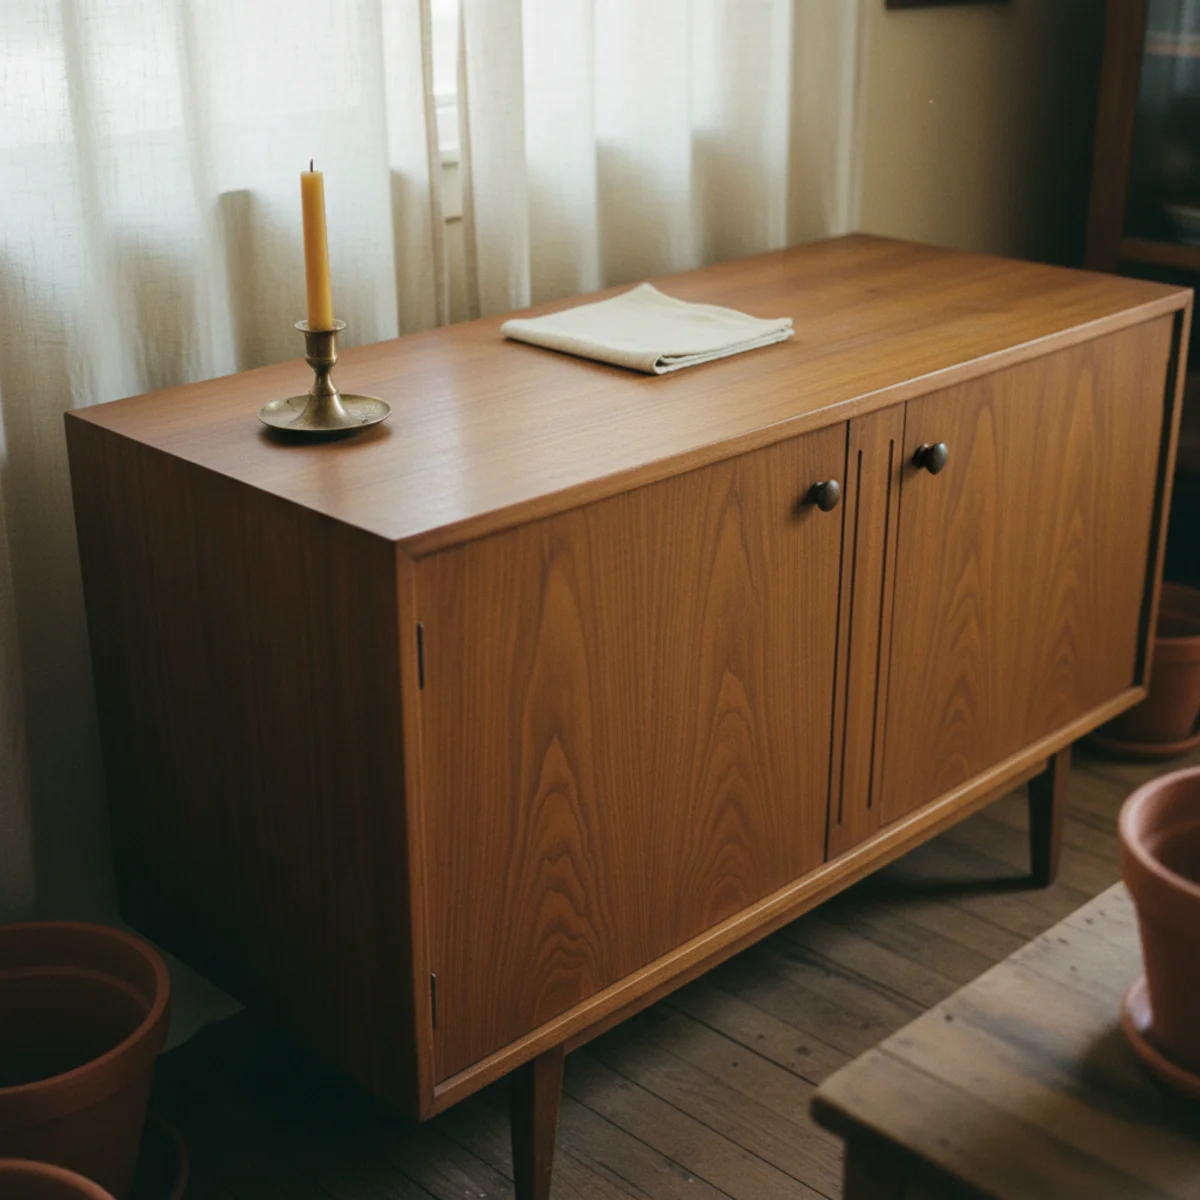
01Start With a Thrifted Credenza
The foundation of the entire DIY coffee bar is sourcing the right credenza — solid wood (not MDF or particleboard), 36 to 54 inches wide (large enough to hold coffee maker + grinder + accessories), 30 to 36 inches tall (counter height for comfortable standing use), with working drawers or doors for hidden storage. Estate sales and Marketplace are the best sources; expect $80 to $300 for the right piece.
Credenza sourcing specifications: DIMENSIONS — 36 to 54 inches wide (wider is better up to about 54 inches), 28 to 34 inches deep, 30 to 36 inches tall. At 30 to 34 inches tall, the credenza works as standing coffee preparation surface. CONSTRUCTION — solid wood (oak, walnut, pine, mahogany, cherry, teak) OR solid-wood veneer over plywood (acceptable) NOT MDF or particleboard (swells with moisture, doesn't hold screws well, can't be refinished). CHECK construction by: looking at unfinished interior surfaces for visible wood grain, checking drawer dovetail joints (solid wood dovetails versus stapled MDF), tapping surface (solid wood has more resonance than MDF). STYLE — mid-century modern (most commonly available, 1950s-1970s walnut or teak credenzas), traditional sideboard or buffet (larger, older), antique farmhouse credenza (pine or oak, more rustic). CONDITION — scratched surface fine (will be oiled), some marks and wear fine (add character), missing hardware fine (replace), structural damage to joints problematic (check all four corners for stability), water damage that raised veneer problematic. SOURCES — Marketplace/Craigslist ($80-250), estate sales ($80-300), Goodwill or thrift stores ($40-150 for smaller pieces), antique stores ($200-600), consignment shops ($150-400). SWEET SPOT — look for mid-century walnut or teak pieces from 1960s-1970s, abundant in estate sales, often between $100-200 in good structural condition even if surface is worn.
AFFILIATE SLOTBUILDThrifted solid-wood credenza 36-54 inches wide, 30-36 inches tall from Marketplace/estate sales at $80-300Add affiliate URL when configuredWhy it works
Because thrifted solid-wood credenzas start with genuine material character — actual wood grain, real dovetail joints, decades of accumulated patina, hardware that shows age and quality — that flat-pack furniture specifically lacks and cannot fake. The IKEA KALLAX or similar flat-pack alternative might cost less ($60-150) but produces a coffee station that reads as 'modified flat-pack' regardless of how much work goes into it. The same build effort applied to a thrifted solid-wood credenza produces a result that reads as 'custom furniture' because the base material has inherent quality. The extra $50-200 investment in a real credenza versus flat-pack is the highest-leverage decision in the entire build.
Pro tip — Search Marketplace and Craigslist with specific material terms rather than generic 'credenza' — search 'mid century walnut credenza,' 'teak sideboard,' 'solid wood buffet,' 'MCM credenza' for the best results. Generic searches produce too much flat-pack and MDF results; material-specific searches surface the right vintage solid-wood pieces.
Vintage mid-century walnut credenza before build — solid wood dovetails and original hardware as the right foundation. See also: thrifted-decor-ideas
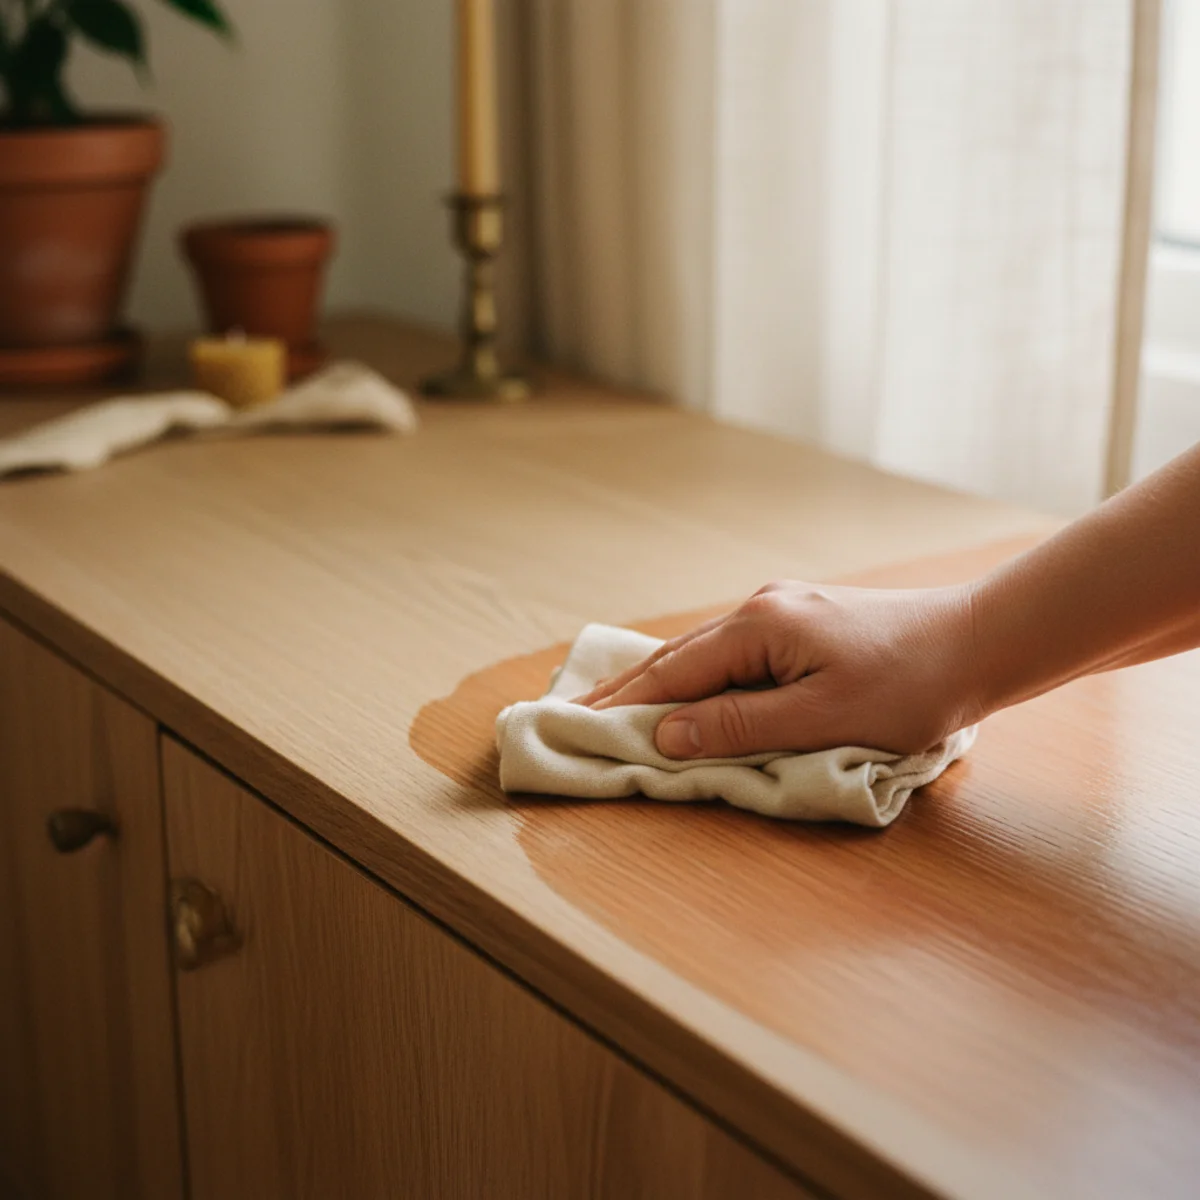
02Oil the Wood, Don't Lacquer It
The first build step after sourcing: apply Danish oil to the credenza's exterior surfaces. Danish oil penetrates the wood fibers and enhances natural grain while providing protection — it produces warm matte glow that lacquer or polyurethane cannot match. Application takes 3 to 4 hours including drying time. Cost: $15 to $25 for one quart of Danish oil.
Danish oil application process: MATERIALS — Watco Danish Oil in Natural (most credenzas) or Walnut (for deeper warm tone) at $15-25 per quart (enough for one 48-inch credenza exterior plus the floating shelf above). Fine steel wool 0000 grade ($6-10 per pack). Clean rags or lint-free cloths. PREPARATION — clean the credenza surface with mild soap and water, let dry completely (1-2 hours). If the credenza has old thick lacquer or polyurethane finish that's flaking, sand down with 150-grit sandpaper first (30-45 minutes), then wipe clean. If original finish is just worn thin or has light scratches, apply oil directly over it. STEP 1 — apply thin coat of Danish oil with rag or brush, working with the wood grain. Work in sections (top, then sides, then drawer fronts) for manageable application. STEP 2 — wait 30-45 minutes, wipe off excess with clean cloth. STEP 3 — let dry 4-6 hours OR overnight. STEP 4 — lightly buff with 0000 steel wool to smooth any raised grain. STEP 5 — apply second coat, wait 30 minutes, wipe excess. STEP 6 — let cure 24-48 hours before placing items on surface. RESULT — warm matte glow that enhances wood grain, provides moderate moisture and stain protection, and produces the authentic vintage-wood character that lacquer or polyurethane covers up.
AFFILIATE SLOTFINISHWatco Danish Oil in Natural or Walnut, applied in 2 coats with 0000 steel wool buff between; cures 24-48 hoursAdd affiliate URL when configuredWhy it works
Because Danish oil penetrates into wood fibers rather than forming surface film — the result is wood that reads as 'beautifully maintained natural wood' versus 'surface coated to look like wood.' Lacquer and polyurethane form thick films that obscure grain, reflect light unnaturally, and peel or yellow over years. Danish oil wears gradually and evenly, can be refreshed with a single coat annually, and produces the warm matte glow that warm-home aesthetic specifically values. For a coffee bar credenza that will be touched and used daily for years, the maintainable oil finish outperforms the high-maintenance lacquer finish significantly.
Pro tip — Apply Danish oil outdoors or in well-ventilated space — the oil has strong fumes during application and drying. Dispose of oil-soaked rags carefully; they can spontaneously combust if bunched up. Spread flat outdoors to dry before disposal, or submerge in water before binning.
Walnut credenza after Danish oil — warm matte grain enhancement versus flat unfinished wood. See also: diy-home-decor-ideas
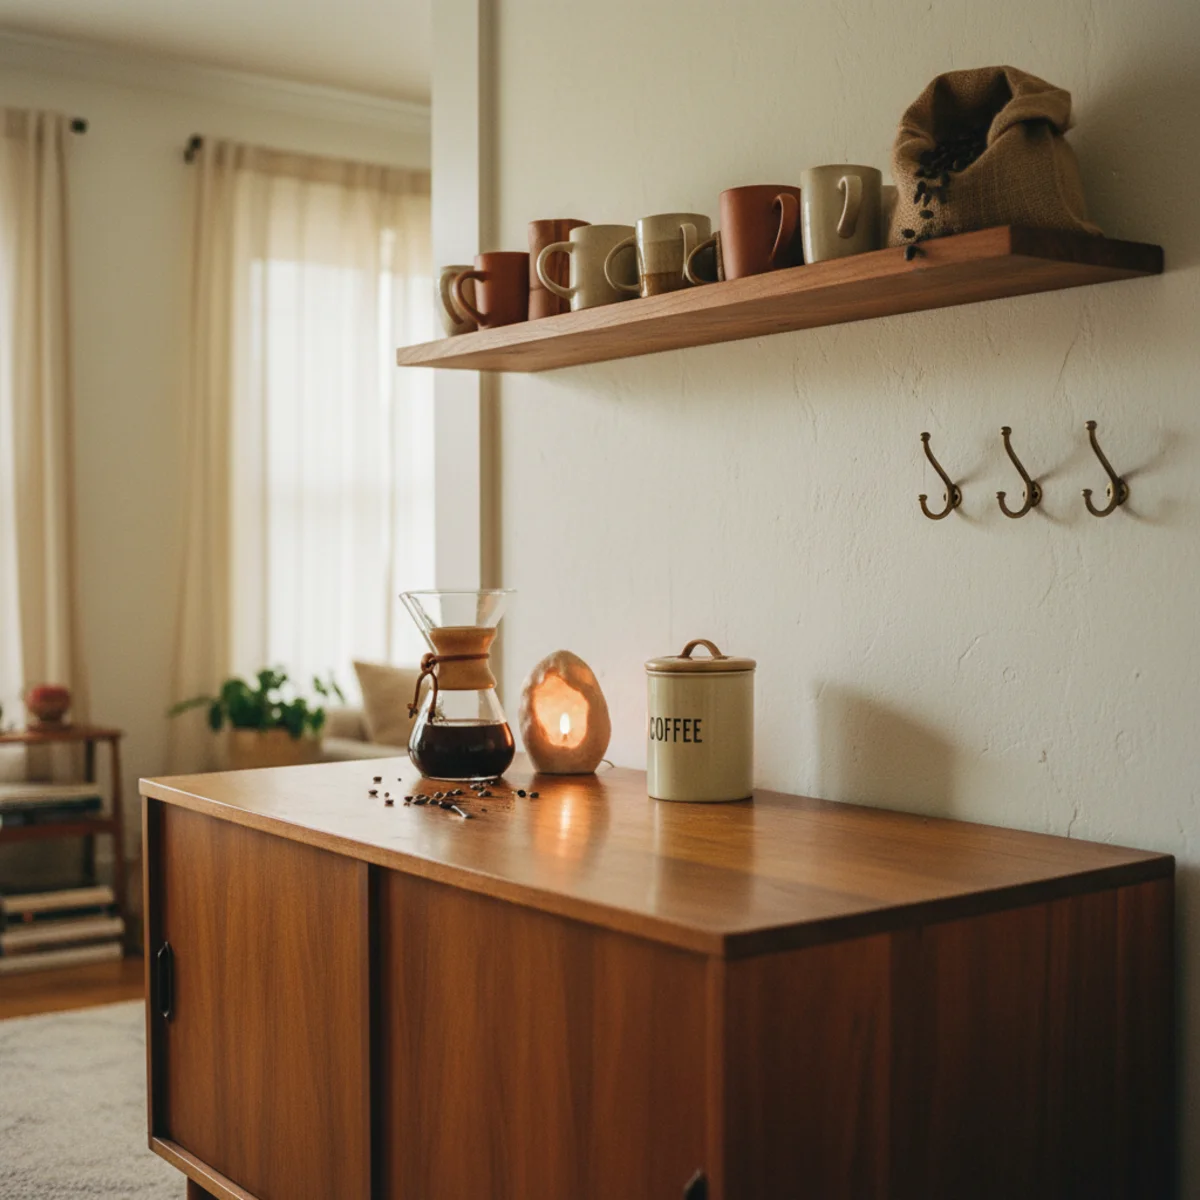
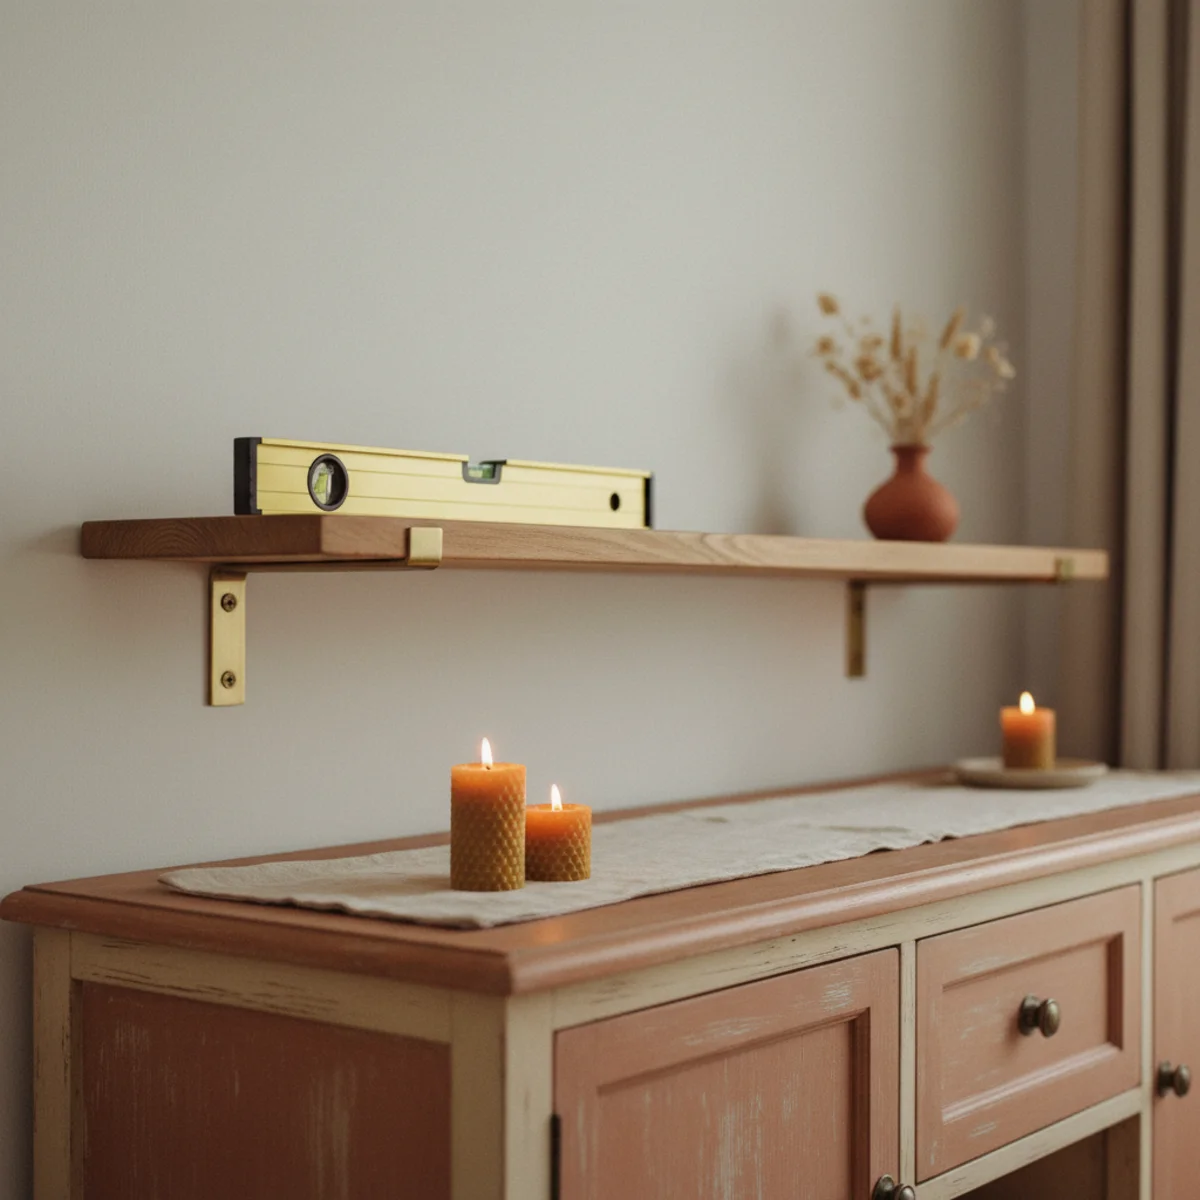
03Add a Floating Shelf Above
The single addition that transforms a credenza into a proper two-tier coffee station: a floating shelf mounted 14 to 18 inches above the credenza top. The upper shelf holds mugs, small plants, leaned prints, and overflow items; the credenza surface holds working equipment. The two-tier arrangement creates the vertical visual interest that single-surface coffee stations lack.
Floating shelf specifications: SHELF DIMENSIONS — 8 to 10 inches deep, same width as credenza (36 to 54 inches) or slightly narrower (90% of credenza width). LENGTH matched to credenza width makes the shelf appear purpose-built for the credenza. MATERIAL — same wood species as credenza if possible (walnut shelf with walnut credenza reads purpose-built), or similar warm wood tone. Best option: 1-inch thick solid oak board at $25-60 for 6 to 8-foot length, cut to match credenza width. MOUNTING HEIGHT — 14 to 18 inches above credenza top surface. Low enough to reach easily while standing, high enough to accommodate tall items on credenza (coffee maker). BRACKET OPTIONS — floating shelf brackets (hidden in wall, completely invisible) at $15-40 per pair (requires studs or wall anchors), OR simple L-brackets in warm brass at $5-15 per pair (visible but decorative), OR pipe shelf brackets (industrial style that works with vintage credenzas). INSTALLATION TOOLS — drill, level, stud finder ($30-60 for basic stud finder), appropriate wall anchors or stud screws. FINISH — Danish oil matching credenza finish, applied before mounting. INSTALLATION TIME — 30 to 60 minutes including measuring, leveling, and mounting. Total cost: $40-100 for shelf + brackets.
AFFILIATE SLOTBUILD1-inch solid oak board 8-10 inches deep x credenza width, mounted 14-18 inches above credenza on floating brackets or L-bracketsAdd affiliate URL when configuredWhy it works
Because single-surface coffee stations have limited vertical interest and limited storage capacity, where two-tier arrangements gain visual height AND storage without taking additional floor space. The upper shelf also gives the build the look of purpose-built furniture (a single credenza alone reads as credenza-repurposed; credenza plus matching floating shelf reads as integrated custom-built coffee station). The vertical addition also provides display space for hanging mugs on hooks (next step) and leaned small print for character — both elements that the credenza top alone can't accommodate when full of working equipment.
Pro tip — Use a laser level ($20-40 at hardware stores) rather than a bubble level when mounting the floating shelf — the laser line projects across the full shelf width and lets you mark both mounting bracket positions at once, ensuring the shelf is level without iterative measurement. The one-time tool cost is worth it for any wall-mounted build.
Floating shelf 16 inches above credenza — two-tier arrangement reading as purpose-built custom station. See also: shelf-styling-ideas
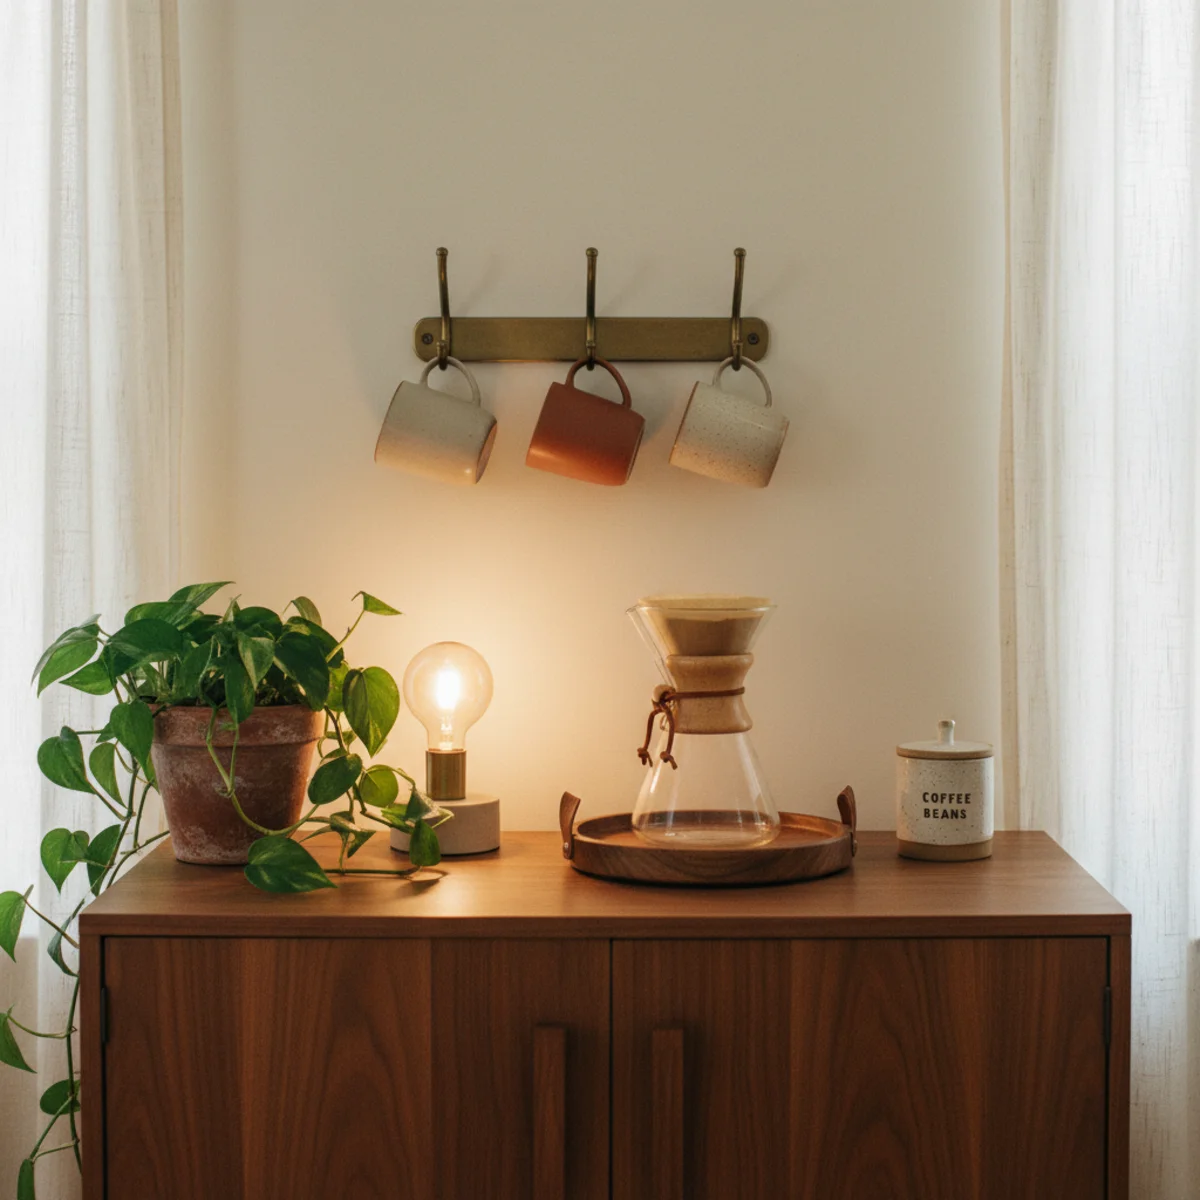
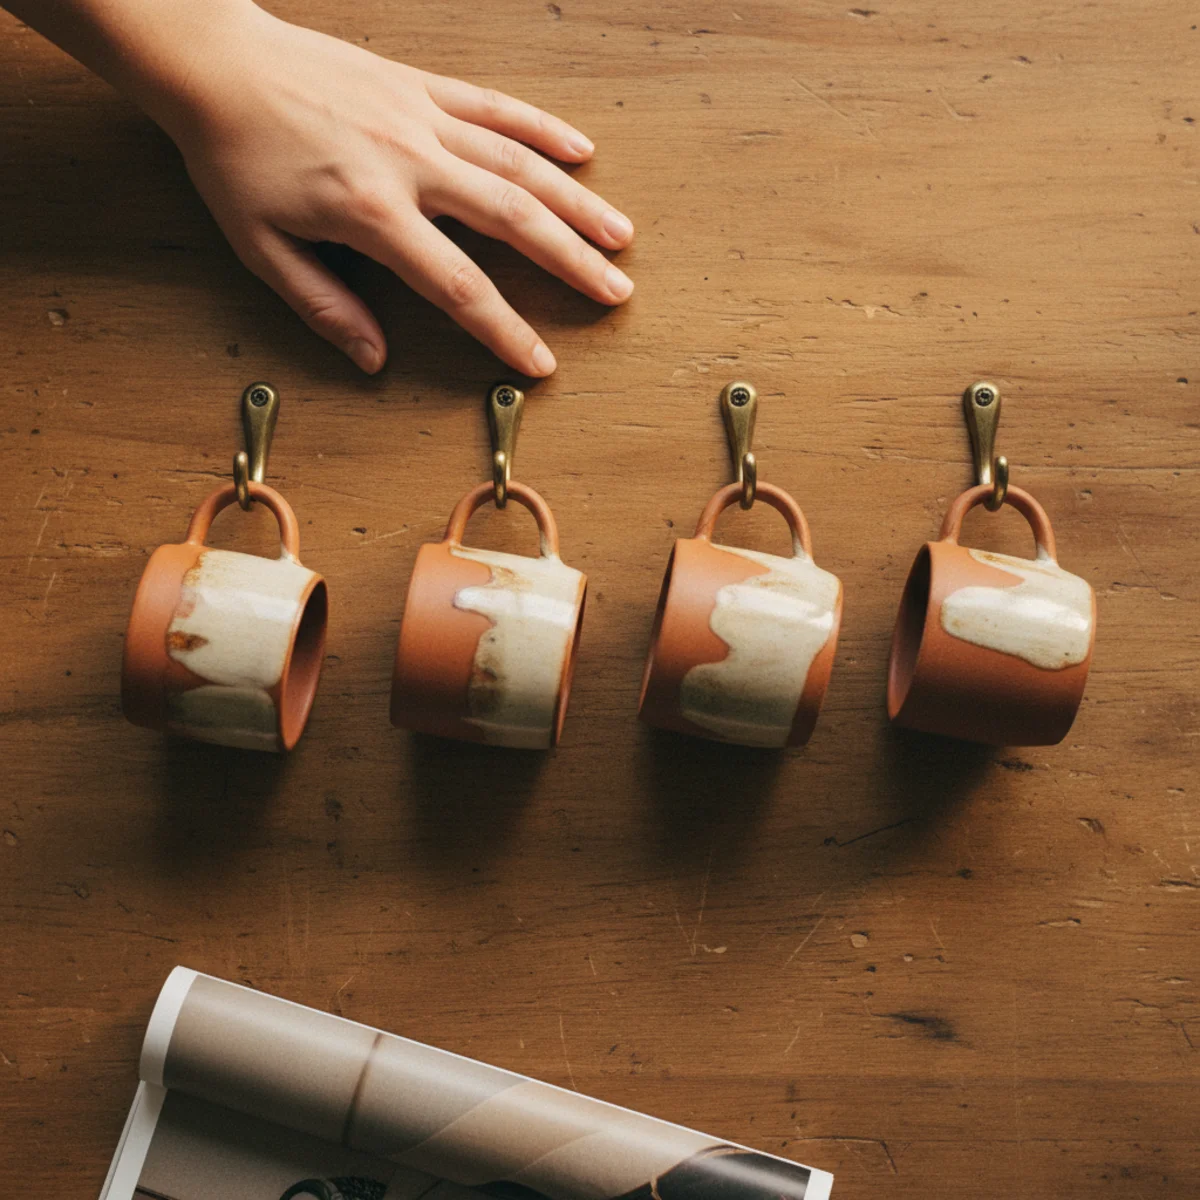
04Install a Row of Brass Hooks
A row of 4 to 7 small brass cup hooks installed on the floating shelf underside or on the wall between shelf and credenza provides mug storage that's visible, accessible, and styled. The hung mugs become part of the coffee bar's visual character; cabinet-hidden mugs miss the display opportunity. Cost: $5 to $25 total for the hook row.
Brass hook installation specifications: HOOK TYPE — small brass cup hooks (screw-in type) from hardware stores at $1-3 each. Look for warm aged-brass finish rather than bright-polished brass. QUANTITY — 4 to 7 hooks for typical 36 to 48-inch shelf. SPACING — 4 to 5 inches between hooks (close enough to read as grouped row, far enough for mug clearance). MOUNTING POSITION OPTION 1 — underside of floating shelf (hooks screw upward into shelf bottom edge), mugs hang below the shelf level. Most common and most compact option. PRE-DRILL pilot holes slightly smaller than hook screw diameter to prevent wood splitting. MOUNTING POSITION OPTION 2 — on the wall surface between the shelf and credenza (hooks screw into wall, must hit studs or use appropriate wall anchors). HOOK SIZE — 1/2 inch to 3/4 inch hook diameter accommodates most mug handles. TEST with one mug before installing all hooks. INSTALLATION TIME — 20-30 minutes for a complete 6-hook row. MATTE BRASS ALTERNATIVE — if aged brass cup hooks aren't available locally, spray-paint standard cup hooks with Rust-Oleum Aged Brass spray at $7-10 per can. Two light coats produce aged-brass effect. TOTAL COST — $10-20 for 6 hooks at $1-3 each.
AFFILIATE SLOTBUILD4-7 brass cup hooks at 4-5 inch spacing on floating shelf underside or wall between shelf and credenzaAdd affiliate URL when configuredWhy it works
Because hung mugs serve three functions simultaneously: they make the mugs visible part of the coffee station's daily ritual (you see and look forward to using specific mugs), they provide easy reach during morning routine without opening cabinets, and they contribute visual character when the mugs are hand-thrown ceramics or vintage finds with interesting shapes and colors. The same mugs in a cabinet above the coffee station are utility; hung on brass hooks, they're a curated collection that completes the build. The hook installation also costs almost nothing ($10-20) relative to its visual impact.
Pro tip — Mix mug types on the hooks rather than hanging uniform matched sets — 2 to 3 hand-thrown ceramic mugs from Etsy artisans ($20-40 each) + 2 to 3 vintage mugs from estate sales ($2-8 each) + 1 interesting oversized mug for texture variation. The mix produces more visual interest than even the most beautiful matched set.
Six brass cup hooks with mixed hand-thrown and vintage mugs — curated display at arm reach. See also: cozy-coffee-corner
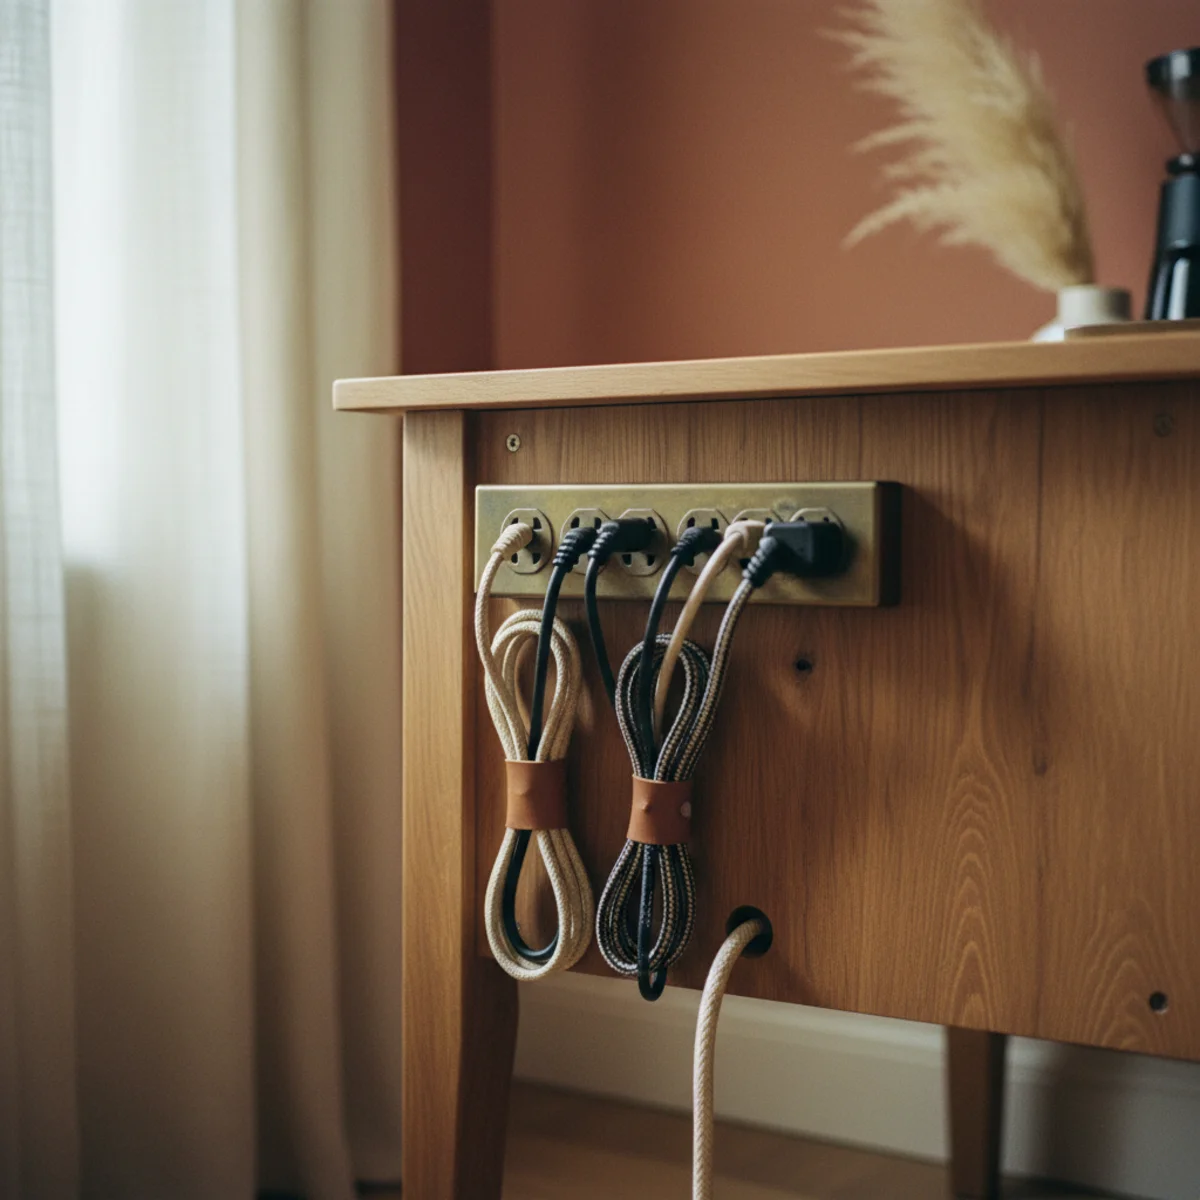
05Mount a Power Strip Behind
Mounting a power strip on the credenza backboard or on the wall behind the credenza (hidden from front view) provides clean electrical access for coffee maker, grinder, milk frother, and lamp without visible cord tangle. The concealed power strip is the single most-important functional step in the build. Cost: $15 to $30 for a quality 6-outlet power strip.
Power strip mounting specifications: POWER STRIP SELECTION — 6-outlet surge-protected power strip at $15-30 (Belkin, APC, or similar). Look for flat-plug model where the power plug enters from the side rather than perpendicular (sits flush against wall better). MOUNTING POSITION — on the wall behind the credenza at credenza-surface level (accessible from above but not visible from front of credenza), OR on the backside of the backboard if building backboard (step 6). MOUNTING METHOD — 3M Command adhesive strips (heavy duty, holds 5-10 lbs) for tool-free temporary mounting at $6-10 per pack, OR 2-inch wood screws through power strip mounting holes into wall studs. CORD MANAGEMENT — run appliance cords behind credenza, down to the power strip, rather than having them visible on the counter surface. Use small adhesive cable clips ($5-10 for pack of 20) to organize cords along the back edge of the credenza and down to the strip. SINGLE VISIBLE CORD — the only cord visible from front of build should be the single power strip cord running to the wall outlet. All appliance cords disappear behind the credenza. CABLE BOX ALTERNATIVE — for very clean installation, a small cable management box ($15-25) mounted behind the credenza hides the power strip entirely within its housing. INSTALLATION TIME — 15-20 minutes.
AFFILIATE SLOTBUILD6-outlet surge-protected power strip mounted behind credenza or backboard; appliance cords behind credenza via cable clipsAdd affiliate URL when configuredWhy it works
Because visible cord tangle is the single most-common complaint about home coffee stations — and the most-visual indicator of 'assembled collection of appliances' versus 'intentional designed station.' The concealed power strip eliminates visible cords behind the coffee maker and grinder, leaving only the single power strip cord to the outlet. The visual difference is significant: cord tangle reads as messy regardless of how well the rest of the build is executed; clean cord management reads as purpose-built station where everything belongs. The $20 investment in a good power strip and $5 in cable clips produces 80% of the build's 'custom' reading.
Pro tip — Run all cords along the back edge of the credenza and down behind it using self-adhesive cable clips before mounting the power strip — plan the cord path first, then mount clips, then run cords, then power strip. The sequential approach produces clean cord management; random cord placement after the fact produces visible bunches.
Power strip mounted behind with cords routed neatly — no cord tangle visible from the front. See also: coffee-bar-ideas
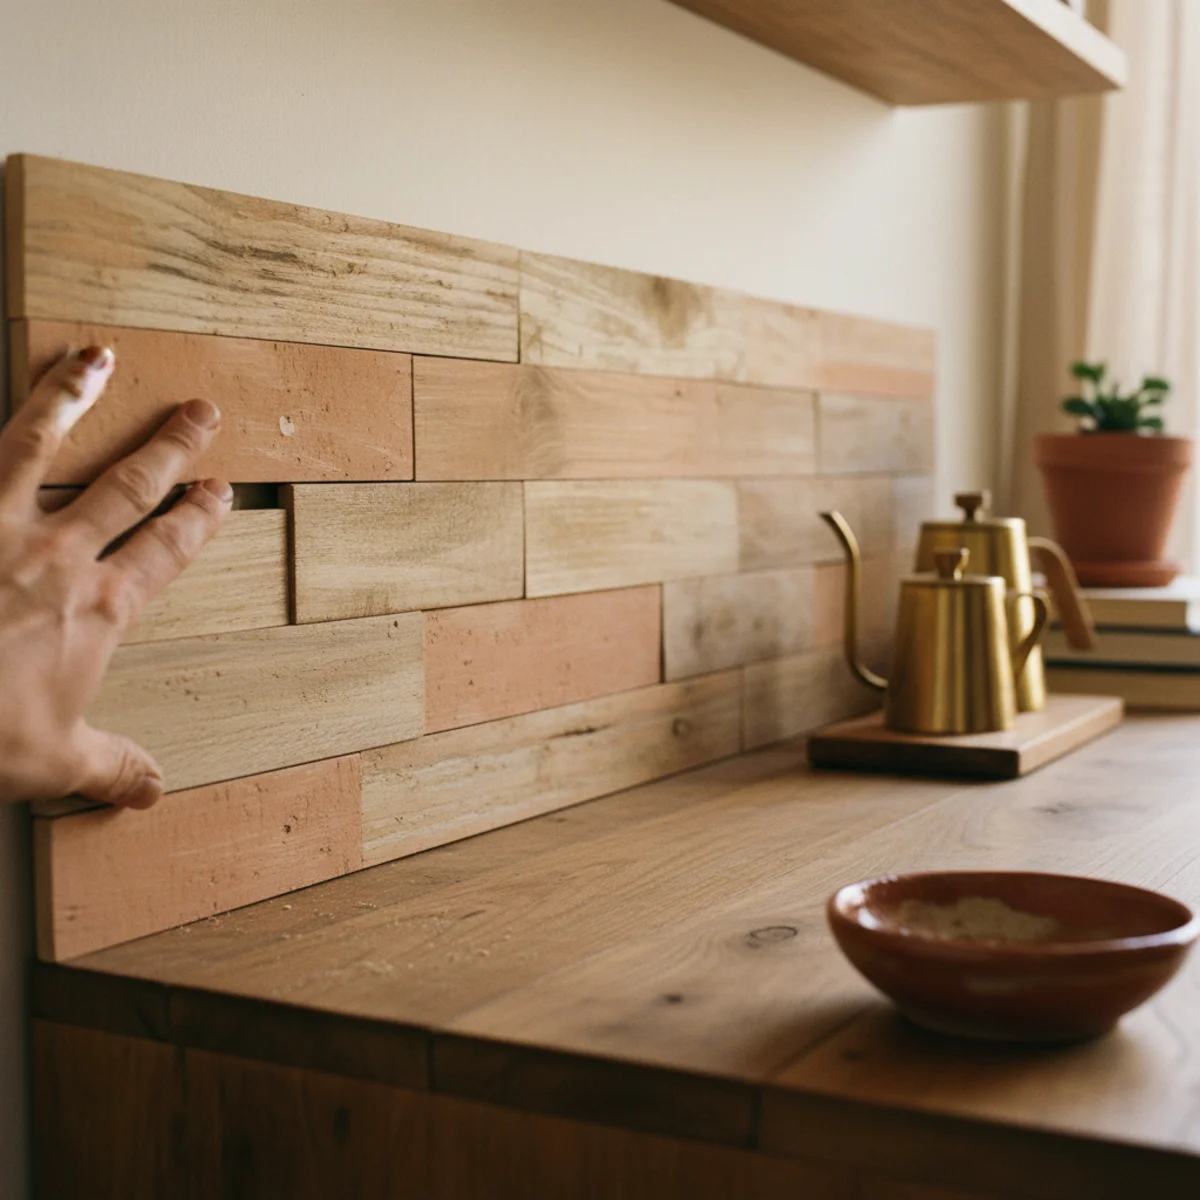
06Build a Backboard for Character
A backboard — a panel of wood, shiplap, or subway tile mounted on the wall in the space between the credenza top and the floating shelf — adds significant visual character, conceals the power strip, and makes the build read as truly purpose-built station rather than assembled furniture. Cost: $30 to $120 depending on material. Build time: 3 to 5 hours.
Backboard options and build: OPTION 1 — SHIPLAP BACKBOARD. 1x4 or 1x6 shiplap boards (pine or poplar) mounted horizontally across the wall zone between credenza and floating shelf. WIDTH matching credenza. 4 to 8 boards of shiplap fill a 16-18 inch zone (typical gap between credenza top and underside of shelf). PAINT in warm white or leave natural wood tone. Cost: $30-60 for materials + hardware. BUILD TIME: 3-4 hours. OPTION 2 — PLYWOOD PANEL BACKBOARD. Single 1/2 or 3/4-inch plywood panel cut to exact size of the wall zone (width of credenza x height between credenza and shelf bottom). Painted or stained, mounted with 2-inch screws into studs. Hides power strip mounted on its back surface. Cost: $20-40 for plywood + paint. BUILD TIME: 2-3 hours. OPTION 3 — REMOVABLE PEEL-AND-STICK TILE. Peel-and-stick subway tile or hexagon tile mounted on the wall zone for a tiled backsplash effect. No wet-setting, removes without damage. Cost: $30-80 per set. BUILD TIME: 1-2 hours. MOUNTING ALL OPTIONS — measure the wall zone precisely (width = credenza width, height = gap from credenza top surface to floating shelf underside), mount to studs with appropriate fasteners, mount power strip to backboard back surface before mounting backboard. The backboard elevates the build from 'credenza with shelf' to 'custom coffee station with proper backsplash.'
AFFILIATE SLOTBUILDShiplap boards ($30-60) OR plywood panel ($20-40) OR peel-and-stick tile ($30-80) in wall zone between credenza and floating shelfAdd affiliate URL when configuredWhy it works
Because backboard fills the wall zone between credenza and shelf with intentional material rather than leaving white-painted drywall visible — and that intentional material coverage is what makes the build read as 'custom-built station' rather than 'furniture pushed against wall.' The same credenza plus shelf with white drywall between reads as assembled components; the same pieces with shiplap backboard reads as custom-built unit. The backboard also provides the visual backdrop that the floating shelf styling elements (hung mugs, leaned prints, small plant) read against. The $30-120 material cost is one of the lowest-cost high-impact build steps.
Pro tip — Pre-drill pilot holes for all shiplap board mounting before nailing — the pilot holes prevent shiplap from splitting at nail points, and the sequential pre-drill makes nailing faster. Use 2-inch finishing nails into studs for shiplap mounting; construction adhesive alone doesn't hold through seasonal wood movement.
Shiplap backboard in wall zone between credenza and shelf — the surface that reads as custom-built. See also: modern-farmhouse-decor
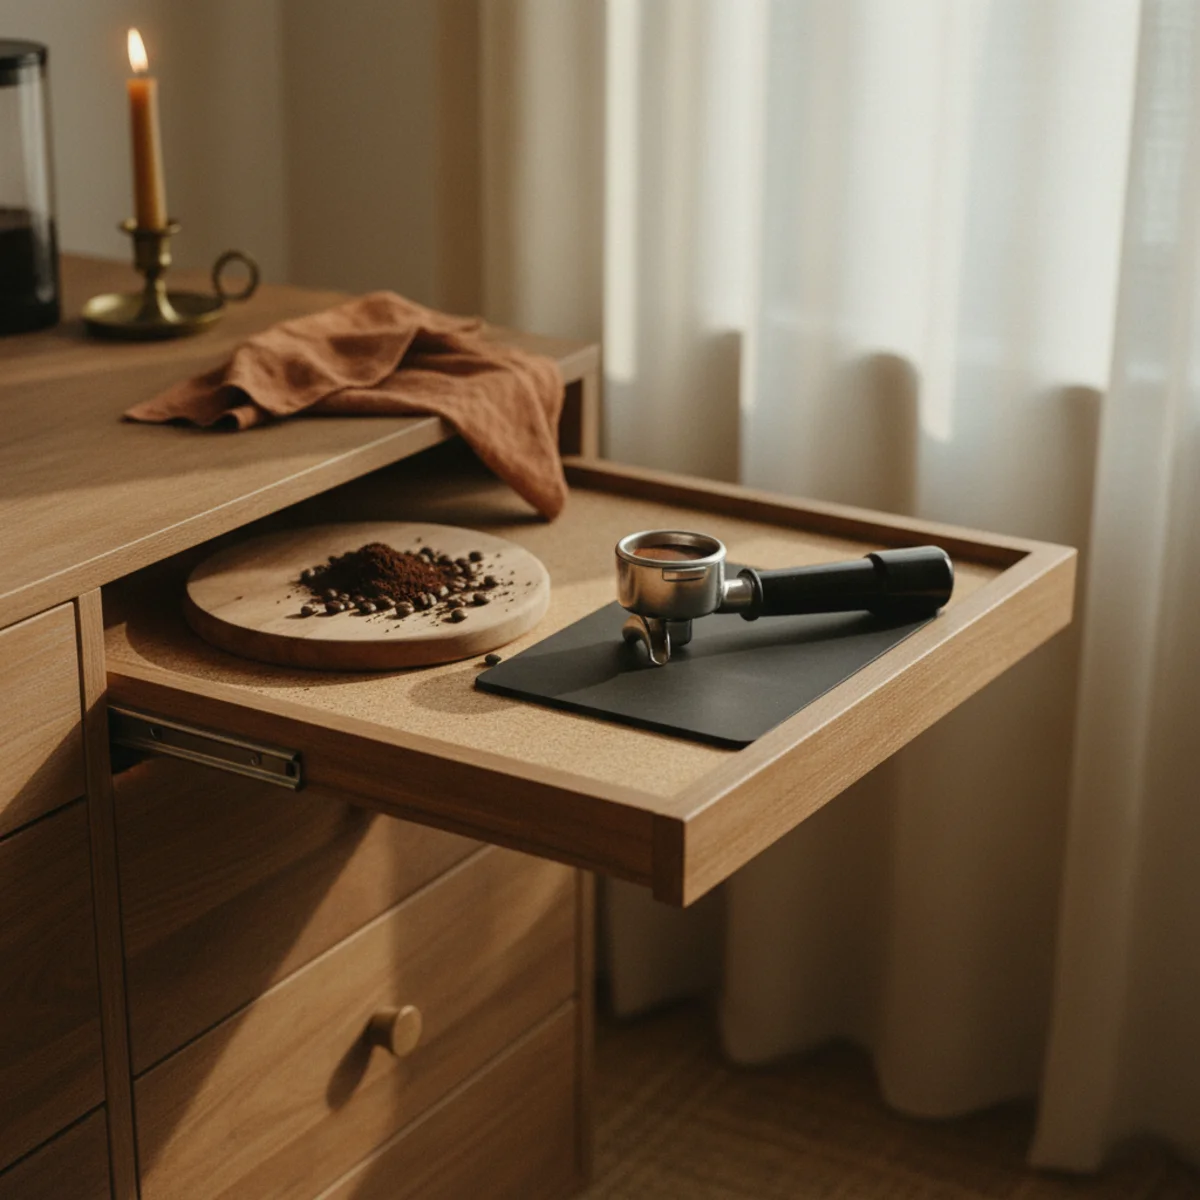
07Add a Pull-Out Tray
Installing an undermount pull-out tray (or a simple sliding tray mounted on drawer slides inside the credenza) provides additional preparation surface that slides out when needed and tucks away when not. Best use: holding the milk frother, sugar and honey, grinder accessories, or overflow tools. Cost: $25 to $60 for the tray and slides.
Pull-out tray specifications: DRAWER SLIDE TYPE — full-extension ball-bearing drawer slides for smooth operation ($15-30 per pair from hardware stores). Length matching desired tray depth (10 to 16 inches typically). TRAY MATERIAL — 3/4-inch plywood cut to fit credenza interior width minus 1/4 inch clearance on each side. Surface: finish with Danish oil to match credenza exterior, or cut a piece of mat or cork sheet to line the tray surface ($5-15). DIMENSIONS — tray width: credenza interior width minus 1/2 inch. Tray depth: 10 to 16 inches (enough to hold small appliances). Tray height: only needs to be 3/4-inch (the plywood thickness). MOUNTING — mount drawer slides to credenza interior sides using 3/4-inch wood screws at designated height (typically 4-6 inches below the credenza top surface). Attach tray to slide front with wood screws. TEST extension before loading items. ADVANCED OPTION — add front panel to tray matching credenza drawer front aesthetic (hides the tray when closed, looks like a shallow drawer). TOTAL COST — $25-60 for slides + plywood + finishing materials. BUILD TIME — 2-3 hours including cutting, finishing, and mounting.
AFFILIATE SLOTBUILDUndermount pull-out tray on full-extension ball-bearing drawer slides for milk frother, sugar, grinder accessoriesAdd affiliate URL when configuredWhy it works
Because coffee preparation involves multiple small accessories (milk frother, tamper, extra spoons, honey dipper, sweetener) that clutter the main surface when left out but are needed frequently enough that full cabinet storage is inconvenient. The pull-out tray provides the middle ground — accessible within one smooth motion, hidden when not in use, keeping the main credenza surface clear for the primary working pieces. The clean credenza surface (only coffee maker + grinder + bean canister) reads as purposeful and composed; accessory-cluttered surface reads as accumulated.
Pro tip — Use non-slip mat or cork sheet on the pull-out tray surface to prevent small items from sliding when the tray is extended or retracted — the non-slip surface also protects from spills (easier to remove and wash than the wood tray surface).
Pull-out tray extended — accessories hidden, main surface clear, one smooth motion to access. See also: coffee-bar-ideas
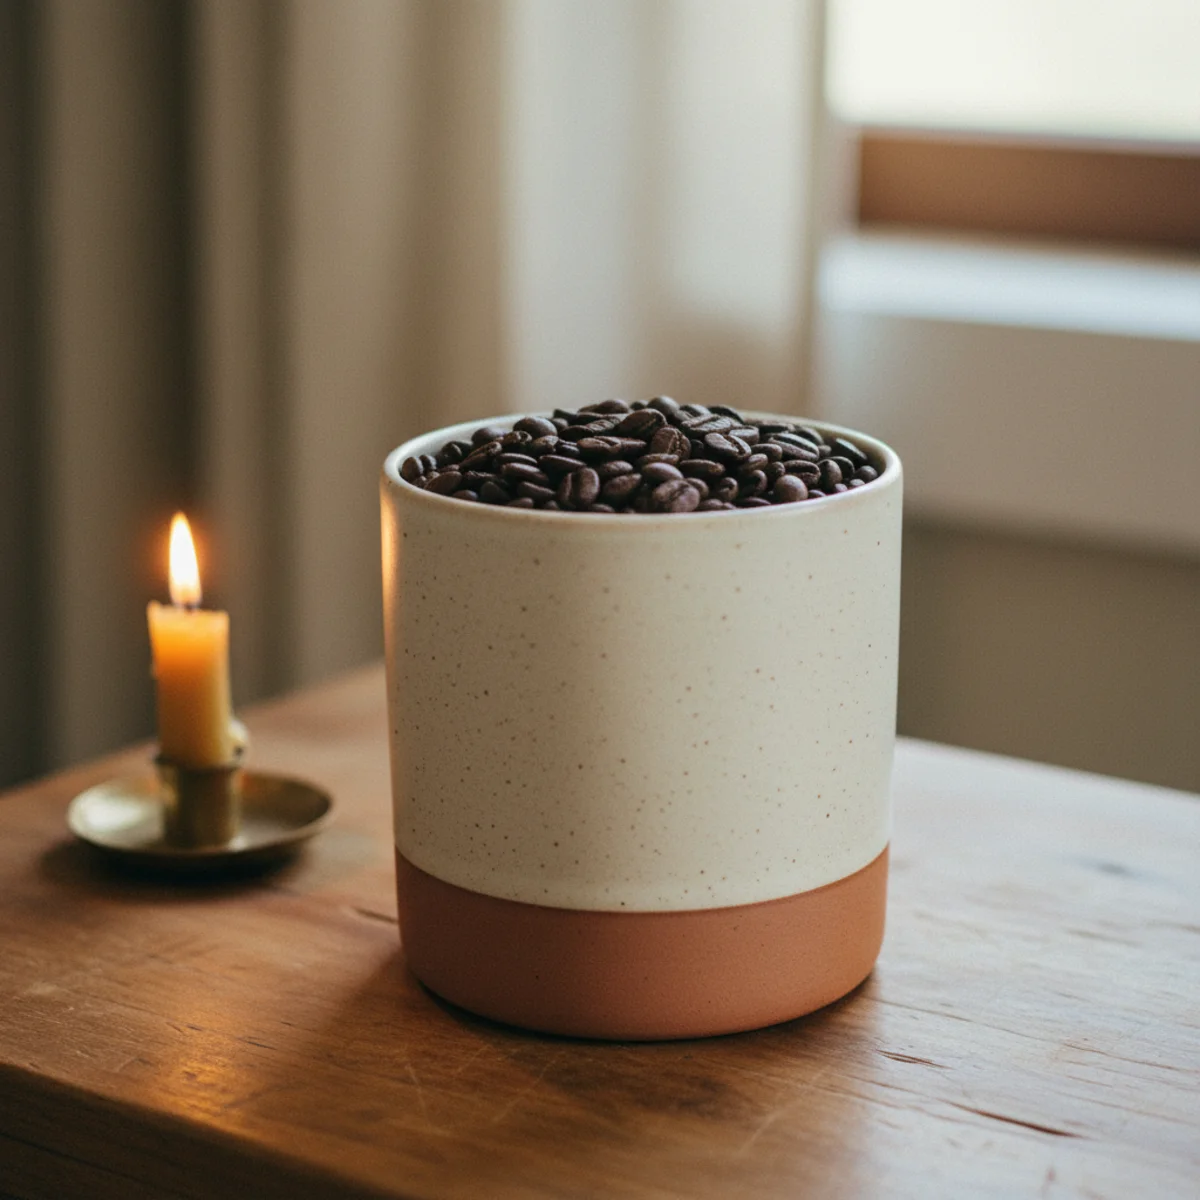
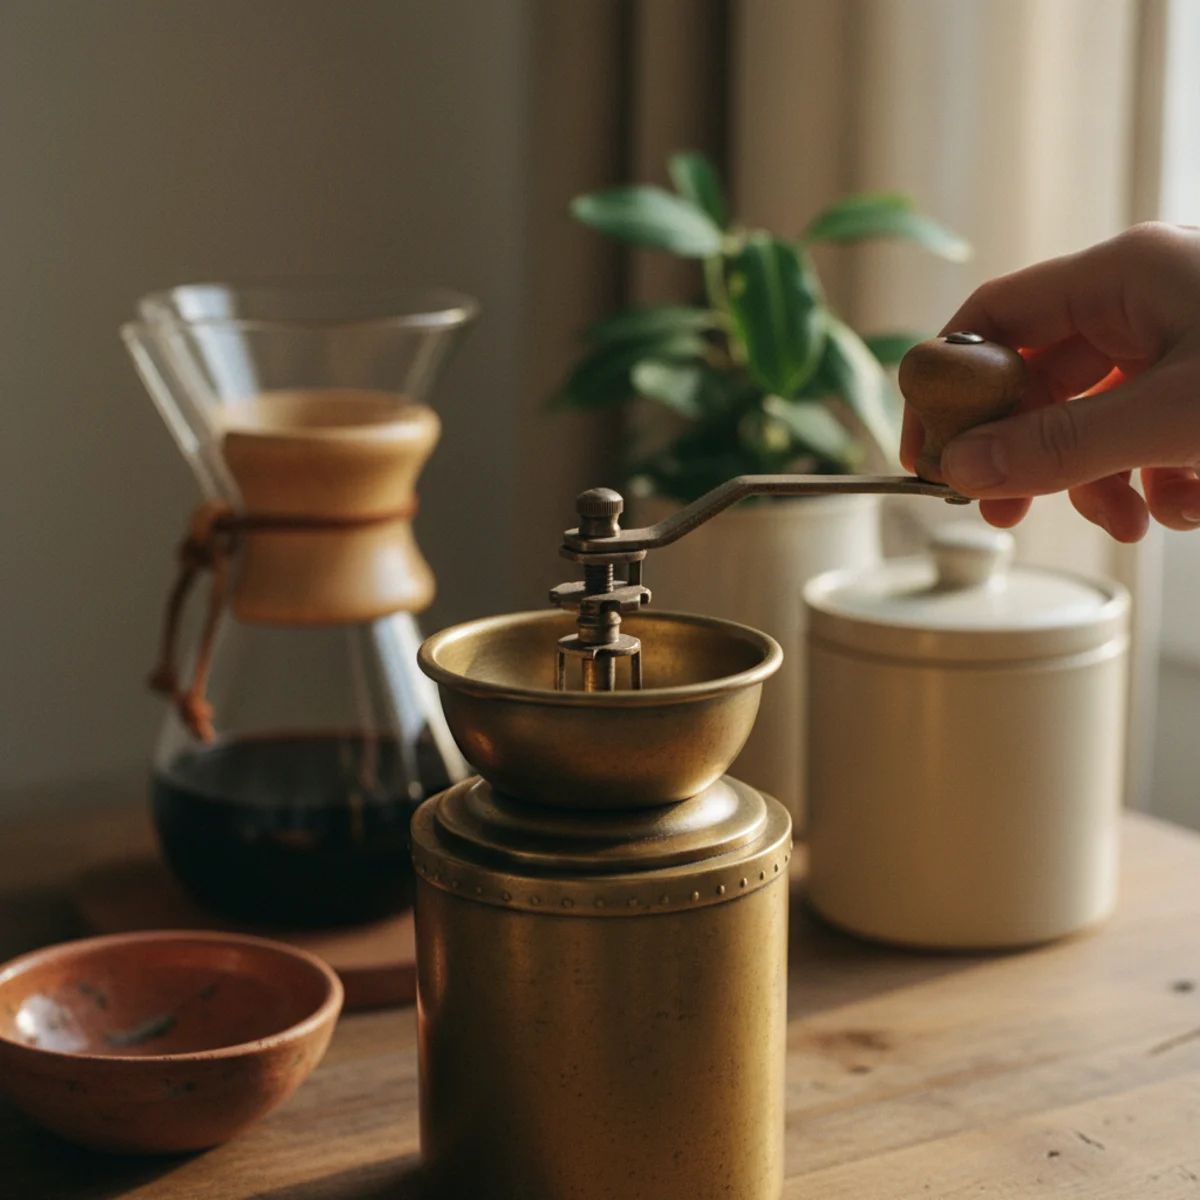
08Decant Into Matching Jars
Transferring coffee beans, sugar, honey, and other dry goods into coordinated glass or ceramic containers transforms the functional items into part of the visual composition. Matching or coordinated jars signal curated intentionality where original branded packaging signals casual grocery storage. Cost: $20 to $60 for a coordinated container set.
Decanting container options: GLASS APOTHECARY JARS — clear glass with airtight swing-top lid, 16 to 32 oz for beans, 8 to 12 oz for sugar or ground coffee. $8-20 each from specialty kitchen retailers, IKEA, or Amazon. CERAMIC CANISTERS — hand-thrown ceramic with airtight lid, $25-80 each from Etsy artisans or local pottery. Best for whole bean storage (ceramic blocks light which can degrade beans). VINTAGE GLASS JARS — mason jars, vintage Ball jars, vintage pharmacy jars with cork lids at $2-15 each from estate sales or thrift stores. Charming but not always airtight. CHALK LABEL TAGS — chalk pen or chalkboard labels ($5-10 per set) for labeling contents in coordinated handwriting style. Alternatives: small paper tags tied with twine, heat-embossed wax seals. CONTENTS TO DECANT — whole coffee beans (into ceramic or dark glass to protect from light), ground coffee (if using separately from bean grinder), granulated sugar, brown sugar, honey (transfer into smaller apothecary jar for daily use), whole spices (cinnamon, cardamom). DISPLAY POSITION — clustered at one end of credenza or in a small wooden tray for easy organization. The coordinated containers replace the visual noise of varied branded packaging with unified warm-material composition.
AFFILIATE SLOTSTYLINGGlass apothecary or ceramic canister set with swing-top lids for beans, sugar, honey; chalk labels or paper tagsAdd affiliate URL when configuredWhy it works
Because original packaging (coffee bags, plastic sugar containers, commercial honey jars) all have brand graphics, text hierarchies, and commercial design language that fights warm-home aesthetic. The same contents in coordinated glass or ceramic containers reads as composed kitchen station; original packaging reads as grocery items on a shelf. The decanting step costs $20-60 in containers and 30 minutes of transfer time but transforms 40% of the visual noise in the coffee bar composition. The jar labels (chalk-written or paper tags) can also include personal details (origin of beans, date of purchase) that add warm character.
Pro tip — Buy containers slightly larger than you think you need — coffee bags are typically 12 to 16 oz and the beans need a jar with some headspace for easy scooping. A 32-oz swing-top jar for beans, 16-oz for sugar, and 8-oz for ground coffee or backup beans is the right sizing for most daily-use coffee bars.
Glass apothecary jars with chalk labels — coordinated containers replacing commercial packaging noise. See also: cozy-kitchen-ideas
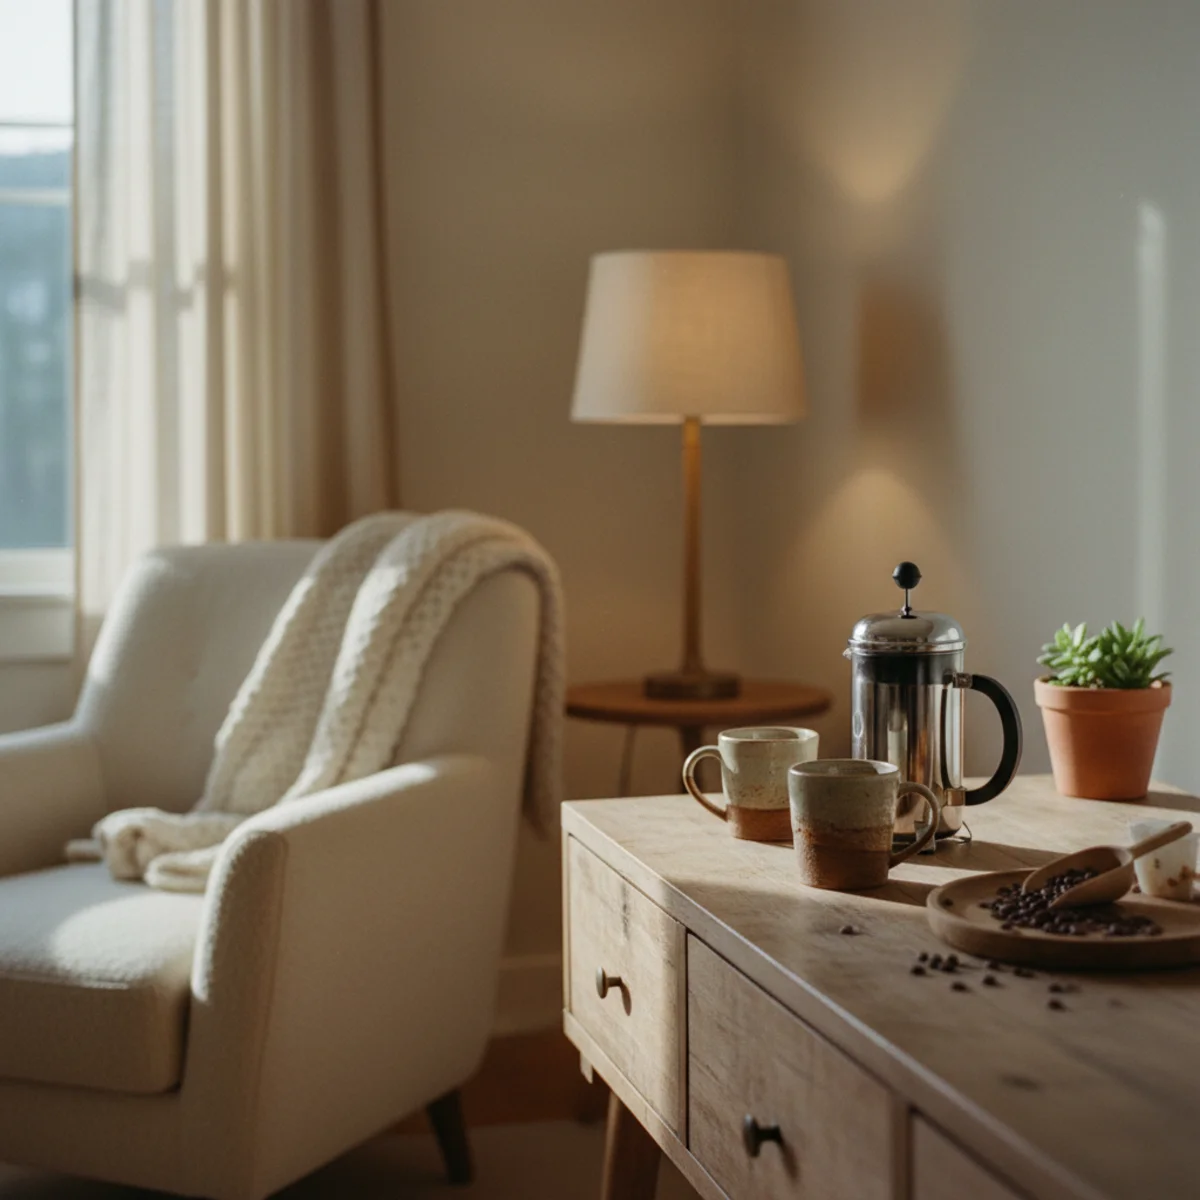
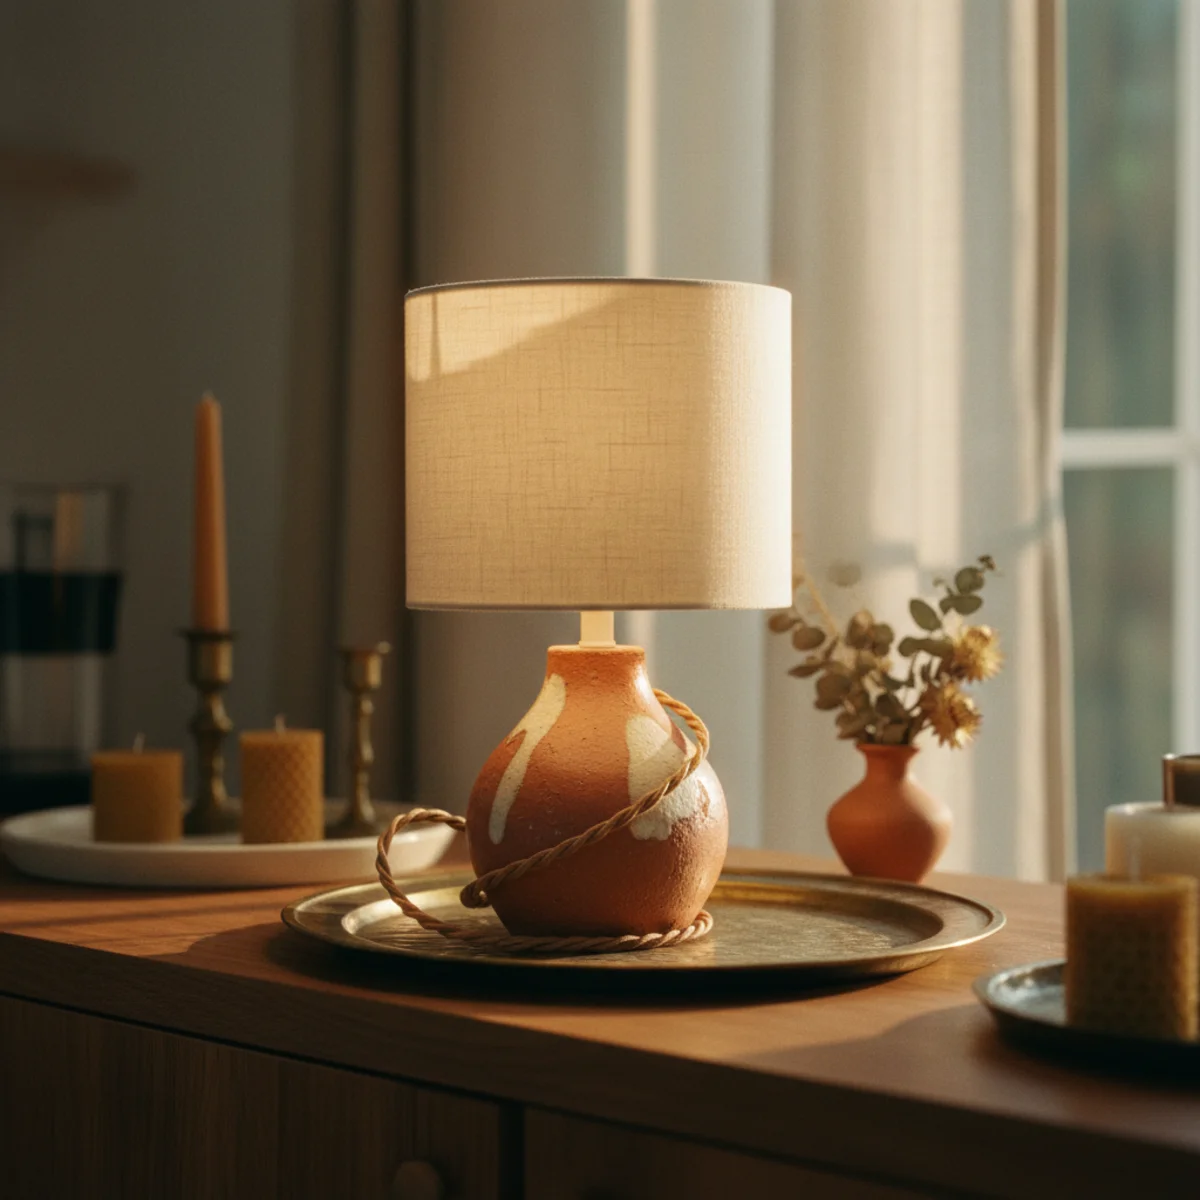
09Add a Small DIY Lamp
A small warm lamp (table lamp 14 to 20 inches tall, or a clip-on lamp on the floating shelf) provides the warm 2700K lighting that transforms the coffee station from daytime-utility to atmospheric-morning zone. Powering through the concealed power strip, the small lamp becomes part of the build's permanent electrical setup. Cost: $20 to $60 for the lamp.
Small coffee bar lamp options: SMALL CERAMIC TABLE LAMP — 14-18 inches tall with small drum shade in linen or paper. Position on credenza surface beside the bean canister or on one end. $40-100 retail, $15-40 thrifted vintage. CLIP-ON LAMP — clamps to the floating shelf edge and provides directional warm light onto the credenza surface. $15-40 from Amazon or specialty lighting. SMALL BRASS LAMP — vintage brass base at 12-16 inches with paper or fabric shade. $20-60 thrifted vintage. DIY OPTION — a simple lamp kit ($15-20 from hardware stores) plus a vintage vessel (pottery, ceramic bottle, vintage glass jar) creates a custom lamp at $25-40 total. Plug the vessel bottom with grommet, run lamp wire through, cap with socket and small shade. BULB — 2700K LED at 40 to 60 watts equivalent (warm amber-toned bulb) for proper atmospheric warmth. SMART PLUG — plug the lamp into smart plug ($10-25) to schedule on/off times automatically with the morning routine. POWER — connect to the concealed power strip from step 5. POSITION — on the credenza surface toward one end, or clipped to floating shelf edge for overhead-but-low illumination.
AFFILIATE SLOTLIGHTINGSmall ceramic or brass table lamp 14-20 inches OR clip-on shelf lamp at 2700K warm LED; powered by concealed power stripAdd affiliate URL when configuredWhy it works
Because overhead kitchen lighting (typically cool or neutral temperature, high position) doesn't support the atmospheric morning ritual that a coffee corner specifically provides. The small lamp's low warm 2700K light transforms the credenza from kitchen-area to dedicated ritual zone — the same coffee maker and grinder under overhead kitchen light reads as kitchen appliance; the same setup with a small warm lamp reads as purposeful morning station. The lamp also signals permanence and intentionality (this station has dedicated lighting, it's not just a piece of furniture with appliances on it). The $20-60 lamp cost produces significant aesthetic upgrade.
Pro tip — Use smart home scheduling on the small lamp — set it to turn on automatically 20-30 minutes before your typical wake time so the warm lamp is waiting when you arrive at the coffee bar. The scheduled warm light waiting for you adds to the ritual without requiring switches or fumbling in the dark. Smart plugs at $10-25 from Amazon enable this automation easily.
Small ceramic lamp with warm 2700K glow — dedicated ritual lighting transforming kitchen appliance into morning station. See also: best-lamps-warm-light
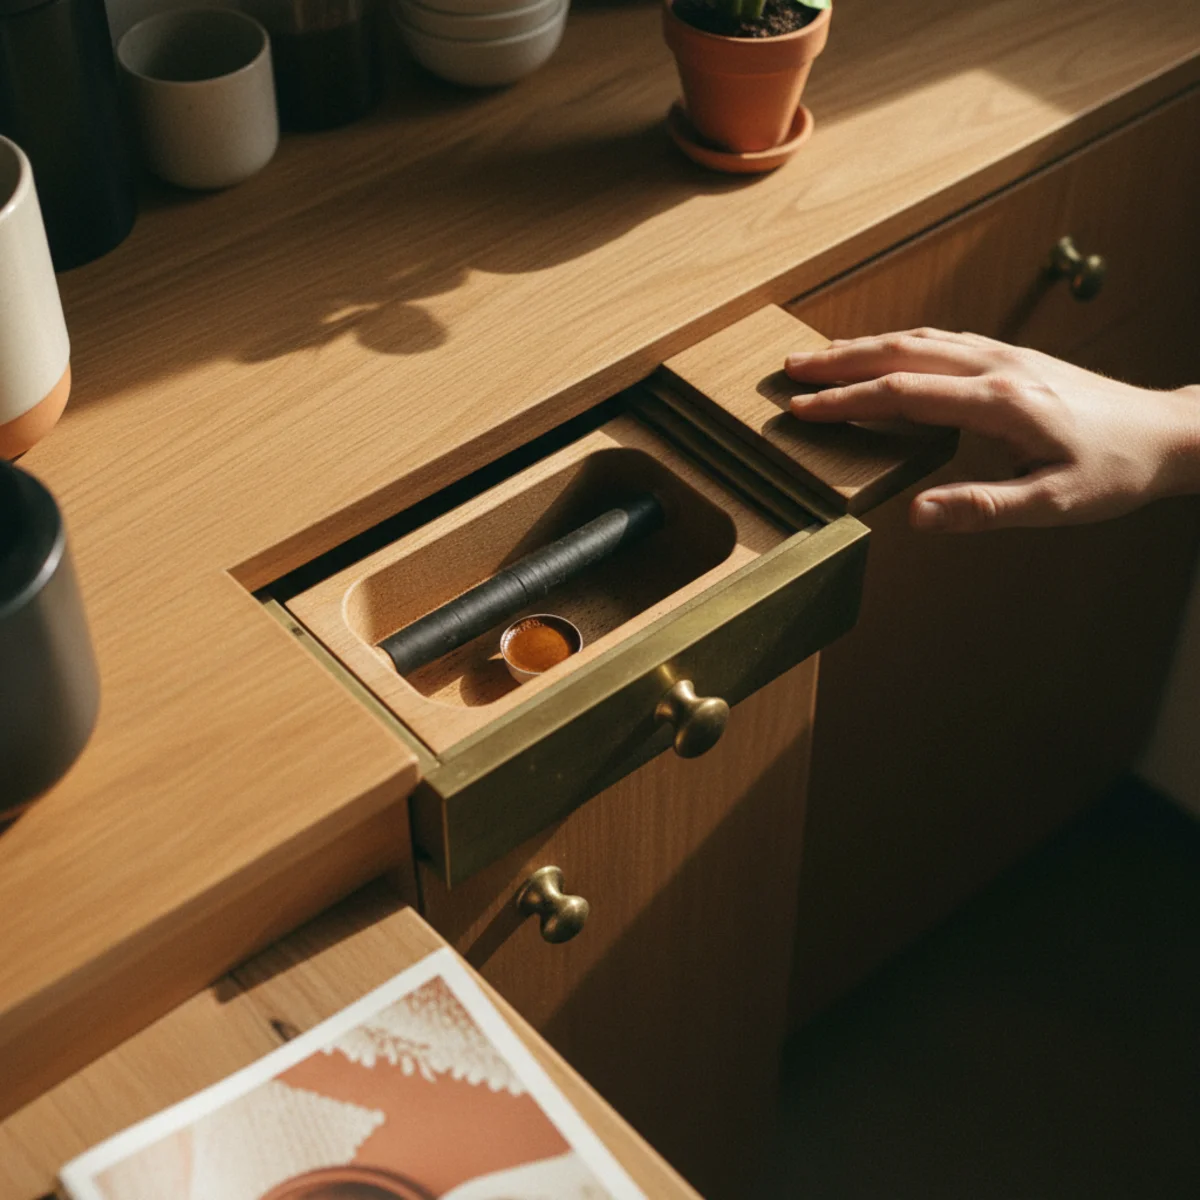
10Make a Knock-Box Drawer
For espresso-setup coffee bars specifically: converting one credenza drawer into a dedicated knock box (for disposing espresso pucks from the portafilter) keeps the main surface clean and the workflow contained. A simple DIY knock box insert costs $10 to $20 in materials and takes 30 to 60 minutes to build.
DIY knock box drawer specifications: BASE CONTAINER — 6x8 inch plastic container (food storage, Tupperware-sized) or 6x8 inch wooden box with 2-3 inch walls. The container holds espresso pucks until emptied. KNOCK BAR — 3/4-inch diameter wooden dowel at 8 inches long, wrapped with thick rubber tubing (bicycle inner tube cut to 6-inch length, stretched over dowel). The rubber-covered dowel provides the surface to knock the portafilter against. MOUNTING THE KNOCK BAR — drill two holes on opposite short walls of the container at the container midpoint height. Feed the rubber-covered dowel through both holes (should be friction-fit, slightly snug). The dowel sits suspended across the container with rubber collar at knock point. INSERT FIT — the completed knock box container should fit inside the credenza drawer with 1/4 inch clearance on each side. Measure carefully before cutting or buying the container. DRAWER CHOICE — the drawer closest to the espresso machine position, accessible with one hand while holding portafilter with the other. ALTERNATIVE — a standalone counter knock box at $20-40 if drawer conversion doesn't suit the credenza's drawer size. TOTAL COST for DIY drawer version — $5-15 for container, $3-5 for dowel, $2-5 for rubber tubing = $10-20 total.
AFFILIATE SLOTBUILDDIY knock box insert: 6x8 container + rubber-wrapped wooden dowel installed across container midpoint; fits in credenza drawerAdd affiliate URL when configuredWhy it works
Because the espresso puck disposal step happens after every single shot pull — it's the highest-frequency maintenance step in the coffee bar. Without a knock box, used pucks go to the sink or a separate container that needs repositioning; with a knock box drawer, the step happens in one motion (pull drawer, knock portafilter, push drawer) that keeps the entire workflow contained at the station. The contained workflow is one of the functional distinguishers between 'coffee appliances on a credenza' and 'designed coffee station.' Skip this step for non-espresso setups (French press, pour-over, drip) where puck disposal isn't part of the workflow.
Pro tip — Empty the knock box drawer whenever it's about 2/3 full rather than completely full — a full knock box can stick together during disposal, making emptying messy. The 2/3 threshold keeps espresso pucks loose and easy to empty in one motion into the compost bin.
DIY knock box drawer with rubber dowel — espresso puck disposal contained at the station. See also: coffee-bar-ideas
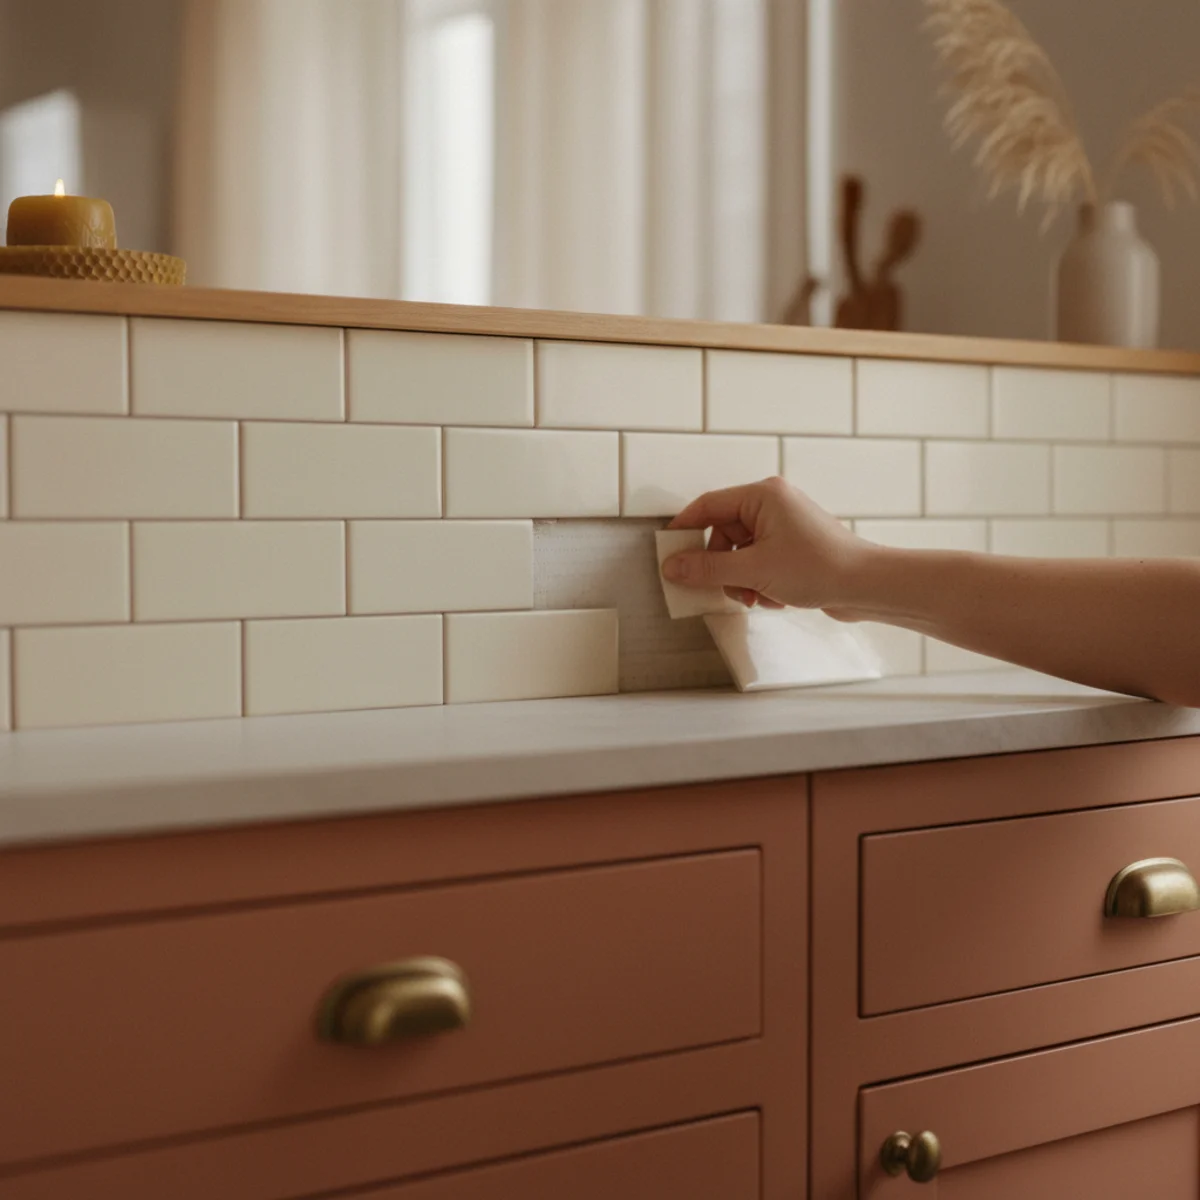
11Tile a Removable Backsplash
For rental apartments or households who don't want permanent backboard installation, a removable tiled backsplash using peel-and-stick tiles provides the same visual impact without wall damage. The tiles peel off cleanly when removed and leave no residue. Cost: $30 to $80 for enough tile to cover the credenza wall zone. Install time: 1 to 2 hours.
Removable peel-and-stick tile specifications: TILE OPTIONS — peel-and-stick subway tiles (3x6 inch white or cream, $20-40 per sheet covering 10 sq ft), peel-and-stick hexagon tiles ($25-50 per sheet), peel-and-stick marble-look tiles ($30-60 per sheet). BRANDS — Smart Tiles, StickTiles, Aspect, Art3d. Best at Amazon, Home Depot, or Wayfair. SURFACE PREPARATION — clean the wall surface completely (mild soap and water, let dry fully). Do not apply to freshly painted walls less than 30 days old. COVERAGE CALCULATION — measure the wall zone width x height, add 10-15% for waste and cuts. INSTALLATION — peel backing, press firmly to wall starting from bottom row, work upward row by row. Use a credit card or rubber roller to press tiles firmly (eliminate air bubbles). CUTTING — cut tiles with sharp utility knife or box cutter where tiles meet the underside of the floating shelf or the top of the credenza. GROUTING — peel-and-stick tiles often include simulated grout lines in the tile design; no actual grouting needed. REMOVAL — peel tiles slowly at 45-degree angle to prevent wall damage. Use heat gun or hair dryer to loosen adhesive if needed for removal. TOTAL COST — $30-80 depending on tile type and coverage area.
AFFILIATE SLOTBUILDPeel-and-stick subway, hexagon, or marble-look tile from Smart Tiles, StickTiles, or Art3d for rental or reversible backsplashAdd affiliate URL when configuredWhy it works
Because rental-apartment households or households who want reversibility have the same aesthetic goals (warm custom-looking coffee station) but different constraints (no permanent wall modifications). The peel-and-stick tile provides 90% of the visual impact of permanent shiplap or tile backsplash at lower cost and zero installation permanence. The reversibility also lets households test different backsplash aesthetics before committing to permanent installation — if the subway tile looks right after 6 months, convert to permanent installation; if you want shiplap instead, peel off the tiles and try shiplap.
Pro tip — Apply peel-and-stick tiles to a test patch on a different wall surface (inside a closet, behind a door) before applying to the coffee bar wall — the test patch verifies adhesion quality and removal cleanness on your specific wall paint type. Some paints (especially flat-finish paints) can peel when tiles are removed; the test patch reveals this risk before the main application.
Peel-and-stick cream subway tile backsplash — permanent-looking without permanent installation. See also: small-apartment-decorating-ideas
12Style With the Working Parts
The final step is the coffee bar's primary styling — arranging the working coffee equipment as the visual composition rather than adding separate decor objects. The coffee maker as anchor, the bean canister and grinder grouped beside, the coordinated jars for sugar and honey, the small plant in terracotta pot, the leaned print behind, the lamp providing warm glow. The functional equipment is the decor.
Styling composition for the finished coffee bar: CREDENZA SURFACE ARRANGEMENT — primary zone (center or slightly off-center): coffee maker as anchor piece (Chemex, French press, espresso machine, or drip maker). Secondary zone (beside the maker): bean canister + grinder, grouped within 12 inches of maker. Accent zone (other end): small terracotta pot with snake plant, ZZ, or pothos (4-6 inch pot), small tray for spoons and honey. FLOATING SHELF ARRANGEMENT — hung mugs on brass hooks (4-7 mugs at varying heights and styles), small ceramic vase or vessel with 1-3 dried stems or fresh-cut small bunch, leaned print or postcard (4x6 to 6x8 inches in simple frame), possibly one small book. PRINCIPLES APPLIED — off-center weighting (60% of items toward dominant side), three height planes (tall lamp + medium coffee maker + low tray provides height variation), one patterned element (if any textured surface), mix functional and character objects (the working parts are the majority, the plant and print add character). WHAT NOT TO ADD — decorative-only coffee-themed objects (signs, coffee-cup figurines, branded coffee objects), excess decor that crowds out the working equipment, textiles on the coffee bar surface (throws and napkins belong in the adjacent chair area, not on the work surface). EDIT RUTHLESSLY — after initial styling, remove one item at a time until the surface looks clean. Most first-pass coffee bar styling is over-decorated; removing 2-3 items produces the right balance.
AFFILIATE SLOTSTYLINGCoffee maker as anchor, bean canister + grinder grouped beside, small plant, leaned print, lamp glow; functional equipment as primary decorAdd affiliate URL when configuredWhy it works
Because the coffee bar's function is making and enjoying coffee — the working parts (maker, grinder, bean canisters) are the center of this function, and placing them as the visual center reinforces the purposeful nature of the station. Adding separate decor over or around the working parts produces the 'appliances-on-decorated-shelf' look where the equipment and decor fight for visual authority. Allowing the working parts to BE the decor produces the 'intentional coffee station' look where everything present serves the ritual either functionally or atmospherically. The distinction is visible and immediate; the working-parts-as-decor approach consistently outperforms the add-decor-separately approach.
Pro tip — Step back 8 to 10 feet from the finished coffee bar after styling and photograph it — the full-view photo reveals whether the station reads as composed custom build or as assembled credenza with stuff on it. Most required adjustments become visible only at this distance (off-center balance, height plane distribution, visual clutter vs. negative space). Make adjustments based on the photo rather than close-up styling.
Chemex anchor, ceramic canister, manual grinder, snake plant, botanical print, ceramic lamp — working parts as the decor. See also: cozy-coffee-corner
How to build a DIY coffee bar step by step
A weekend, a drill, and a thrifted base. Build it in this order.
- 1Source and refinish the base
Find a credenza deep enough for your machine, tighten any loose joints, sand lightly, and finish with two thin coats of hardwax oil.
- 2Add storage above
Mount a floating shelf into the studs and a row of brass hooks beneath for mugs. Pre-drill to avoid splitting the wood.
- 3Run and hide the power
Mount a power strip to the credenza back and zip-tie cords to a leg, so the machines stay plugged in with nothing trailing.
- 4Style with the working parts
Decant beans into jars, hang the mugs, add a small lamp and a plant, and leave a clear zone for the cup you're filling.
Quick tips
- Choose a credenza deep enough to clear your machine with the water lid open.
- Find studs before mounting the shelf; a loaded shelf pulls anchors out of drywall.
- Oil the wood rather than lacquer it — warm, repairable, and forgiving of a beginner's hand.
- Mount a power strip to the back and zip-tie cords to a leg so nothing trails.
- Pre-drill pilot holes for the hooks so the wood doesn't split.
- Leave venting space and a pull-out option if you're enclosing an espresso machine.
DIY coffee bars by space and skill
A cart plus hooks-on-a-board and decanted jars — no drilling, just assembly and styling.
A refinished credenza with a mounted floating shelf, hooks, and a hidden power strip.
Convert a hutch into a coffee bar cabinet with doors; see our coffee bar cabinet guide for venting.
A freestanding credenza, peel-and-stick backsplash, and a plug-in power strip — no permanent work.
A forty-dollar credenza and a weekend buys the warmest three feet in the house — and you use it every single morning.
Frequently asked questions
How do I build a DIY coffee bar?+
What's the best starting piece for a DIY coffee bar?+
How much does a DIY coffee bar cost?+
What kind of finish should I use on my coffee bar credenza?+
Can I build a DIY coffee bar in a rental apartment?+
How do I style the finished DIY coffee bar?+
Don't build a coffee bar from lumber — start with a forty-dollar thrifted credenza and add only what it needs: a shelf, some hooks, a hidden power strip, and good styling. We'd spend the real effort on refinishing and cord-hiding, because that's what makes a DIY station read built rather than improvised. It's the rare weekend project you'll use every single morning, which is exactly why the wear on a secondhand base only makes it better.