These twelve no-sew curtain principles apply to single-panel curtains for standard windows (30-60 inches wide, 84-120 inches long), multi-panel arrangements for wider windows and doorways, drop cloth curtains for the most budget-conscious approach ($20-30 total for a window), and kitchen cafe curtains as a separate smaller-scale project. Each principle names the specific materials (linen fabric weight, hem tape brand, ring type), the exact measurements, and the installation decisions (high-and-wide rod mounting) that produce professional results without a sewing machine.
The no-sew curtain succeeds when the fabric choice is right — linen, heavyweight cotton, or canvas that hangs with natural weight and doesn't require precise seam finishing to look intentional. The fabric choice is the foundational decision; the iron-on hemming is technique. Most no-sew curtain failures come from using lightweight or stiff fabric that reveals unhemmed edges as visible rather than intentional.
By the end of this guide, you'll know how to make no-sew curtains that look sewn — choosing the right linen fabric, using iron-on hem tape correctly, hanging from clip rings, mounting the rod high and wide, going floor-grazing or slightly puddling, repurposing a drop cloth, adding a blackout liner, using curtain weights for drape, choosing a warm neutral tone, making cafe curtains for the kitchen, ironing before hanging, and layering over a sheer.
WHAT'S INSIDE
- Why linen specifically works for no-sew curtains where lighter fabrics don't
- Iron-on hem tape — the complete technique that produces clean crisp hems without a machine
- Hang high and wide — the rod-mounting decision that makes any curtain look more expensive
- The drop cloth curtain — $20-30 per window including the rod, the most budget-accessible option
Curtains hung high and long are one of the cheapest ways to make a room feel taller and warmer. And you can make them without a single stitch.
— Apartment Therapy [citation needed — verify before publish]
What are no-sew curtains?
No-sew curtains are drapes made without a sewing machine, using iron-on hem tape to create the hems and clip rings to hang them, rather than stitching. You buy or repurpose a length of fabric — linen is the warmest choice — cut it to size, fold and bond the hems with heat-activated tape and an iron, and hang it from clip rings on a rod. The result looks like sewn curtains for a fraction of the effort and cost.
The appeal is accessibility and savings. Quality linen curtains are expensive and rarely come in the exact length a room needs; making your own gets you warm, custom-length drapes cheaply and with no sewing skill. The clip rings even let you skip hemming the top entirely. The key choices are the fabric (linen for warmth and drape), the length (floor-grazing or slightly puddling), and the mounting (high and wide), which together deliver the height-and-warmth upgrade curtains are really for.
More in DIY you may love
See allWhy no-sew curtains are everywhere in 2026
As linen curtains became a defining warm-home element and their cost stayed high, the no-sew DIY version spread as the affordable route — Pinterest's no-sew curtain and DIY linen curtain searches climb every year.
The honest appeal is cost, custom length, and zero skill required. Quality linen drapes are pricey and rarely the right length, while a no-sew version using hem tape and clip rings delivers the same warm, floor-grazing look for far less, in any length. As hanging curtains high and long became a known trick for making rooms feel taller and warmer, the no-sew method made it achievable for anyone with an iron and an afternoon, no sewing machine or skill needed.
12 no-sew curtain ideas and tips
01Choose Linen for Warmth
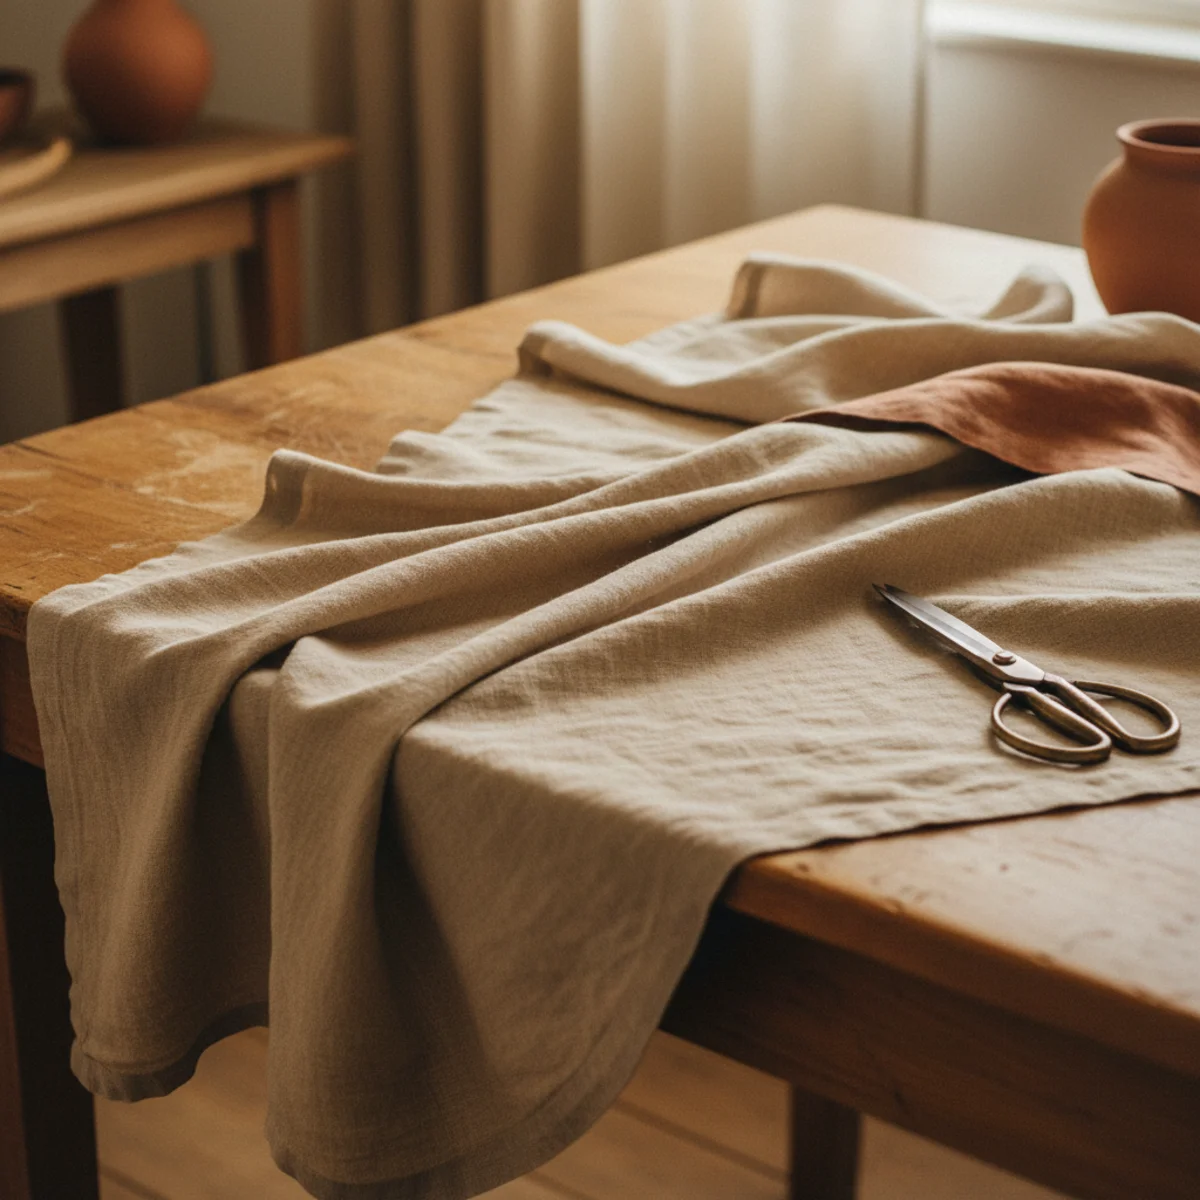
Linen is the right no-sew curtain fabric because its natural weight holds the hem tape bond reliably, its fiber stiffness maintains the drape without requiring sewn seam structure, and its warm natural texture reads as intentionally warm rather than as accidentally unhemmed. Lightweight sheers and thin cotton fail with no-sew technique because the hem tape bond is visible or separates; linen's weight and structure prevents both failure modes.
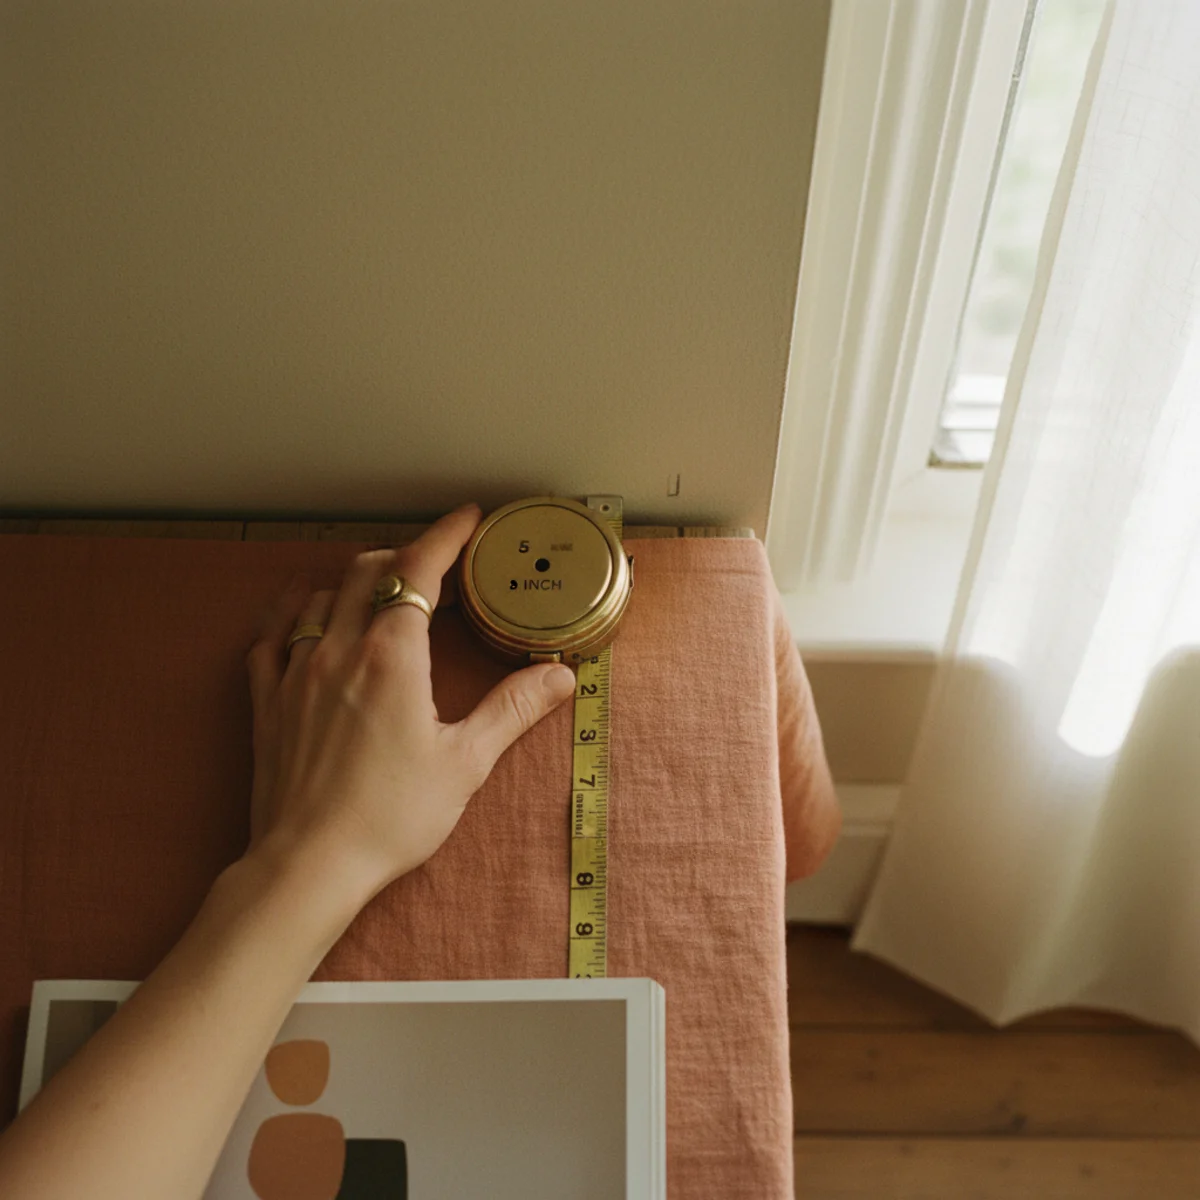
Linen fabric sourcing for no-sew curtains: FABRIC WEIGHT — 200-280 gsm medium-weight linen. Light linen (under 180 gsm) is too translucent and doesn't hold hem tape bond reliably. Heavy linen (over 300 gsm) is too stiff for good drape. Medium weight is the correct range. FABRIC SOURCES — fabric by the yard from: ETSY LINEN SELLERS ($8-18 per yard for quality European flax linen yardage), FABRIC.COM ($6-15 per yard), Fabriccut ($7-15 per yard), local fabric stores ($8-20 per yard). COLOURS — unbleached natural linen (warm cream/oat with slight variation), bleached linen (cleaner off-white), pre-dyed linen in warm earth tones. For warm home aesthetic: natural unbleached linen or soft sage are the most-appropriate curtain tones. FABRIC QUANTITY — for one standard 84-inch long panel: 2.5 to 3 yards of 54-inch wide fabric (allowing for 8-inch hems top and bottom and slight width fold). For 96-inch length: 3 to 3.5 yards. For drop floor curtains at 108 inches: 3.5 to 4 yards. WIDTH — 54-60-inch-wide fabric makes one curtain panel. 2-3 panels per window depending on window width and desired fullness.
AFFILIATE SLOTFABRIC200-280 gsm medium-weight linen at $8-18 per yard from Etsy linen sellers, Fabric.com, or local fabric stores; 2.5-4 yards per panel depending on lengthAdd affiliate URL when configuredWhy it works
Because linen's fiber stiffness and natural weight create structural self-support that lighter fabrics require sewn seams to achieve. A lightweight cotton needs the structural integrity of precise sewn hems to hang without visible edge irregularities; linen's natural body allows a simply-hemmed (or iron-on-hemmed) edge to read as intentional because the fabric itself holds its form. The difference is the same as why thick cardstock doesn't need tape to hold a fold where tissue paper does.
Pro tip — Order 20% more fabric than calculated — linen shrinks 5-8% in the first wash (wash all fabric before cutting and hemming to prevent post-installation shrinkage), and some additional fabric is needed to account for the specific drape length after washing. Calculate finished length needed, add 16 inches for top and bottom hems, multiply by 1.2 for the shrinkage buffer.
Medium-weight natural linen — the fabric whose structural self-support makes no-sew technique produce professional results. See also: best-linen-bedding
02Use Iron-On Hem Tape
Iron-on hem tape (fusible web tape) bonds two layers of fabric together with heat, creating a hem that holds washing and use without thread. The technique is reliable for medium-to-heavyweight fabrics like linen when applied correctly — hot iron, damp press cloth, full 10-second contact per section. The hem reads as clean and finished from the front; only the tape line is visible from the back interior fold.
Iron-on hem tape complete technique: PRODUCT — Steam-A-Seam 2 at 5/8-inch width ($8-12 per package, enough for 2-3 curtain panels from most fabric stores or Amazon) is the most-reliable brand for heavy fabric applications. HeatnBond Lite ($6-10) for lighter applications. WIDTH — 5/8-inch hem tape for standard curtain hems; 1/2-inch for thinner fabrics. TECHNIQUE — STEP 1: fold the fabric edge to the desired hem depth (8 inches at bottom, 4 inches at top for rod pocket or clip-ring tab). Press the fold with iron to create a crease. STEP 2: unfold. Insert hem tape strip along the fold line, tape against the fabric face, strip paper backing toward the fold interior. STEP 3: refold fabric over the tape. STEP 4: place a damp press cloth over the folded hem. Apply iron at the temperature specified on the hem tape package (typically cotton/high setting for linen) for 10 full seconds per 2-inch section. Move across the full hem length in sections. STEP 5: allow to cool completely (5 minutes) before handling — the bond sets as it cools. TEST — tug gently; the hem should not separate. If it peels, the iron was not hot enough or the contact was too brief. WASHING — hem-taped curtains can be washed on gentle cycle, line dried or low dryer heat. The bond holds through repeated washing.
AFFILIATE SLOTTECHNIQUESteam-A-Seam 2 at 5/8-inch width ($8-12 per package); fold, insert tape, damp press cloth, hot iron 10 seconds per 2-inch section; allow 5 min cool before handlingAdd affiliate URL when configuredWhy it works
Because the steam created by the damp press cloth under the iron significantly increases the hem tape's activation temperature above what dry ironing alone achieves, producing a stronger and more durable bond. Dry ironing at the same temperature setting activates the tape partially; steam ironing fully melts the adhesive into both fabric surfaces. The difference in bond strength is significant — dry-ironed hem tape on linen may peel at corners within a few washes; steam-ironed hem tape holds for years.
Pro tip — Apply hem tape in 12-18 inch sections rather than trying to iron the full hem length in one pass — longer sections are difficult to reposition if the tape shifts before bonding, and the iron's contact time is more reliably maintained per section. Move along the hem in sections, overlapping by 1 inch between sections.
Hem tape folded into linen with damp press cloth and hot iron — the technique that produces clean hems without a sewing machine. See also: diy-headboard-ideas
03Hang From Clip Rings
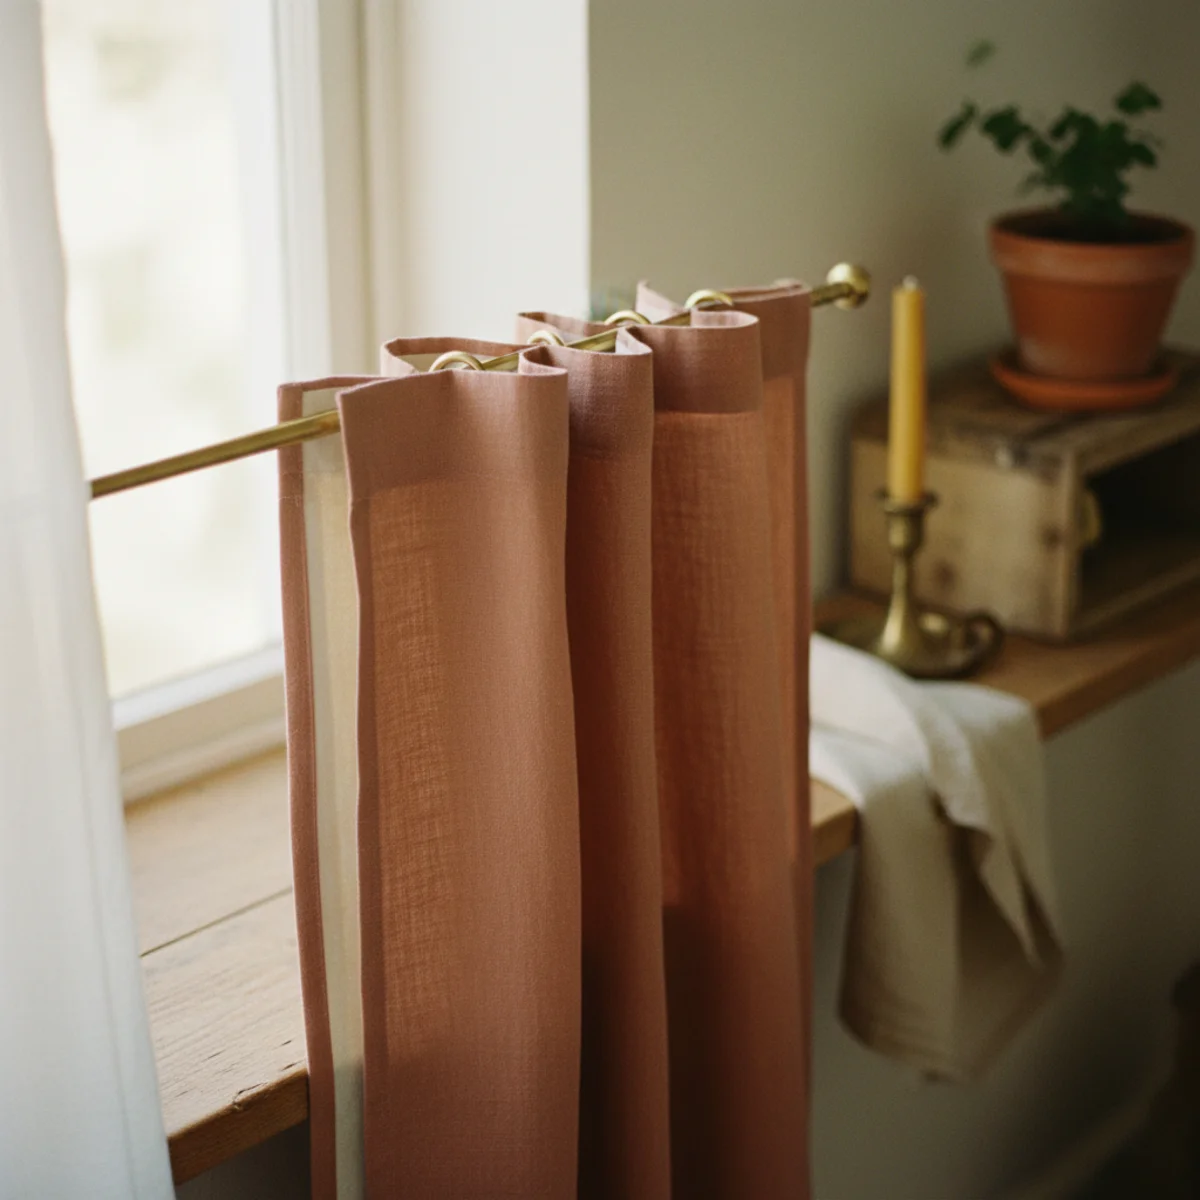
Clip rings — curtain rings with small spring clips attached — are the correct hanging hardware for no-sew curtains because they grip the fabric's top edge directly without requiring a sewn rod pocket or grommets. The clip ring spacing determines the curtain's pleat character: rings 6-8 inches apart produce soft natural folds; rings 4 inches apart produce tighter more formal folds. Cost: $8-20 for a pack of 10-12 rings.
Clip ring specifications and spacing: RING DIAMETER — should match or be slightly larger than the curtain rod diameter. Standard rings: 1-inch diameter for 3/4-inch rods, 1.5-inch diameter for 1-inch rods. MATERIAL — aged brass clip rings ($10-20 per pack of 10 from Pottery Barn, Amazon, or hardware stores) for warm home aesthetic. NOT chrome or stainless clip rings for warm home curtains. SPACING — 6-8 inches between clips for soft natural gather (most-flattering for linen). 4-6 inches for tighter more formal pleat. Measure the fabric width and divide by the chosen spacing to determine ring count. CLIP PLACEMENT — clip the rings exactly at the folded-top edge of the fabric (after the top hem tape is applied). The clip's teeth grip both layers of the hemmed fold. CORNER CLIPS — always start with corner clips at the two extreme ends of the fabric, then distribute the remaining rings evenly between. FULLNESS — curtain panels should be 1.5x to 2x the window width in fabric width for natural full gather. Wider is more luxurious-looking.
AFFILIATE SLOTHARDWAREAged brass clip rings matching rod diameter ($10-20 per 10-pack); 6-8 inch spacing for natural linen gather; panels at 1.5-2x window widthAdd affiliate URL when configuredWhy it works
Because rod pockets require a sewn sleeve (the pocket itself must be sewn to form a tube through which the rod passes), which eliminates them as a no-sew option. Grommets require punching precisely spaced holes and inserting metal grommet hardware, which adds tool requirements and is less forgiving of measurement errors. Clip rings require only clipping — no sewing, no punching, no permanent attachment — and can be repositioned if spacing looks wrong. They're also removable for washing without unthreading the rod.
Pro tip — Hang the curtain panel on the rod before final clip spacing adjustment — clip all rings at rough spacing, hang the curtain and stand back to assess whether the gather reads as natural or whether any ring spacings should adjust. Re-clipping one or two rings to refine the spacing takes 2 minutes; getting the spacing right before hanging takes more guesswork.
Aged brass clip rings at 7-inch spacing gripping linen top hem — natural soft gather without sewn rod pocket or grommets. See also: bedroom-cozy-ideas
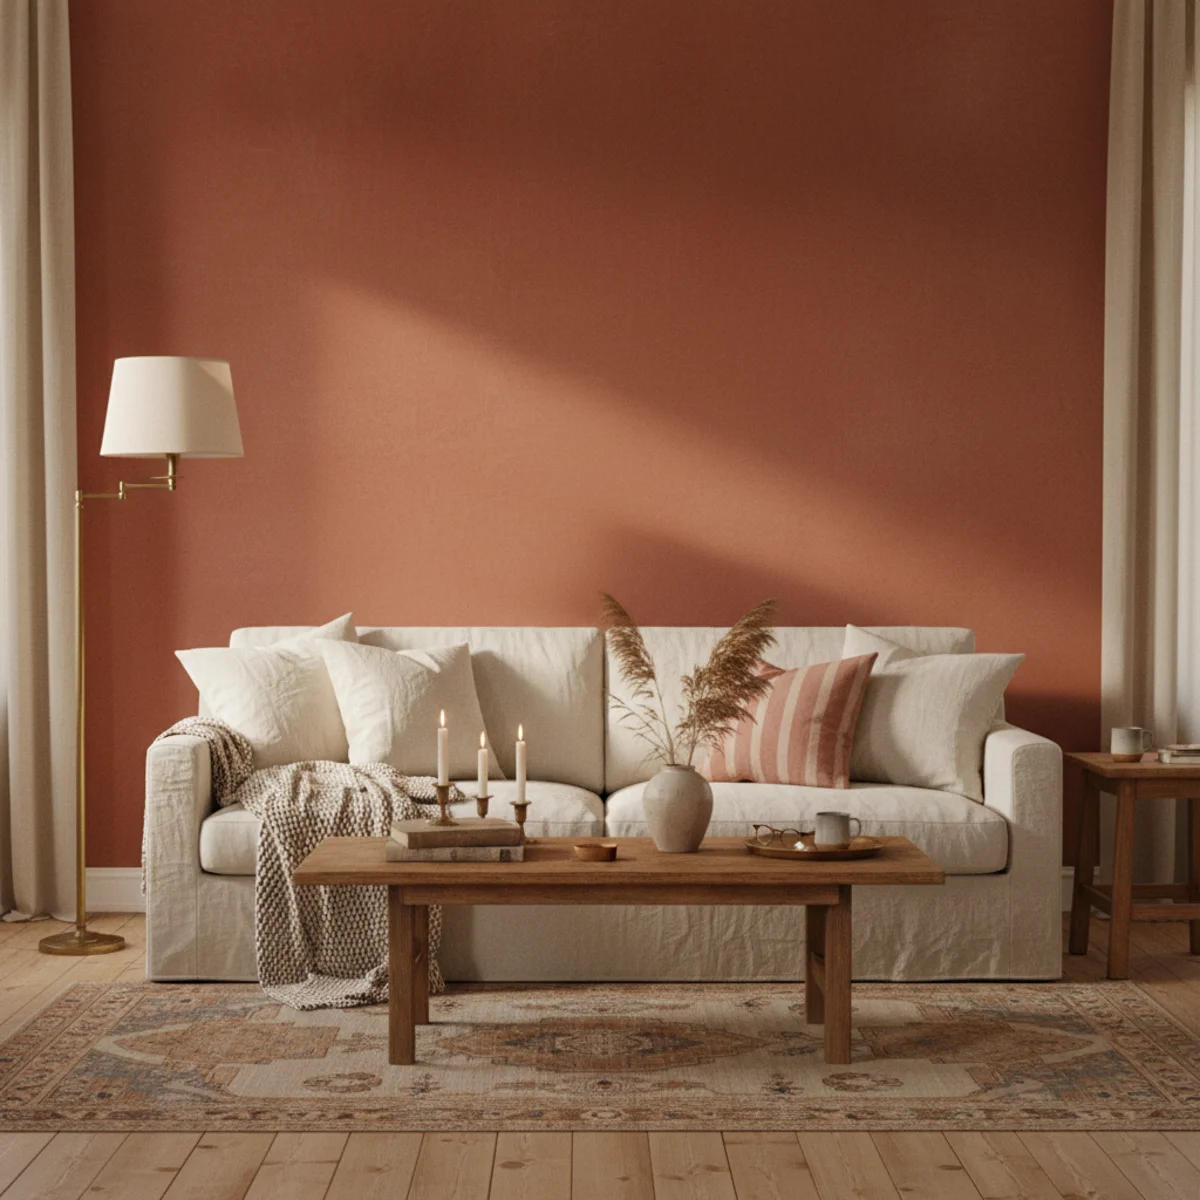
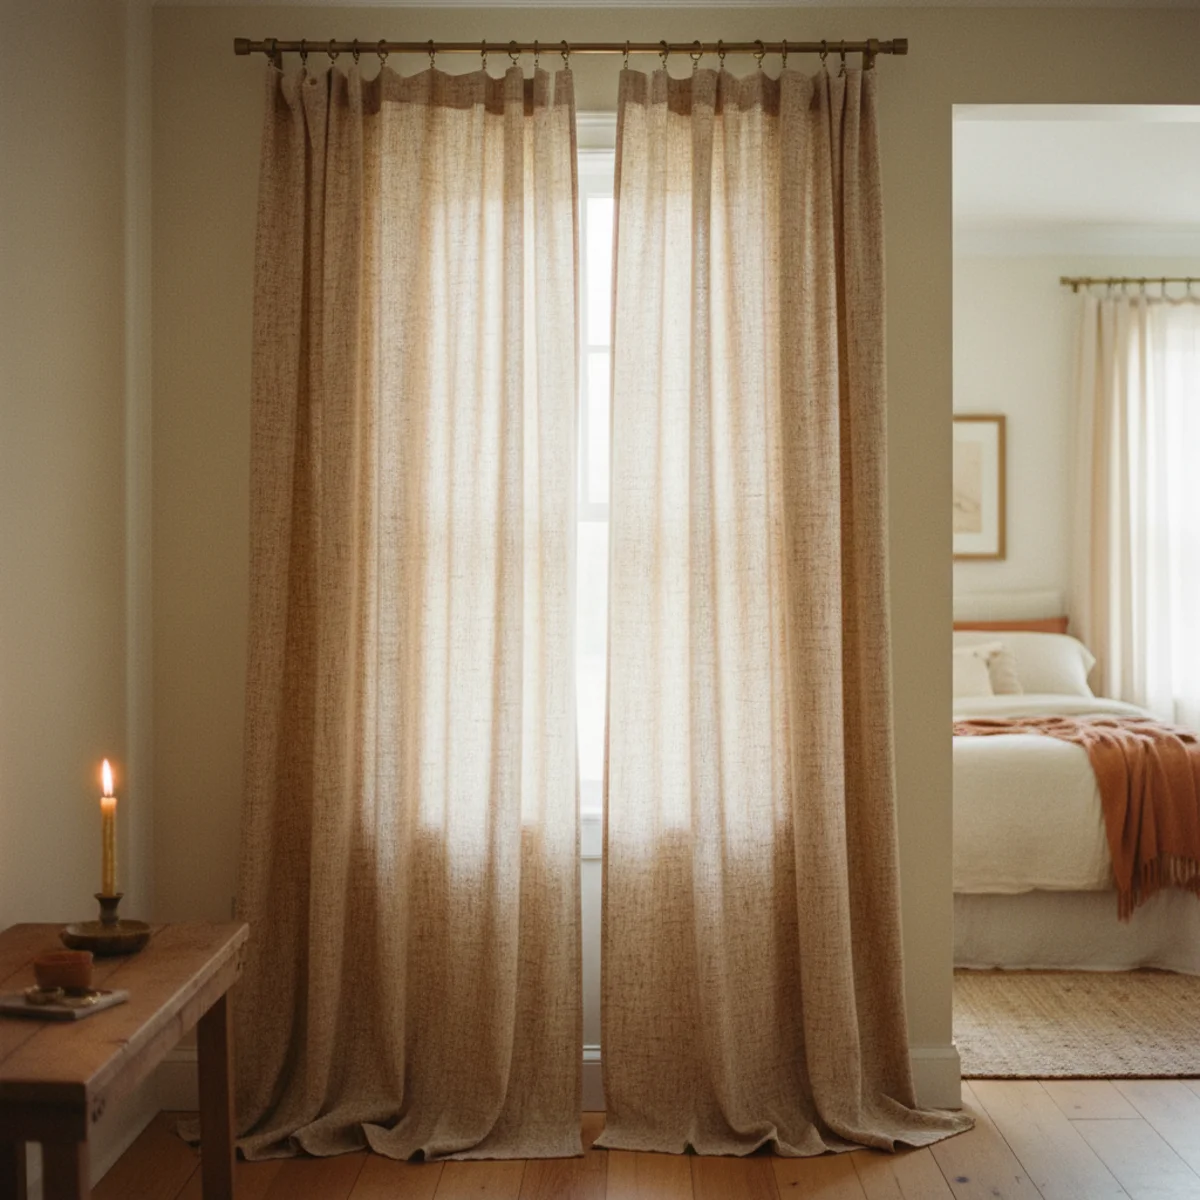
04Mount the Rod High and Wide
The single most-important curtain installation decision — regardless of the curtain fabric or construction method — is where the rod mounts. Rod mounted 4-6 inches below the ceiling (not just above the window) and 6-10 inches wider than the window frame on each side makes any curtain look significantly more expensive and makes any room look taller and the window look larger. Cost: $0 (just different placement of the existing bracket holes).
High-and-wide rod mounting specifics: HEIGHT — mount the rod brackets 4-6 inches below the ceiling (or crown molding if present). For an 8-foot ceiling with 7-foot window top, mount at 90-92 inches from floor (2-4 inches from ceiling). In lower-ceiling rooms (7 feet or below), mount as close to the ceiling as the bracket allows. The visual effect: the curtain appears to run from near the ceiling, making the window look taller and the ceiling look higher. WIDTH — mount brackets 6-10 inches beyond the window frame on each side. Standard practice is 3 inches; the upgraded 6-10 inch extension requires curtain panels to stack off the window glass entirely when open, preserving maximum window light and making the window appear significantly wider. ROD LENGTH — add 12-20 inches to the window width (to accommodate the 6-10 inch extension per side). LENGTH CALCULATION — with rod high-mounted 4-6 inches from ceiling and floor-grazing length, the curtain panels will be 90-116 inches long depending on ceiling height. Measure from the rod position to 1/2 inch above the floor for the finished length, then add 16 inches for hems.
AFFILIATE SLOTINSTALLATIONRod 4-6 inches below ceiling, brackets 6-10 inches beyond window frame each side; panels 1/2 inch above floor finished length; stud-finder bracket placementAdd affiliate URL when configuredWhy it works
Because professional interior design curtain installations always mount high and wide — the convention is based on the knowledge that ceiling-height curtains signal investment and intention, and wide-mounted curtains allow windows to show fully when open. These two visual signals (full ceiling height, fully-revealed windows) are what distinguish professionally-installed curtains from apartment-standard hardware-store-bracket installations. The mounting costs nothing beyond repositioning the bracket holes; the visual difference is substantial.
Pro tip — Use a stud finder and long level before drilling any bracket holes — curtain rods bear significant weight (fabric plus occasional pulling), and mounting brackets into drywall without studs using only drywall anchors frequently results in bracket pull-out within months. Studs are 16 inches on center; plan the bracket positions to hit studs on at least one side, using a high-quality drywall anchor rated for 25+ lbs on the other.
Rod 5 inches below ceiling, brackets 8 inches beyond frame — the installation that transforms any curtain into a professional-looking window treatment. See also: cozy-living-room-ideas
05Go Floor-Grazing or Slightly Puddling
Curtain length has three options: hovering (ending 1/2 to 1 inch above the floor), floor-grazing (ending at floor level or touching it by 1/2 inch), and puddling (ending 2-6 inches on the floor in a soft pool). For no-sew curtains in warm homes, floor-grazing or slight puddle (1-2 inches) produces the most-intentional and most-warm result. Hovering reads as precise formal; puddling reads as romantic and warm.
Curtain length specifics: HOVERING (1/2 to 1 inch above floor) — the most practical (doesn't collect dust or impede vacuuming) but reads as precisely measured and slightly formal. Appropriate for high-traffic areas, doorways, kitchen. FLOOR-GRAZING (1/2 inch on the floor, often referred to as breaking at the floor) — the most common warm-home-appropriate length. The slight floor contact reads as intentional fullness rather than accidental short-cutting. For most rooms, the ideal choice. SLIGHT PUDDLE (1-2 inches on floor) — most romantic and warm. The slight pooling gives the curtains a soft settled quality. Appropriate for living rooms, bedrooms, dining rooms. Requires vacuuming around the pooled edge occasionally. FULL PUDDLE (3-6 inches) — dramatic and specifically luxurious-reading, but requires fabrics with good drape (which linen at 200-280 gsm has) and rooms that won't disturb the pool with foot traffic. NOT RECOMMENDED for no-sew technique: SILL-LENGTH or APRON-LENGTH curtains (ending at the window sill or below it but above the floor) — these lengths read as unfinished rather than as intentional unless specifically in kitchens and bathrooms where functionality justifies them.
AFFILIATE SLOTLENGTHFloor-grazing (1/2 inch contact) or slight puddle (1-2 inches) for living rooms and bedrooms; hovering (1/2 inch above) for kitchens and doorways; never sill-length in main roomsAdd affiliate URL when configuredWhy it works
Because the curtain that meets the floor has the settled quality of having found its resting place — it reads as appropriate, proportional, and settled. The curtain that hovers above the floor reads as having been measured precisely to avoid touching the floor, which signals practical concern over aesthetic warmth. The meeting of fabric and floor (or the soft pool of excess fabric at floor) creates the visual completion that hovering specifically withholds. Warm home aesthetic prioritizes the settled quality; practical installation prioritizes the hovering.
Pro tip — Hem the curtains 1 inch longer than measured floor-grazing length to allow for the slight floor touch — the 1-inch extra produces a natural floor-grazing break that reads as intentional fullness. If you discover the 1 inch produces a puddle rather than a break (floors are rarely perfectly level), simply fold the bottom hem tape slightly higher and re-press.
Linen panels pooling 1 inch at the floor — the settled quality that hovering specifically withholds. See also: cozy-living-room-ideas
06Repurpose a Drop Cloth
A standard 9x12-foot canvas drop cloth from the hardware store ($15-25) makes two full-length curtain panels — the most budget-accessible no-sew curtain material that still reads as intentional. Drop cloth canvas has natural warm cream-oat tone, good weight for no-sew hemming, and a slightly rough texture that reads as intentionally rustic rather than as cheap fabric.
Drop cloth curtain specifics: PRODUCT — Husky or HDX 9x12 or 9x16 canvas drop cloth from Home Depot or Lowe's at $15-25. The 9x12 makes two panels at 4.5 feet wide by 12 feet long (trimmed to room ceiling height) — ideal for standard windows at 84-108 inch length. MATERIAL — 100% cotton canvas at approximately 8-10 oz per square yard weight. Appropriate weight for no-sew hem tape. PREWASHING — wash the drop cloth 2-3 times before cutting and hemming. This: (1) shrinks to final dimensions, (2) softens the canvas slightly, (3) removes the starch sizing used in manufacturing. THE COLOUR — drop cloth canvas is warm cream-oat with slight variation. This color works immediately in warm home rooms without any dyeing or treatment. CUTTING — cut the drop cloth in half lengthwise to produce two panels. Hem all four edges of each panel using iron-on hem tape (8 inches at bottom, 4 inches at top, 2 inches at each side). TOTAL COST PER WINDOW — $15-25 drop cloth + $8-12 hem tape + $10-20 clip rings + $20-40 curtain rod = $53-97 for a complete window treatment. DYEING OPTION — drop cloth takes fabric dye easily for custom colors.
AFFILIATE SLOTBUDGET9x12 canvas drop cloth ($15-25 from Home Depot/Lowe's) prewashed 3x; cut in half for two panels; hem all four edges; total window cost $53-97Add affiliate URL when configuredWhy it works
Because canvas drop cloth is woven cotton — a natural material with genuine warmth — at significantly below retail fabric pricing. The same canvas fabric sold as 'natural cotton curtain fabric' by home decor retailers costs $12-18 per yard; the identical material sold as hardware-store drop cloth costs $1.50-2.50 per yard. The warm home aesthetic values the material quality (100% cotton canvas) rather than the retail category, making the drop cloth the obvious choice for budget-aware warm home decorating.
Pro tip — Hem drop cloth curtains on all four sides (bottom, top, and both sides) rather than only the top and bottom — the factory-cut canvas edges on the sides can fray over time with washing and handling. A 2-inch side hem on each panel edge prevents fraying and produces a cleaner finished appearance at minimal extra hem tape cost.
Canvas drop cloth panels — the same woven cotton as retail fabric curtains at 80% less cost per yard. See also: budget-home-decor
07Add a Blackout Liner
A blackout liner behind the primary linen or canvas curtain panel provides light-blocking for bedrooms or media rooms while preserving the linen panel's warm front-facing appearance. The liner attaches to the clip rings behind the main panel (two layers on the same rings) or hangs on a separate inner rod. Cost: $15-40 for a pre-made blackout liner panel.
Blackout liner options and attachment: PRE-MADE BLACKOUT LINER PANELS — purchased separately at $15-40 per panel from Ikea (MAJGULL at $10-15), Amazon ($15-30), or Target ($15-35). Size to match the primary curtain panel width. ATTACHMENT METHOD 1 (clip rings) — attach the blackout liner to the same clip rings as the primary linen panel. Layer the liner behind the linen, clip both together through the liner's top hem and the linen's top hem. This creates a two-layer panel on one set of rings. ATTACHMENT METHOD 2 (velcro strips) — attach velcro along the top inner edge of the linen panel; attach corresponding velcro to the top of the blackout liner. The velcro holds the liner behind the linen when the curtain is closed, and the liner can be removed for washing independently. ATTACHMENT METHOD 3 (second rod) — mount a second thin inner rod (tension rod or thin cafe rod, $5-15) closer to the window; hang blackout liner panels on this rod separately from the outer linen panels. The most-flexible approach for independent operation. BLACKOUT QUALITY — true blackout liners block 95-100% of light; 'room darkening' liners block 70-85%. For bedrooms requiring total darkness (shift workers, light-sensitive sleepers), confirm 'true blackout' rather than 'room darkening.'
AFFILIATE SLOTOPTIONPre-made blackout liner panel ($10-40 from IKEA MAJGULL, Amazon, or Target); attach to same clip rings as main linen panel, OR tension rod as inner rod layerAdd affiliate URL when configuredWhy it works
Because linen fabric cannot be made truly light-blocking without coating or weaving processes that eliminate the natural breathable linen quality — blackout linen fabric is coated linen, which feels and looks different from natural linen and often costs significantly more. The separate liner approach preserves the primary linen panel's natural beauty and breathability while adding the functional blackout layer behind it. Each layer does what it's best at: linen provides warmth and appearance, blackout liner provides light blocking.
Pro tip — Choose a blackout liner in natural warm cream or oat tone rather than stark white — the warm-toned liner is less visible through the sheer weave of natural linen in daylight, and when the panels are open the liner's folded-back face is less visually jarring against warm room decor.
Linen outer panel and blackout liner on same clip rings — warm appearance from outside, light blocking from inside. See also: master-bedroom-ideas
08Use Curtain Weights for Drape
Curtain weights sewn into or hung from the bottom hem of curtain panels improve drape quality — heavier bottom hem means the panels hang straighter, close more fully at the center, and resist billowing in air conditioning or open-window breezes. For no-sew curtains, clip-on curtain weights or chain weights inserted into the bottom hem during hemming produce the improvement without sewing.
Curtain weight installation: CHAIN WEIGHTS — a 1/2-inch chain threaded through the bottom hem channel (the 8-inch hem folded before iron-on bonding). Insert the chain before applying the hem tape. The chain sits inside the hem fold, invisibly adding weight along the full curtain base. Curtain chain at $5-10 per yard from fabric stores or Amazon. CLIP-ON CURTAIN WEIGHTS — small lead or steel curtain weights with small clip attachment ($8-15 for a pack of 20). Clip these onto the bottom hem edge from inside. Not visible from the front; add weight to key positions (corners and center). CUT-TO-LENGTH LEAD WEIGHT TAPE — a thin lead-filled tape that replaces or supplements chain inside the hem. $10-20 per 10 yards from specialty curtain suppliers online. POSITIONING — weights at the two bottom corners are the minimum (prevents corner curling). Weights every 10-12 inches along the bottom hem is maximum weight for maximum drape. NO-SEW INSERTION — the weight tape or chain is inserted into the hem fold before heat-bonding the hem tape. Iron the hem tape above and below the weight position; the weight sits in the hem channel permanently.
AFFILIATE SLOTTECHNIQUEChain weights ($5-10/yard) inserted in bottom hem fold before iron-on bonding; OR clip-on weights ($8-15 per 20-pack) at corners and at 10-12 inch intervalsAdd affiliate URL when configuredWhy it works
Because sewn curtains typically include a lining (which adds weight throughout the panel) that no-sew single-layer curtains lack. The lining provides overall panel weight that improves drape throughout. No-sew single-layer curtains are lighter than lined sewn curtains and benefit more from the deliberate bottom-hem weighting that compensates for the absent lining weight. The curtain weight addition to no-sew curtains produces drape quality approaching that of lined sewn curtains at minimal cost.
Pro tip — Test the drape improvement from weights by temporarily hanging clip-on weights on the bottom hem before installation — the 10-minute test with 4-6 clip-on weights reveals whether the drape improvement is significant enough for your specific fabric and rod height before committing to the permanent chain-weight insertion.
Chain weights in the bottom hem fold — the drape improvement that compensates for no-sew curtains' absent lining weight. See also: cozy-living-room-ideas
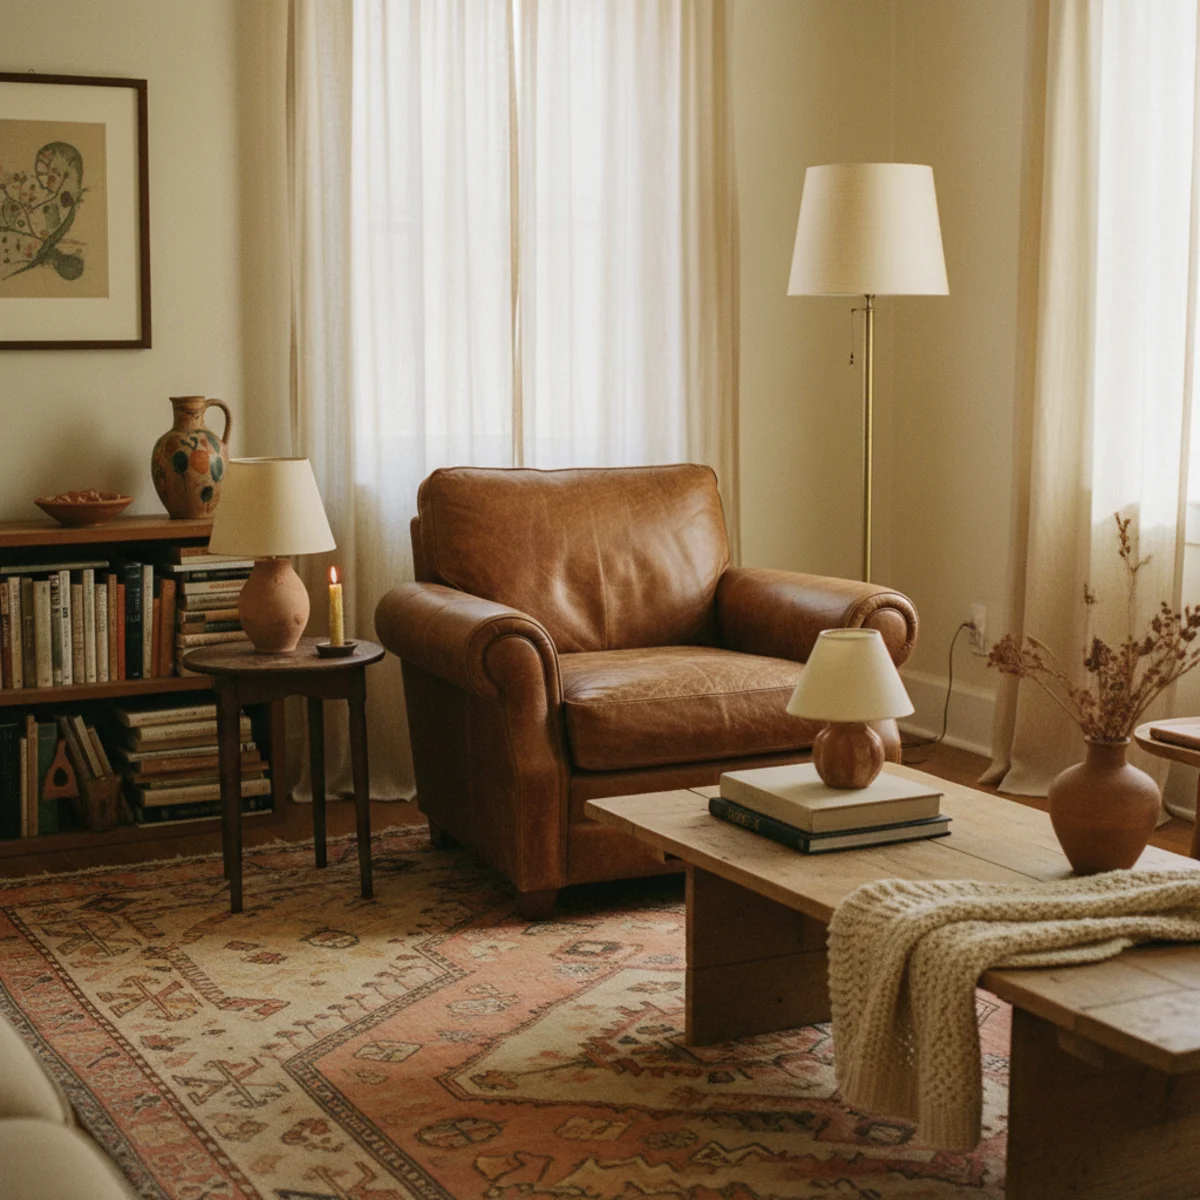
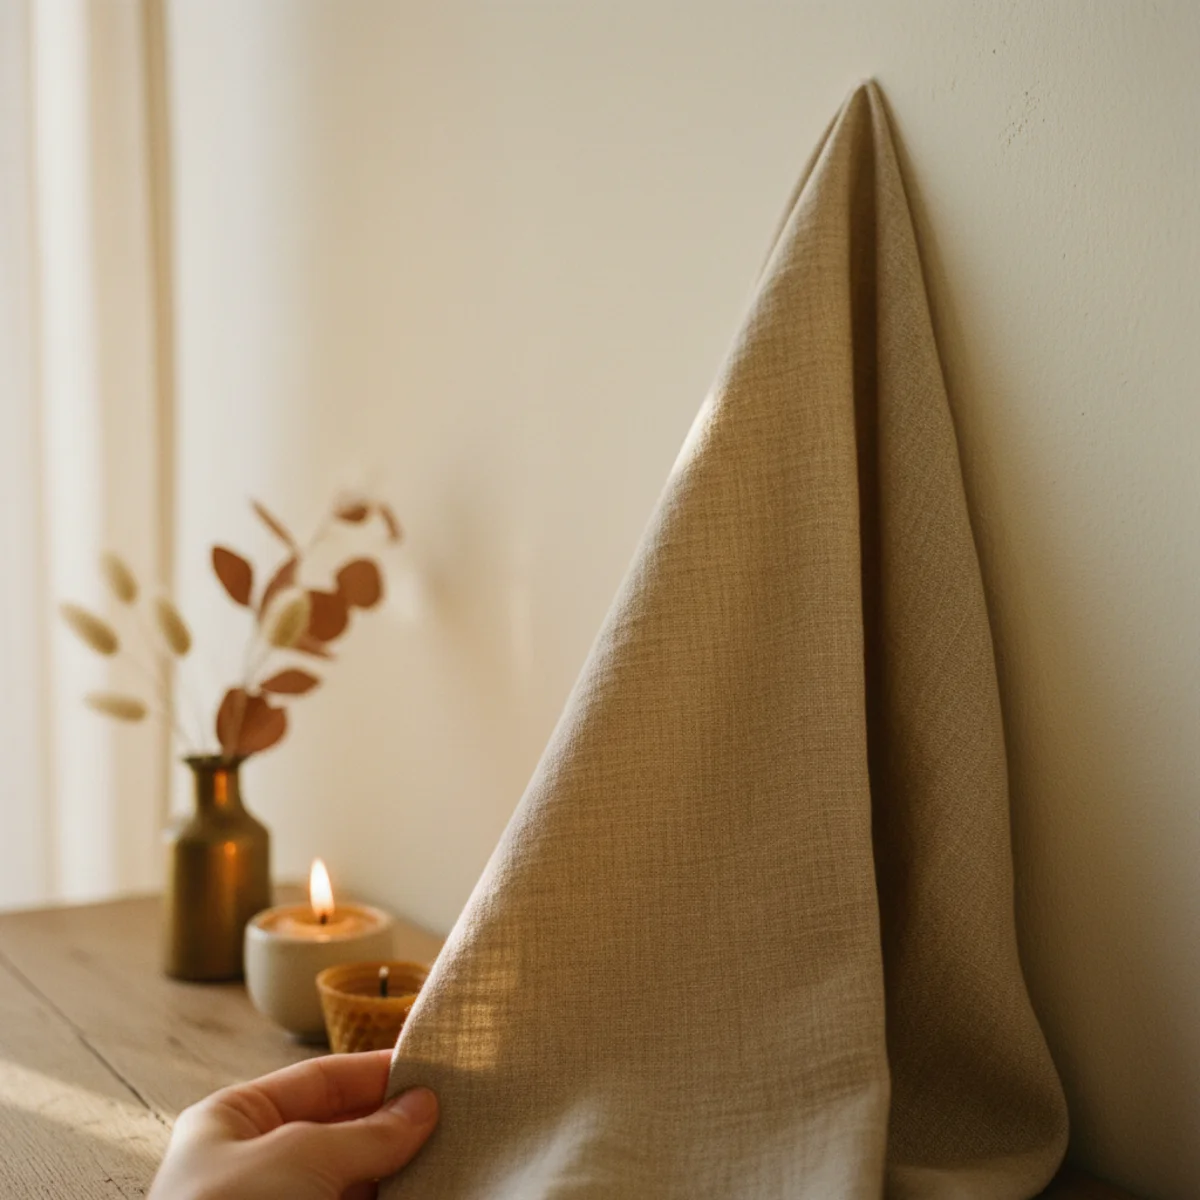
09Choose a Warm Neutral Tone
The correct color choice for no-sew curtains in warm homes is a warm neutral — natural unbleached linen (warm cream-oat), drop cloth canvas (same warm cream), soft sage, or warm taupe. Not bright white (too clinical), not cool grey (too cold), not commercial ecru with orange undertone (too beige-commercial). The warm neutral integrates the curtain into the room's overall warm palette rather than reading as a separate window element.
Warm curtain colour options: NATURAL UNBLEACHED LINEN — warm cream with slight oat variation and natural slubby texture. The most-authentic warm home curtain tone. Available in natural linen fabric from any linen fabric supplier. STONEWASHED CREAM LINEN — slightly lighter and more uniform than natural but still in the warm cream family. Many pre-made quality linen curtains (Pottery Barn Belgian Flax, West Elm Belgian Linen) offer this tone. SOFT SAGE — muted green-grey that reads as warm foliage-reference. Works particularly well with terracotta and wood-tone rooms. Requires fabric dye or pre-dyed linen fabric. WARM TAUPE — warm grey-brown, earth-tone adjacent. Available pre-dyed from some linen and canvas fabric suppliers. DROP CLOTH CANVAS — natural warm cream (same tonal family as unbleached linen) from the hardware store. AVOID — bright pure white (fights warm room palette, reads as new-construction blank), cool grey (pulls warmth from the room), chartreuse or saturated colors (compete with the room's warmer elements), bold patterns (no-sew curtains in bold pattern read as amateur unless perfectly executed).
AFFILIATE SLOTCOLOURNatural unbleached linen (warm cream-oat), stonewashed cream, soft sage, or warm taupe; avoid bright white, cool grey, bold patterns; confirm in room's natural lightAdd affiliate URL when configuredWhy it works
Because curtains occupy significant wall area in most rooms — typically 20-40% of the room's primary wall when open. A warm neutral curtain reads as part of the room's warm palette (an extension of the warm wall rather than a window treatment); a cool or bright curtain reads as a window element imposed on the warm room. The integration versus imposition difference determines whether the curtain reads as part of the room or as a separate object hanging in it.
Pro tip — Compare your proposed curtain fabric sample to both the room's wall paint and to the primary sofa or bed textile in full natural daylight before purchasing the full yardage — the curtain will be seen in that specific light relationship. What looks warm in the fabric store under commercial fluorescent may look slightly different in your room's morning or afternoon light. The at-home sample comparison takes 10 minutes and prevents color-regret at full yardage.
Natural linen in warm cream-oat — the tone that integrates into warm home palette rather than imposing itself as window treatment. See also: warm-paint-colors
10Make Cafe Curtains for a Kitchen
Cafe curtains — short curtains covering only the lower half of a window, mounted on a tension rod or thin rod at window mid-height — are the appropriate no-sew curtain project for kitchens. They provide privacy from eye-level view from outdoors while allowing full light into the upper half of the window. One panel, short, simple, and appropriate to kitchen function. Cost: $15-40.
Cafe curtain specifics: HEIGHT — covers the lower 40-50% of the window. Mount the rod at the midpoint of the window or slightly below, depending on what's visible from outside. FABRIC — for kitchen cafe curtains: 100% cotton canvas or medium-weight linen, 1.5x the window width in fabric width for light gather. FINISHED LENGTH — from the rod position to just below the window sill (hovering 1/2 inch above the sill). NOT floor-length for cafe curtains. HEMMING — same iron-on hem tape technique as full panels but simpler project due to smaller size. Top hem for clip rings (4 inches), bottom hem (3 inches). MOUNTING ROD — tension rod (requires no drilling, $5-10) inside the window frame at the correct height, OR cafe rod mounted with small brackets (3-4 inches of projection) at the mid-window position. TENSION ROD ADVANTAGE — the tension rod option produces kitchen curtains at essentially zero installation effort. Push the rod to the correct tension inside the window frame opening; hang the clipped panel. FABRIC CHOICE FOR KITCHEN — medium-weight cotton muslin ($3-6 per yard) or drop cloth canvas ($1.50-2.50 per yard equivalent) work well for kitchen cafe curtains — machine-washable, heat-resistant adjacent, and warm cream tones.
AFFILIATE SLOTVARIATIONLower 40-50% of window; drop cloth canvas or cotton muslin; tension rod inside frame (no drilling); clip rings; 1.5x window width fabric; kitchen and bathroom specificAdd affiliate URL when configuredWhy it works
Because kitchens need maximum natural light for task work (cooking, washing, preparation) and the lower-half coverage provides the privacy benefit (people at eye level outside cannot see in directly) while fully sacrificing neither light (top half open) nor warmth (bottom half covered). Full-length kitchen curtains close off the full window when closed and read as slightly formal for a working room. Cafe curtains are the functional-and-appropriate middle option.
Pro tip — Sew a narrow rod pocket at the top of the cafe curtain panel rather than using clip rings — cafe curtains are short enough that a simple 2-inch rod pocket (the only sewn element in the project) is easy to stitch by hand even without a machine, using a simple running stitch. The rod pocket hangs more smoothly than clip rings on a short panel. If truly no-sew, use clip rings; if comfortable with 5 minutes of hand stitching, the rod pocket is worth it.
Cafe curtain on tension rod at kitchen window midpoint — lower-half coverage preserving full upper-window light. See also: cozy-kitchen-ideas
11Iron Before Hanging
Ironing the fully hemmed curtain panels before hanging removes the storage fold creases and produces the smooth hanging surface that distinguishes finished curtains from freshly unpacked fabric. The ironing step takes 15-20 minutes per panel and produces a significantly more polished result. This is the step most DIY curtain projects skip and the one that most visibly distinguishes finished results.
Pre-hanging ironing technique: IRON TEMPERATURE — high cotton/linen setting for linen and canvas; medium for cotton muslin. Linen specifically benefits from slightly damp ironing (mist the panel lightly before ironing) for maximum crease removal. DIRECTION — iron with the grain of the fabric (typically vertically, following the warp thread direction) rather than across. Ironing across the weave can produce slight stretching in medium-weight linen. PRESSING CLOTH — use a thin cotton pressing cloth between the iron and the fabric face if the linen is darker-toned (prevents iron shine on the fabric surface). Not needed for natural unbleached linen but advisable for any dyed or darker fabric. FOCUS AREAS — iron the hem folds especially carefully to press them flat and sharp. The top hem fold and the bottom hem fold should be pressed to a clean crease. FINAL PRESSING ON ROD — after hanging, let the panels hang for 24-48 hours (the weight pulls out remaining vertical fold lines from storage). Any persistent horizontal crease lines that remain after 48 hours should be steamed out using a handheld steamer ($20-40) without removing from the rod.
AFFILIATE SLOTFINISHHigh iron with slight misting on linen panels before hanging; pressing cloth on darker fabrics; press hem folds sharp; 24-48 hours hang-straight after installingAdd affiliate URL when configuredWhy it works
Because fabric fold lines from storage or hemming work read as 'just made' or 'just unpackaged' — they signal that the curtain hasn't been lived with. Ironed fabric reads as settled and finished. The same two panels, one ironed and one not ironed but otherwise identical, read as different quality levels from across the room. The 20-minute ironing investment produces the finished result that all the other work was aiming toward.
Pro tip — Hang panels on a shower rod or temporary clothesline in the laundry room for the 24-48 hour hang-straight period before moving to their final window — the gravity hang in a controlled environment removes most vertical fold lines before the final installation. Only the remaining stubborn horizontal creases need the final pressing.
Pre-hanging ironing with damp cloth — the 20-minute step that transforms hemmed fabric into finished curtains. See also: bedroom-cozy-ideas
12Layer Over a Sheer
Layering the no-sew linen or canvas outer panel over a lightweight sheer inner panel produces the fullest, most-luxurious window treatment without requiring complex installation. The sheer filters harsh direct sun (reducing glare and UV fade to furniture) while the outer linen panel provides privacy and warm visual texture. Two simple panels produce a combined effect that neither achieves alone.
Layered curtain setup: SHEER INNER PANEL — pre-made sheer or semi-sheer panels in warm cream or natural linen weave at $15-40 per panel from IKEA, Target, or Amazon. IKEA RITVA (heavy cotton, not truly sheer but lighter weight) at $7-8 per panel is an excellent budget inner layer. Or purchase lightweight cotton voile fabric ($3-6 per yard) and no-sew hem it as the inner panel. TWO-ROD APPROACH — mount a secondary rod inside the window frame (tension rod, $5-10) for the sheer inner panel. The outer linen panel hangs on the primary high-and-wide rod. The two rods allow independent operation (open outer panels while keeping sheers closed). SINGLE-ROD APPROACH — both sheer and outer panel hang on the same rod with clip rings, alternating clips. The combination hangs as one unit; both open and close together. VISUAL EFFECT — the warm textured outer linen panel in the stacked-to-sides open position, combined with the soft sheer filtering the window light, produces the window treatment that reads as professional designer installation. PRACTICAL BENEFIT — the sheer protects furniture (sofas and floors near windows) from UV fade that direct sun produces. Even a light sheer blocks 30-50% of UV.
AFFILIATE SLOTTECHNIQUELightweight sheer or IKEA RITVA ($7-8) as inner panel on tension rod inside frame; no-sew linen outer on primary rod; two-rod for independent operation; UV protection benefitAdd affiliate URL when configuredWhy it works
Because professional window treatments in warm homes almost always use two layers — the sheer provides the function (light filtering, privacy, UV protection) while the outer panel provides the visual richness (warm texture, room scale, color). Single-layer curtains can be functional or beautiful; two-layer treatments are typically both. The layering also allows the space between the sheer and the outer panel to create dimensional depth at the window, which flat single-layer treatments lack.
Pro tip — Choose an IKEA RITVA panel as the inner layer for the most budget-conscious two-layer setup — at $7-8 per panel, RITVA provides the warm cream inner layer weight that makes a convincing sheer-like inner panel without requiring fabric purchasing. The RITVA is actually a heavy cotton rather than a true sheer, but in the two-layer setup it reads as an appropriate warm inner layer.
Linen outer, cream sheer inner — two simple panels producing the dimensional warmth that neither achieves alone. See also: cozy-living-room-ideas


How to make no-sew curtains step by step
Measure, hem with tape, hang from clips. An afternoon, no machine.
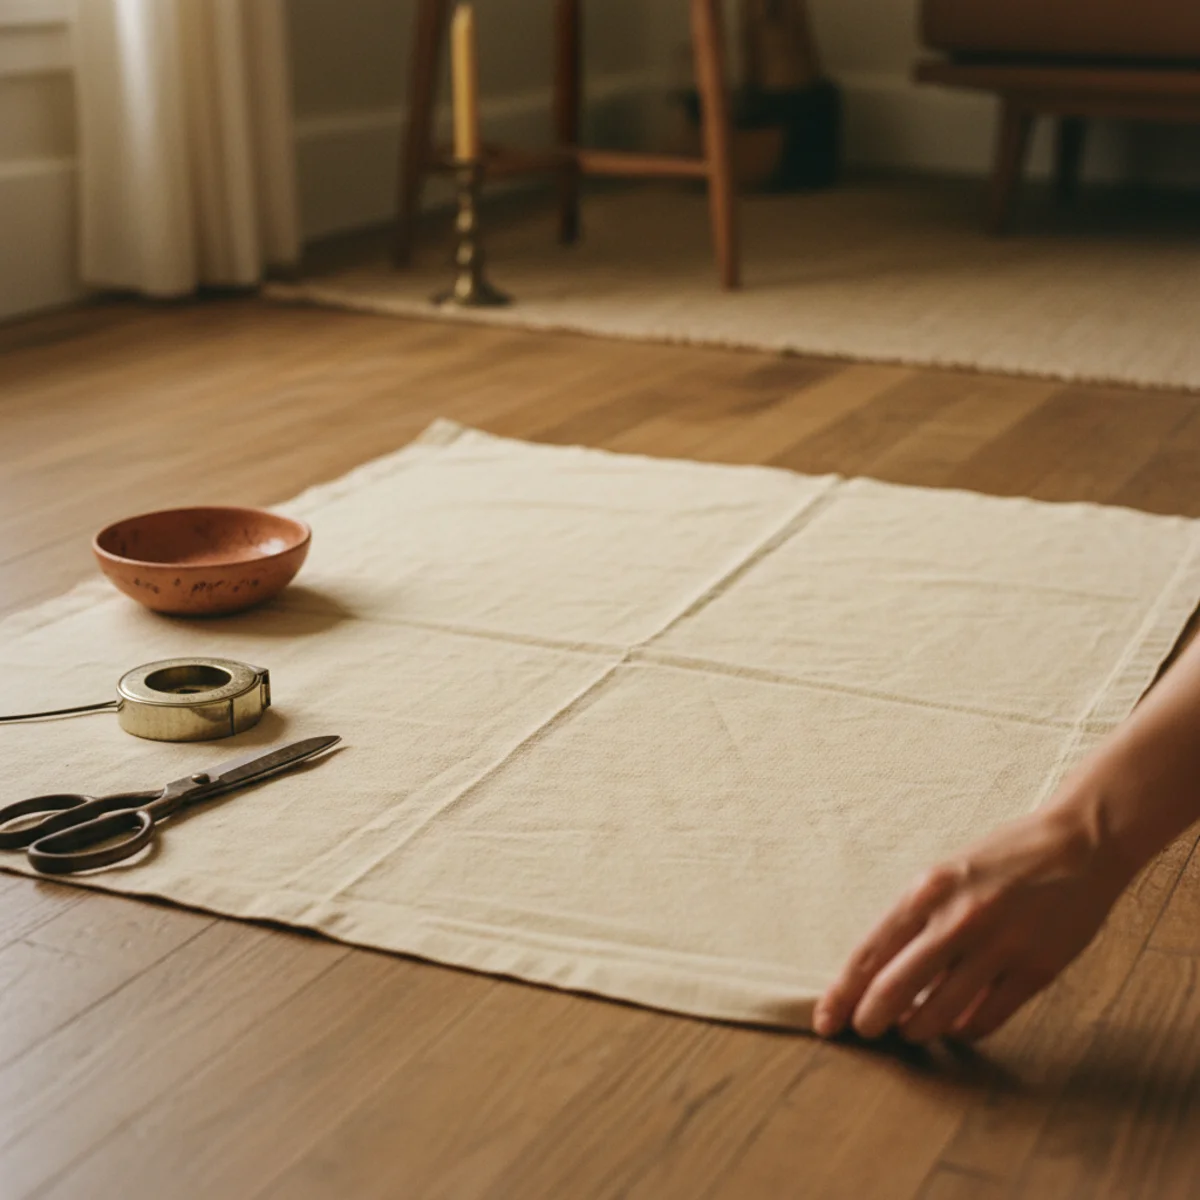
- 1Measure and cut the fabric
Mount the rod high and wide first, then measure from the rod to the floor for length and add for hems. Cut your linen to size, one panel per side.
- 2Bond the side and bottom hems
Fold each edge over twice, sandwich iron-on hem tape inside, and press firmly with a hot iron to bond clean hems with no sewing.
- 3Attach the clip rings
Clip evenly spaced rings along the top edge — this skips top hemming entirely and lets you fine-tune the length.
- 4Press and hang
Iron the finished panels, slide the rings onto the high, wide rod, and adjust so they graze or slightly puddle on the floor.
Quick tips
- Mount the rod high and wide — the single biggest curtain-hanging upgrade.
- Hem with iron-on tape: fold twice, sandwich the tape, press firmly.
- Use clip rings to skip top hemming and fine-tune the length.
- Hem to graze the floor or puddle slightly; short curtains read cheap.
- Buy linen by the yard or repurpose a washed drop cloth for cheap warm fabric.
- Add a clipped blackout liner behind the linen in a bedroom.
No-sew curtains by room
Floor-grazing linen panels on clip rings, mounted high and wide for height and warmth.
Linen with a clipped blackout liner for the warm look and a dark room; see our master bedroom guide.
Short no-sew cafe curtains on a tension rod for a warm, no-hardware window.
Washed canvas drop cloths hemmed with tape — the cheapest warm curtain there is.
Curtains hung high and long make a room feel taller and warmer — and you can make them without a single stitch.
Frequently asked questions
How do I make no-sew curtains with iron-on tape?+
What fabric should I use for no-sew curtains?+
How high should I hang curtains?+
How do I hang curtains without a rod pocket?+
What is the best iron-on hem tape for curtains?+
How much fabric do I need for no-sew curtains?+
Store-bought linen curtains cost a fortune and never come in the right length, which is exactly why making your own no-sew version wins: a length of linen, iron-on hem tape, and clip rings get you warm, custom-length drapes in an afternoon for a third the price. We'd mount the rod high and wide before worrying about the fabric; hanging curtains high and floor-grazing is the real upgrade, making a room feel a foot taller. No machine, no skill, no stitch — just an iron, an afternoon, and a warmer, taller-feeling room.