These twelve DIY headboard projects are tested across real bedrooms and real skill levels — beginners with no tools who need no-drill solutions, intermediate DIYers comfortable with a drill and saw, and confident DIYers wanting a full-weekend build project. Each project below names specific materials with exact dimensions and sourcing, exact tools required, approximate build time, total cost, and what makes that particular headboard project produce warm-home character rather than generic DIY result.
Most DIY headboard failures come from using the wrong materials — cheap foam that flattens, polyester fabric that reads synthetic, plywood panels that look exactly like plywood. The projects below all start from warm materials (linen, solid wood, vintage textiles, reclaimed lumber) and produce headboards that read as intentionally-made rather than as cost-saving alternatives to furniture-store purchases.
By the end of this guide, you'll know how to make twelve different DIY headboards — from the beginner 30-minute hung-rug-or-tapestry to the advanced weekend-build tufted linen panel — using warm materials that produce genuine bedroom character and warmth across years of daily presence.
WHAT'S INSIDE
- The upholstered linen panel — the most popular DIY headboard for good reason
- Reclaimed wood planks — the weekend project that produces professional-quality results
- A hung rug or tapestry — 30 minutes, no tools, no damage, completely reversible
- The painted headboard shape — the faking-architecture approach for renters
A headboard finishes a bedroom the way a frame finishes a picture. And it's one of the easiest things to make yourself.
— Studio McGee blog [citation needed — verify before publish]
What makes a good DIY headboard?
A good DIY headboard anchors the bed visually, adds warmth and texture behind it, and is built sturdily enough to lean against. The three main routes are upholstered (plywood, foam, batting, and fabric), reclaimed or planked wood, and no-build options like a hung rug, a row of leaning shutters, or a painted shape on the wall.
What makes it forgiving for DIY is that a headboard is essentially a flat panel — no complex joinery, no moving parts. An upholstered one is foam and fabric stapled to plywood; a wood one is boards joined and mounted; a no-build one skips construction entirely. The skill is in the finishing — taut fabric with neat corners, oiled rather than lacquered wood, secure mounting — and in choosing warm materials. A linen-upholstered or warm-wood headboard reads cozy where a cold metal frame reads like a hotel.
More in DIY you may love
See allWhy DIY headboards are everywhere in 2026
The headboard became a focal point of the warm, layered bedroom, and the DIY version exploded because store headboards are expensive and a custom one is surprisingly achievable. Pinterest's DIY headboard searches climb every year, toward upholstered linen, reclaimed wood, and clever no-build options.
The honest appeal is cost and customization. A store upholstered headboard runs into the hundreds; a DIY one costs the price of plywood, foam, and fabric — often a quarter as much — and you choose the exact size, shape, and material. As the cozy bedroom prized warm texture behind the bed, the DIY headboard let people get a linen or wood one affordably, and the slight imperfections of handmade read as character.
18 DIY headboard ideas
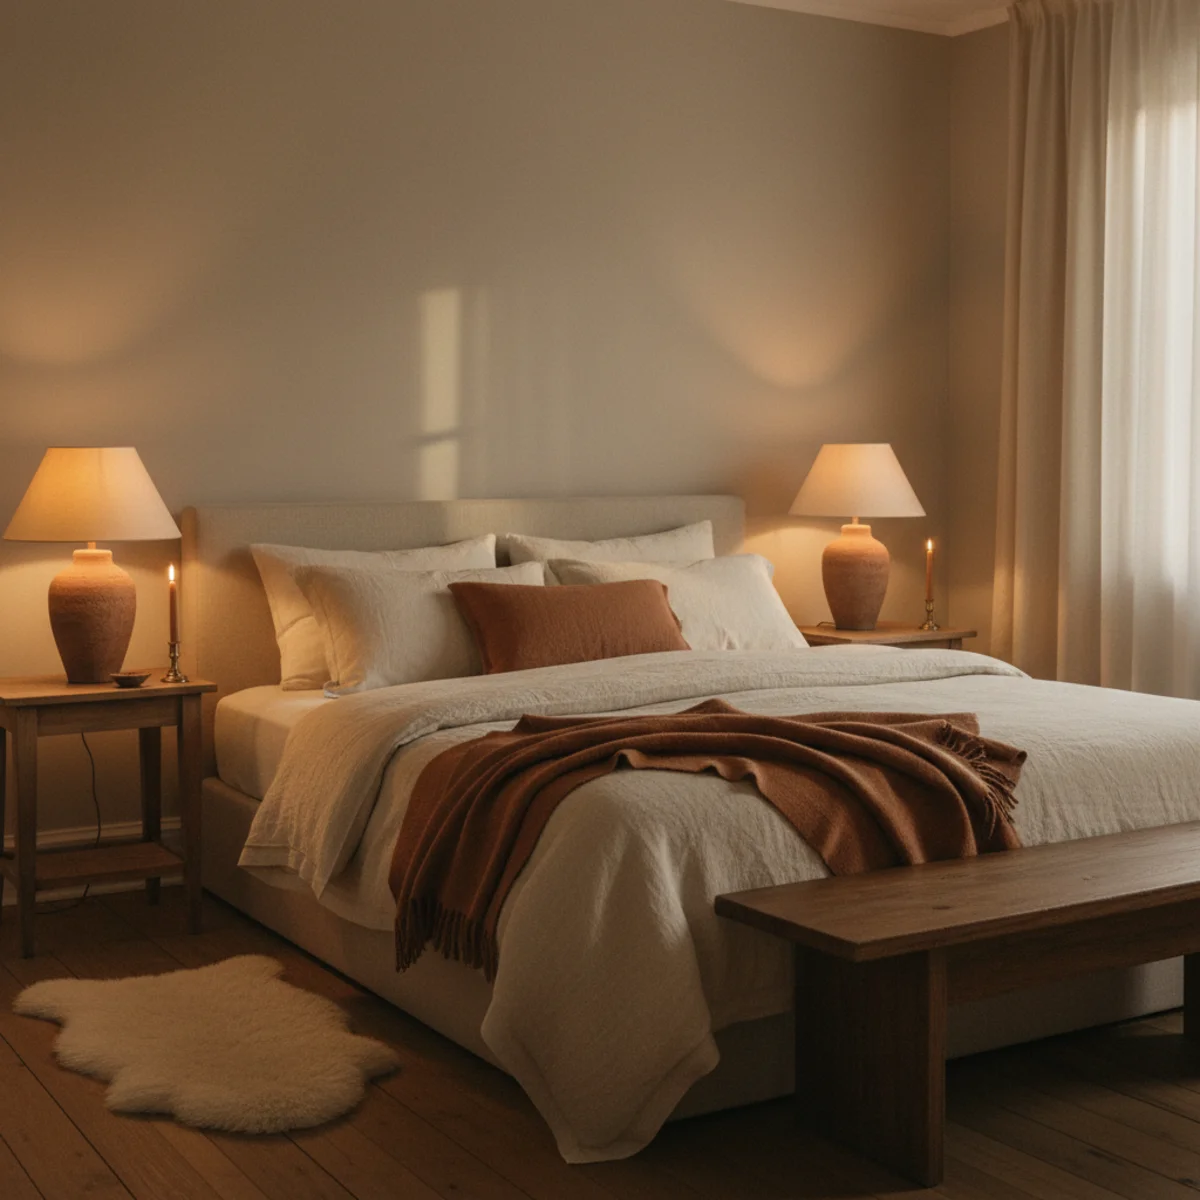
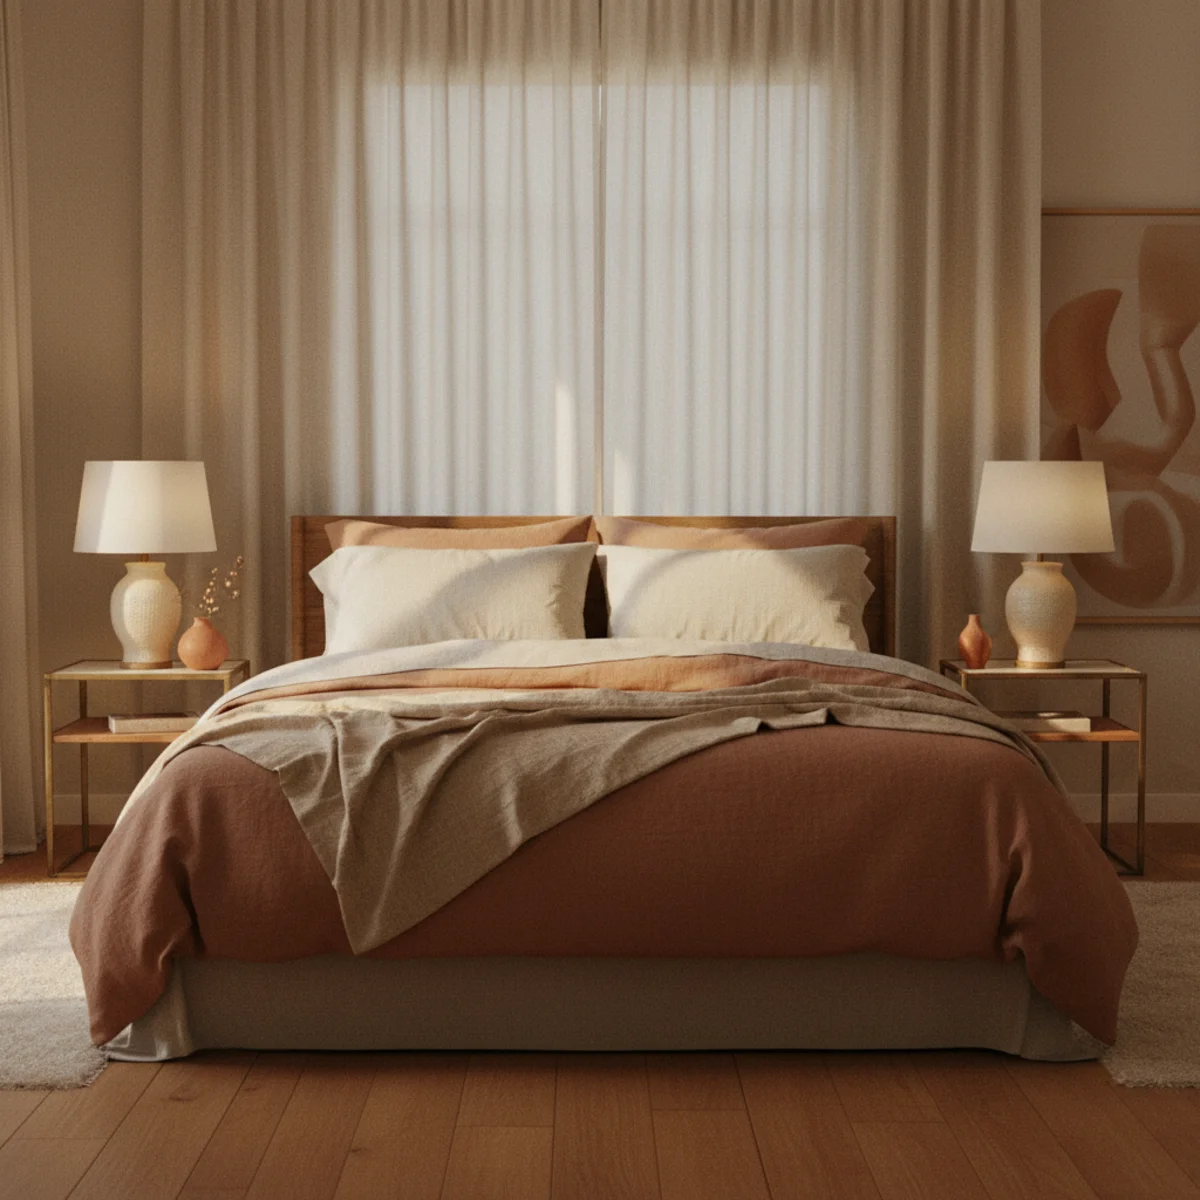
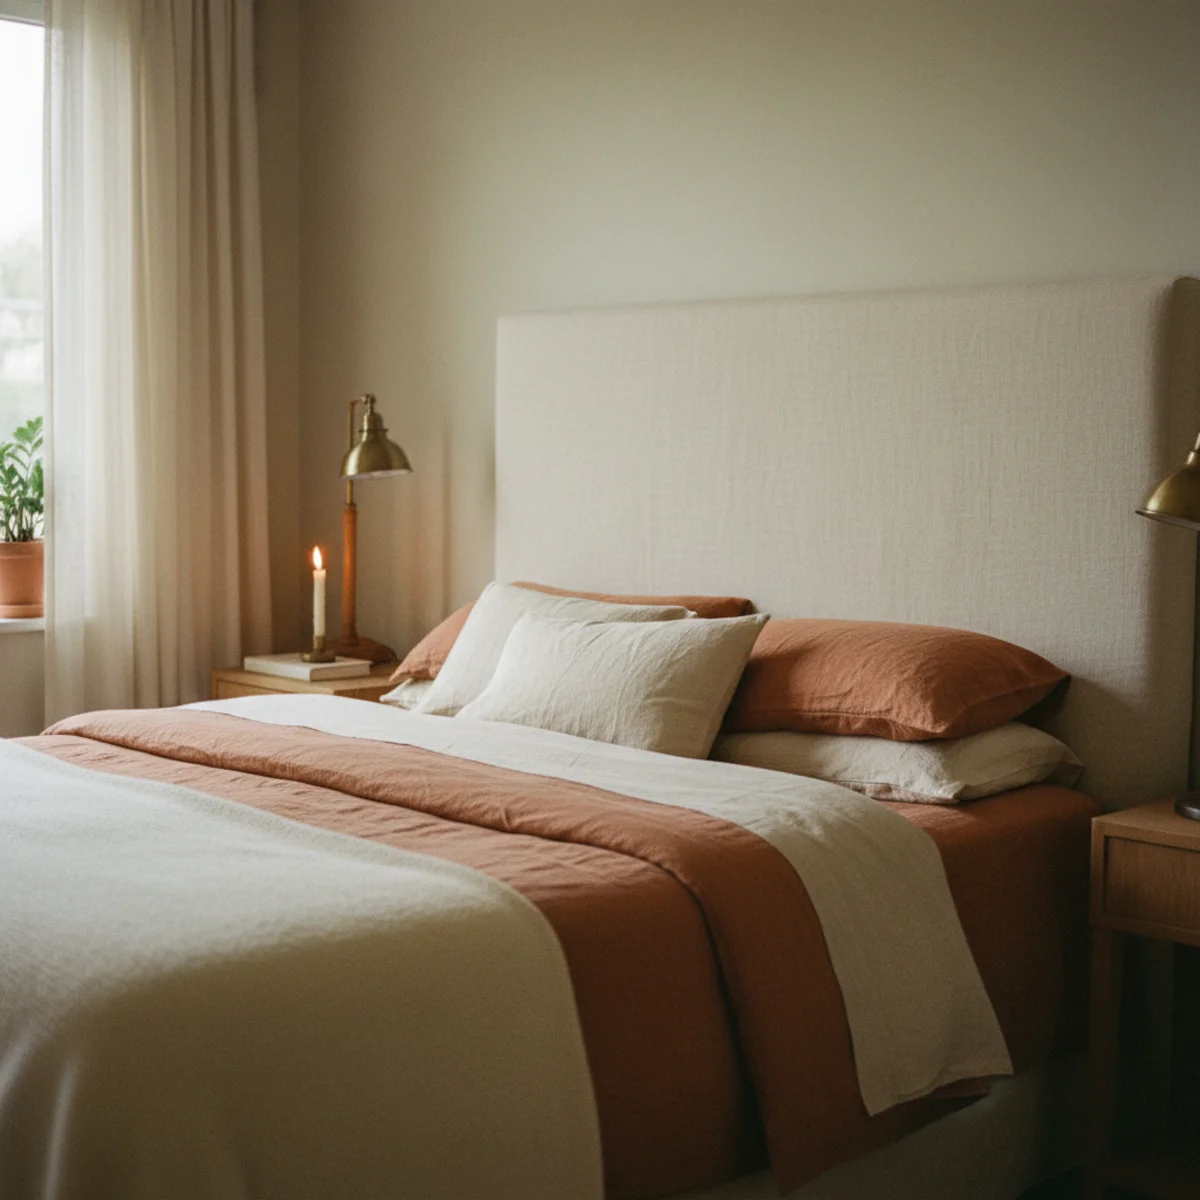
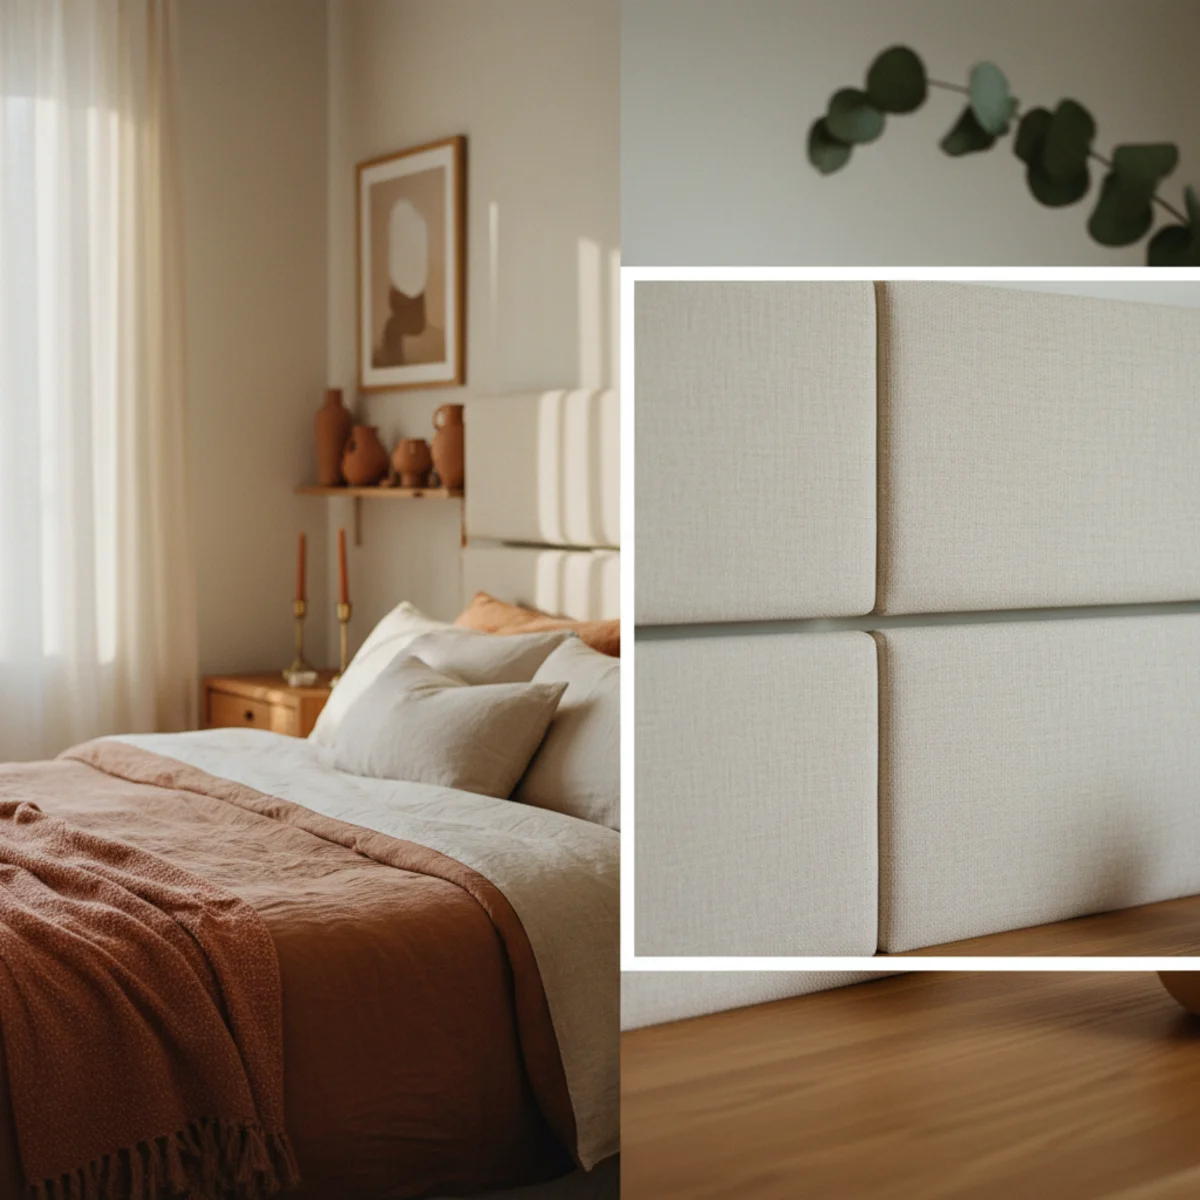
01Upholstered Linen on Plywood
The most popular DIY headboard: a padded fabric-covered plywood panel mounted to the wall behind the bed. It takes one weekend, costs $80 to $200, and produces a headboard that reads as custom furniture rather than as DIY. The linen-on-plywood is the gold standard because linen's natural texture reads warm and the upholstered padding creates the tactile comfort that bare-wood headboards miss.
Upholstered linen headboard build: DIMENSIONS — full-width panel: same width as bed + 4 to 6 inches each side (queen bed = 66-68 inches wide, king = 82-84 inches wide). HEIGHT: 24 to 48 inches tall depending on ceiling height (typical queen headboard 36-42 inches tall). MATERIALS — 3/4-inch plywood ($20-40 per 4x8 sheet, have cut at hardware store), 3-inch high-density foam ($30-60 for sheet cut to size from Foambymail.com), 2 layers of polyester batting ($10-20 per yard), 1.5 yards of washed linen fabric ($15-30 per yard from fabric stores or Etsy), staple gun ($15-30) and 3/8-inch staples. PROCESS — cut plywood to size. Glue foam to plywood front. Wrap 2 layers of batting over foam and staple to back. Pull linen taut over batting and staple to back — start at center of each edge, work toward corners. Fold corners neatly. MOUNTING — D-ring hardware on back of panel, mount to wall studs. TOTAL COST — $80-150 in materials. BUILD TIME — 6-8 hours including drying times. FABRIC ALTERNATIVES — bouclé ($20-40 per yard, luxurious nubby texture), velvet ($15-35 per yard, rich and warm), washed cotton canvas ($8-15 per yard, durable and casual), vintage ticking stripe ($12-25 per yard).
AFFILIATE SLOTPROJECT3/4-inch plywood + 3-inch foam + batting + washed linen; queen size $80-150 materials; 6-8 hours build time; D-ring wall mountAdd affiliate URL when configuredWhy it works
Because washed linen's natural slubby texture reads warm in a way that cotton and synthetic fabrics specifically don't — the visible fiber irregularity and slight wrinkling of linen communicates 'natural material' where smooth cotton or polyester communicates 'commercial upholstery.' The same headboard in washed linen versus polyester-blend reads as entirely different aesthetic quality. The linen's aging character (it softens and develops slightly with each wash and touch) also means the headboard improves rather than deteriorates across years of bedroom presence.
Pro tip — Pre-wash the linen fabric 2-3 times before cutting and stapling — the pre-washing shrinks the linen to its final dimensions (linen can shrink 5-8% in first wash) and develops the soft slightly-wrinkled character. Cutting and stapling pre-washed linen produces a headboard that maintains its appearance; using fresh-from-bolt linen risks shrinkage distorting the fabric after installation.
Upholstered washed linen panel — the gold-standard DIY headboard that reads as custom furniture. See also: master-bedroom-ideas
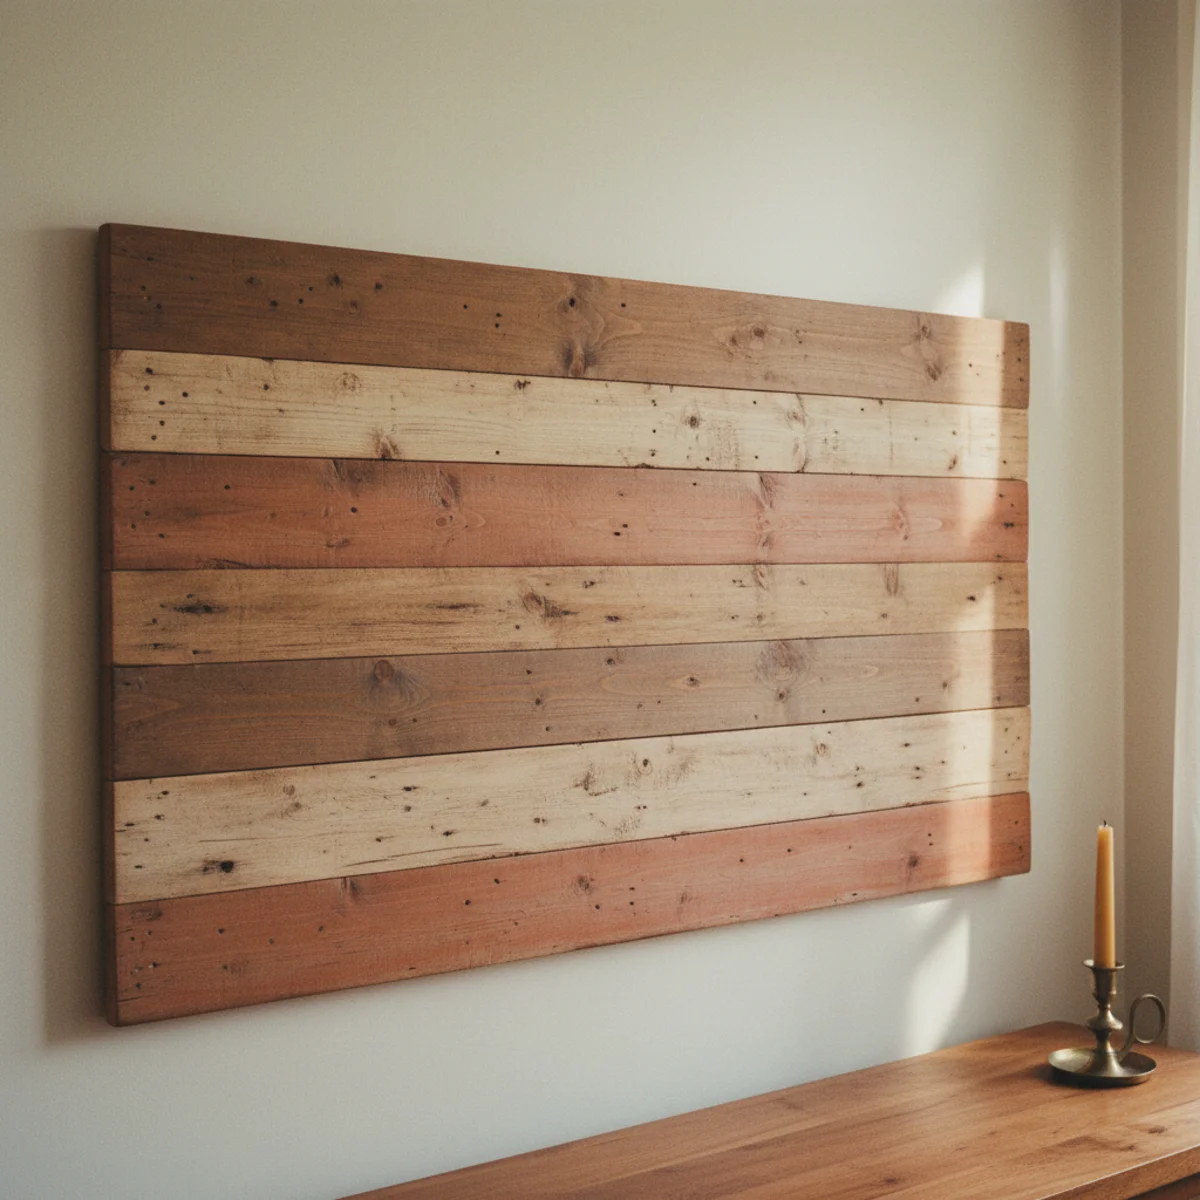
02Reclaimed Wood Planks
A reclaimed wood plank headboard — horizontal boards of actual salvaged or vintage wood mounted to the wall behind the bed — produces the most-authentic farmhouse bedroom character of any DIY headboard. The natural wood variation, nail holes, grain character, and weathered surface that reclaimed wood carries are the character that commercial headboards try and fail to fake. Cost: $40-120 depending on wood sourcing. Build time: 4-6 hours.
Reclaimed wood headboard build: WOOD SOURCING — barn wood from estate sale demolitions (free to $30), old fence boards ($0.50-$2 per linear foot from replacement projects), vintage flooring from renovation salvage, pallet wood (free from garden centers or hardware stores), construction lumber with natural character (knots, grain variation) from hardware store ($20-50). DIMENSIONS — headboard width matching or slightly wider than bed. HEIGHT: 24 to 36 inches for plank headboard (full-bed-width planks arranged horizontally). NUMBER OF PLANKS — 5 to 8 horizontal planks of 4 to 6-inch width, creating 24 to 48-inch total height. PREP — cut planks to headboard width if needed (circular saw or hardware store cutting). Light sand with 80-grit to remove splinters only (preserve character). MOUNTING OPTIONS: DIRECT TO WALL — drill pilot holes through planks, screw through into wall studs. PLYWOOD BACKING — mount all planks to a 1/2-inch plywood backer panel first, then mount the whole panel to wall. More stable and easier to level. FINISH — Danish oil for warm matte glow, or leave natural for more rustic reading.
AFFILIATE SLOTPROJECTSalvaged barn wood / fence boards / pallet wood; 5-8 planks horizontal, 24-36 inch height; Danish oil finish; direct stud mount or plywood backerAdd affiliate URL when configuredWhy it works
Because actual reclaimed wood has real history — specific grain patterns, nail holes from previous use, weathering checks, color variation from sun and moisture — that purchased distressed wood approximates but doesn't match. The specific individual character of reclaimed planks (no two boards are the same) produces the warm-collected aesthetic; consistently-distressed commercial 'reclaimed-look' products produce imitation. The same headboard in genuine salvaged barn wood versus new pine stained to look old reads as qualitatively different material.
Pro tip — Collect reclaimed planks from multiple sources for maximum variety — some barn wood, some old fence board, one plank from a vintage flooring sample. The varied sources produce the most-interesting grain and color variation across the headboard's horizontal planks.
Reclaimed planks with nail holes and weathered grain — real history that commercial imitation cannot replicate. See also: modern-farmhouse-decor
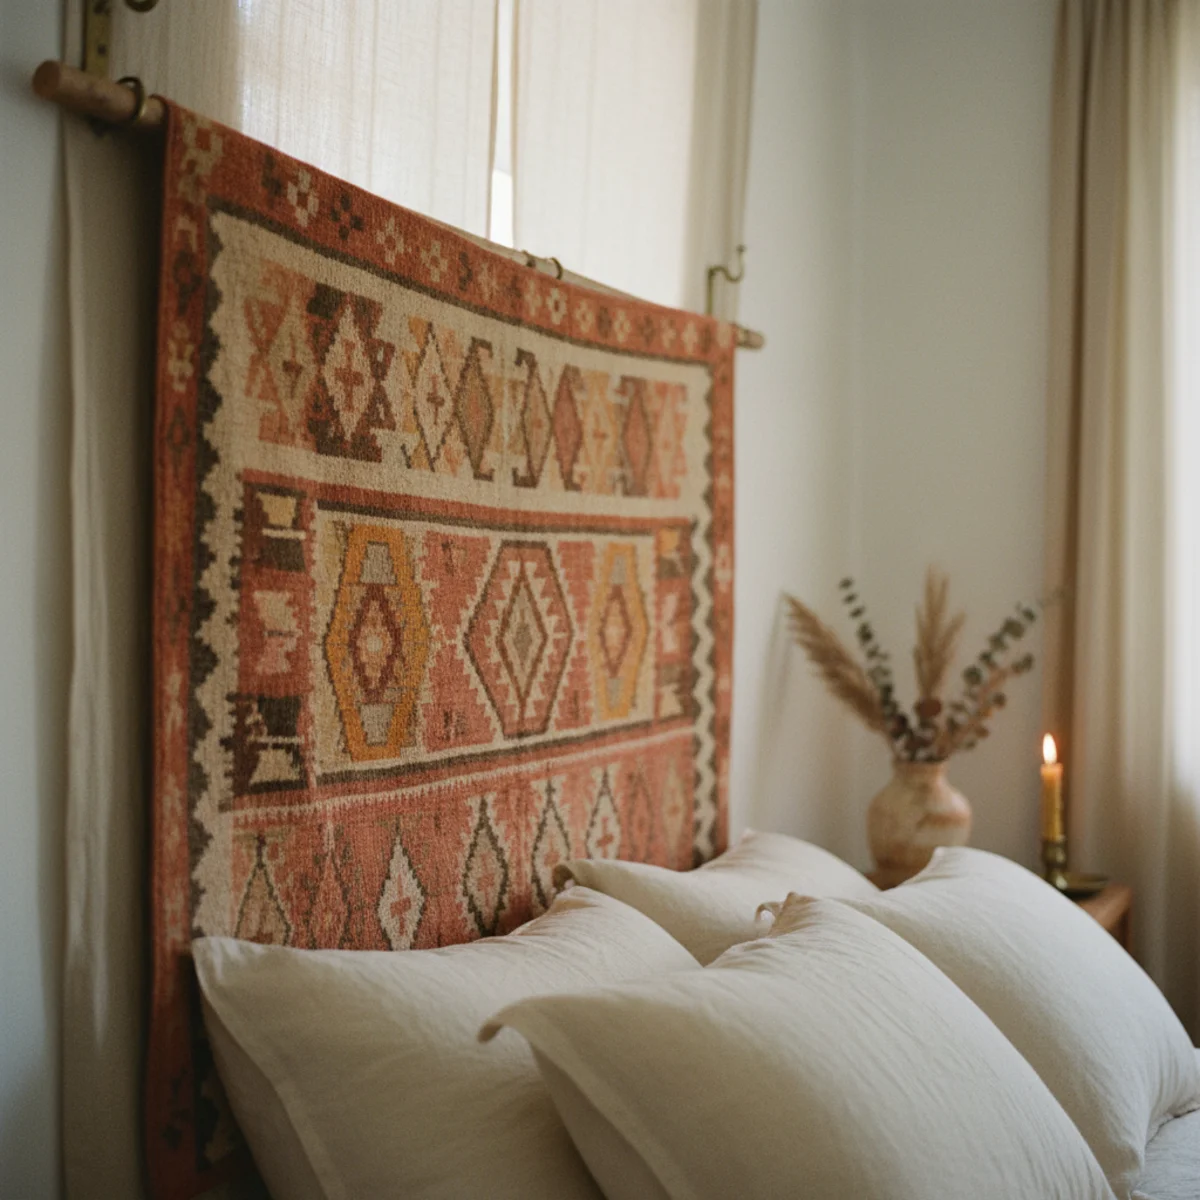
03A Hung Rug or Tapestry
Hanging a vintage rug, a handwoven tapestry, or a large textile behind the bed is the fastest, no-tools, completely-reversible headboard alternative. A vintage Turkish kilim, a woven wall hanging, or an antique quilt hung on a dowel or directly to the wall creates a headboard with more warmth and character than most purchased headboards at a fraction of the cost. Build time: 30 minutes. Cost: $30-200.
Hung textile headboard specifications: TEXTILE OPTIONS — VINTAGE KILIM OR TURKISH RUG: 4x6 or 5x8 foot vintage kilim hung horizontally behind the bed ($60-300 from Rugs USA, Etsy vintage rug shops, or estate sales). HANDWOVEN TAPESTRY: handmade or artisan woven wall hanging in warm earth tones ($40-200 from Etsy or local artisan markets). ANTIQUE QUILT: vintage patchwork quilt hung on a wooden dowel ($30-150 from estate sales). LARGE VINTAGE LINEN OR COTTON TEXTILE: antique grain sack or large embroidered piece ($40-200). HANGING METHODS: DOWEL ROD — run a 1-2-inch diameter dowel through rug loops, quilt hanging sleeve, or through a fabric sleeve sewn or safety-pinned to textile top edge. Hang dowel on two nails or hooks into wall studs. TAPESTRY HANGER — purpose-built clamp system that grips the textile's top edge ($15-30 from Amazon or craft stores). VELCRO STRIPS — heavy-duty command velcro strips (holds up to 16 lbs) for lighter textiles that lie flat. SIZING — the textile should extend 2-4 inches past each side of the bed at minimum, and 24-40 inches tall for headboard visual effect.
AFFILIATE SLOTPROJECTVintage kilim, handwoven tapestry, antique quilt, or large embroidered textile hung on dowel or tapestry hanger; 30 minutes, no permanent hardwareAdd affiliate URL when configuredWhy it works
Because textiles have warmth, texture, pattern, and material character that structural headboard materials (plywood, MDF, metal) require significant effort to approach. A vintage kilim hung behind a bed has handwoven pattern, decades of fiber history, and visual richness from the weave — it reads as the bedroom's most-interesting element immediately. The reversal from 'installed piece of furniture' to 'hung textile' doesn't diminish the headboard effect; it often improves it because the textile can be more beautiful than the structural alternatives at the same cost.
Pro tip — Source vintage kilims from rug dealers who specialize in antique Turkish or Persian rugs — these often have estate-sale-quality pieces at $60-150 that are both more authentic and more beautiful than the 'vintage-style' reproductions at big-box retailers at similar prices. Search 'vintage kilim' on Etsy filtered to $50-150 price range for the best options.
Vintage kilim on wooden dowel — 30-minute no-tools headboard with more warmth than most constructed alternatives. See also: thrifted-decor-ideas
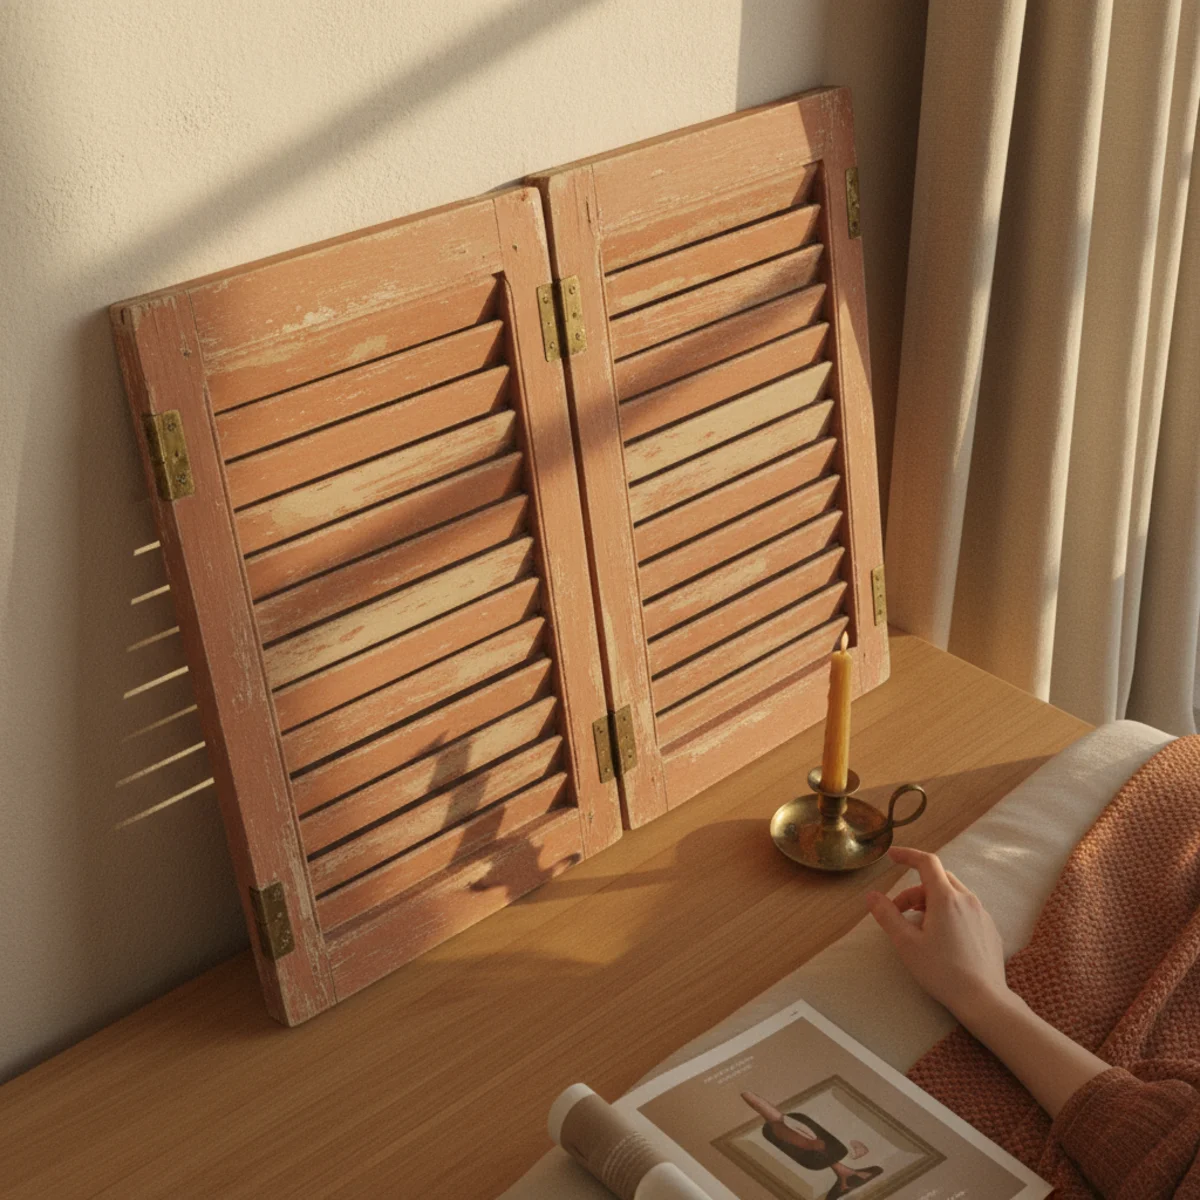
04Leaning Shutters or Doors
A pair of vintage shutters or a vintage panel door leaned against the wall behind the bed (rather than mounted) creates architectural headboard character with zero wall commitment. The leaning posture reads as warm-collected, is completely reversible, and is repositionable without any tools or hardware. Cost: $40-200 for vintage shutters or doors. Setup time: 10 minutes.
Leaning shutter or door headboard specifications: VINTAGE SHUTTERS — pair of old wooden shutters at 18-24 inches wide each, positioned flanking the headboard zone or overlapping at center ($20-80 per shutter from Craigslist Marketplace, Habitat for Humanity ReStore, architectural salvage yards). Source shutters with visible weathering, original paint (even peeling), and honest age. VINTAGE PANEL DOOR — single antique panel door or interior door leaned against wall at the bed center ($30-150 from architectural salvage). The door's vertical orientation creates dramatic proportions. DOUBLE SHUTTER FLANKING — position one shutter at each side of the bed, each leaning against the wall. The flanking symmetry reads as formal headboard architecture. SINGLE DOOR CENTERED — one door panel leaned at center behind bed, slightly taller than typical headboard (typically 80-inch door creates dramatic height). STABILITY — lean shutters/doors at approximately 5-degree backward tilt against wall. For safety (particularly in earthquake-prone regions or households with children), anchor top of leaning piece to wall with a small L-bracket or screw eye and picture wire to a wall hook. PAINT OR FINISH — leave original patina for most authentic look. If repainting, chalk paint in cream, sage, or deep terracotta reads well against bedroom warm aesthetic.
AFFILIATE SLOTPROJECTVintage shutters ($20-80 each) or antique panel door ($30-150); leaned at 5-degree backward tilt; anchor top with picture wire for safetyAdd affiliate URL when configuredWhy it works
Because vintage shutters and doors carry architectural character that specifically translates to bedroom scale — the louvered or paneled forms, the original hardware, the weathered paint layers, the wood grain — all of which are architectural details at bedroom scale. A vintage panel door behind a bed immediately reads as 'architectural character' even though it's literally a door leaned against a wall. The warmth of real aged wood and real original paint far exceeds anything manufactured specifically for headboard use at similar cost.
Pro tip — Shop Habitat for Humanity ReStore specifically for vintage shutters and doors — ReStore receives donations from home renovation projects and typically has significant shutter and door inventory at $5-40 per piece. The proceeds support Habitat for Humanity construction, making it the best ethical sourcing option for architectural salvage.
Vintage weathered shutters leaned as flanking headboard — architectural character from zero hardware. See also: modern-farmhouse-decor
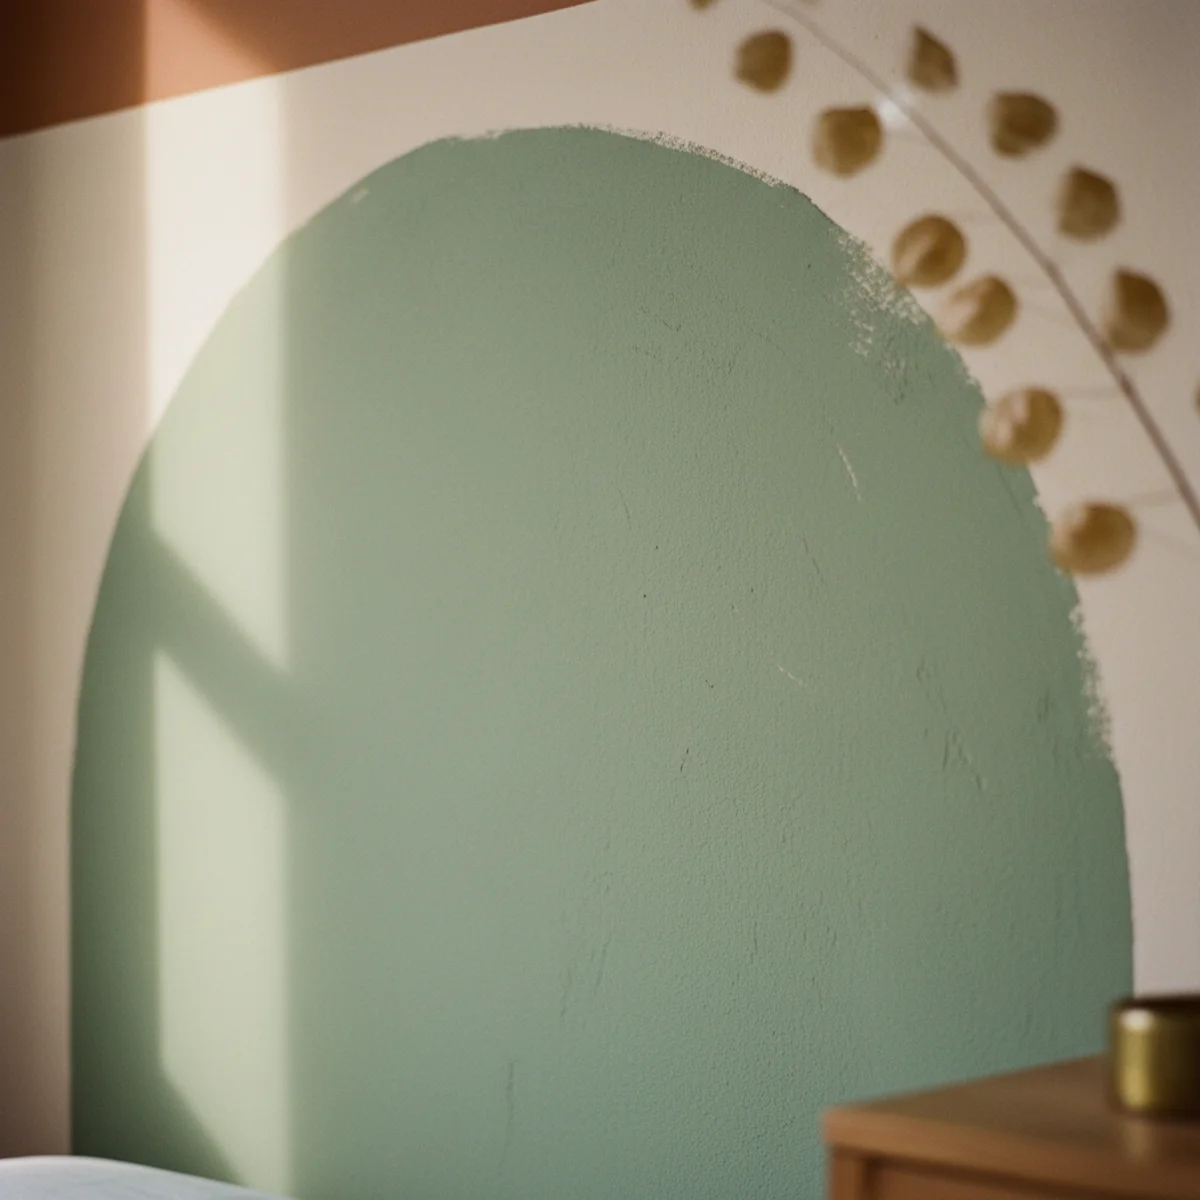
05A Painted Headboard Shape
Painting a headboard shape directly on the wall behind the bed — arch, rectangle, or organic shape — creates architectural presence without any construction or hardware. The painted shape defines the bed's visual zone and adds color accent behind the bedding. Best for renters (patch-and-paint at move-out), minimalists, or anyone wanting maximum impact from minimum effort. Cost: $15-40 in paint. Time: 2-4 hours.
Painted headboard specifications: SHAPE OPTIONS — ARCH: classic headboard arch shape, 30-42 inches tall, painted above the bed center. RECTANGLE: simple rectangle painted at headboard dimensions (wider than bed, 24-42 inches tall). ORGANIC: free-form organic shape tracing from pencil sketch. DIMENSIONS — width: 10-20 inches wider than the bed on each side. Height: 24-42 inches above the mattress top. PAINT COLOR — one or two shades deeper than the wall color for a tone-on-tone effect, or a full accent color (sage, terracotta, deep cream against white wall). PROCESS — sketch the shape lightly on the wall with pencil, tape the boundary with painter's tape, paint inside the shape with 2 coats of eggshell. Remove tape while paint is still slightly wet for cleanest edge. ARCHED EDGE TECHNIQUE — trace a large arched shape using a pencil tied to a string fixed at a center point (compass technique), or print an arch template and trace in sections. RENTER-FRIENDLY — the painted headboard is a coat of primer + paint to remove at move-out. WARM PALETTE OPTIONS — sage (F&B Cromarty 285), terracotta (BM Pottery 1297), deep cream (F&B Pointing 2003 two shades deeper), or warm putty tone.
AFFILIATE SLOTPROJECTArch, rectangle, or organic shape painted in wall accent color; 10-20 inches wider than bed per side; 24-42 inches tall above mattress; $15-40 in paintAdd affiliate URL when configuredWhy it works
Because the human eye reads bounded areas of color as objects — the painted rectangle or arch behind the bed registers as architectural element rather than as wall decoration because its shape and position directly reference the furniture it's marking. The visual effect is the same as a constructed headboard for the photographic and casual-glance register, while costing $15-40 in paint rather than $300-1,000 in headboard. The technique is used by designers to create architectural presence when budget or rental constraints prevent actual construction.
Pro tip — Use the same paint as one shade deeper than the existing wall color for the most-sophisticated result — the tone-on-tone painted headboard reads as architectural shadow rather than as applied color, which is more sophisticated than a contrasting color and more forgiving of imperfect tape lines at the edges.
Painted arched headboard shape in sage — $15-40 creating the same architectural presence as a constructed headboard. See also: sage-green-decor
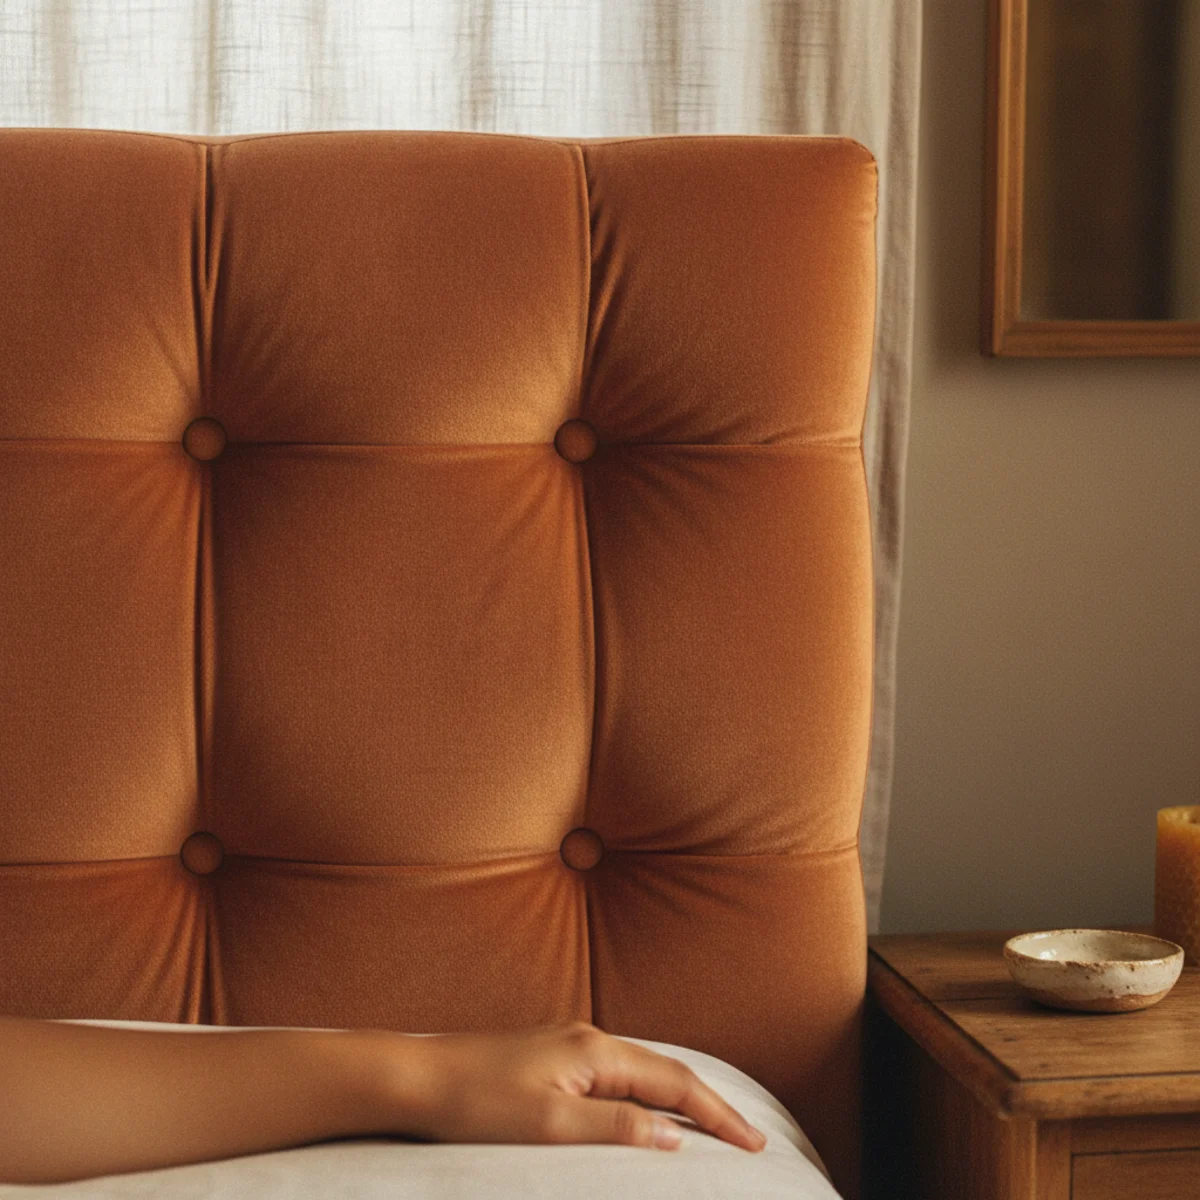
06Tufted Upholstered Panel
A tufted upholstered headboard — fabric pulled into a grid of button-through indentations across the padded surface — adds visual texture and craft-signal that flat-upholstered panels miss. The tufting process is more time-consuming (adds 4-6 hours) but produces professional-quality results that justify the effort. Best in velvet ($30-60 per yard) or heavy linen ($15-30 per yard). Total cost: $150-300.
Tufted upholstered headboard process: MATERIALS — same as standard upholstered panel (per item 1) plus: upholstery buttons ($15-30 for 12 buttons covered in matching fabric), long upholstery needle ($5-10), heavy-duty thread ($5-10), button awl or drill bit for making holes through foam. PLANNING THE TUFT GRID — mark a diamond grid pattern on the front foam surface. For standard 60-inch wide headboard: 5 horizontal positions spaced 12 inches, 3 vertical rows spaced 10 inches = 15 button positions. Or 4x4 = 16 positions. PROCESS — after stapling fabric, use long upholstery needle to push thread through the marked positions, pulling tightly enough to create the distinctive indentation. Secure with button on front and backing knot on plywood back. FABRIC CHOICE — velvet tuft creates the most dramatic results ($25-50 per yard), heavy linen creates more casual sophisticated look ($15-25 per yard). DIFFICULTY LEVEL — intermediate. Requires comfort with planning the grid, using the long upholstery needle, and consistent button-pull depth for even tufting. THE RESULT — visually significantly richer than flat-upholstered panel. The dimensional surface catches light differently across the day and looks like professionally-upholstered furniture.
AFFILIATE SLOTPROJECTSame as upholstered linen panel + upholstery buttons in matching fabric + long needle + diamond or grid tuft pattern; adds 4-6 hours, $150-300 totalAdd affiliate URL when configuredWhy it works
Because tufting adds three-dimensional texture to what would otherwise be a flat fabric surface — the indentations create shadow and depth that change as light moves across the panel throughout the day. The tufting also visually signals the additional craft effort (button-through tufting is recognizably labor-intensive) which communicates quality and intention. A flat-upholstered panel reads as simple DIY; a tufted panel reads as professional upholstery. The same materials, 4 to 6 additional hours, and the result reads at a fundamentally different quality level.
Pro tip — Cover the upholstery buttons in the same headboard fabric before attaching — fabric-covered buttons match perfectly and read as designed element; standard covered buttons from craft stores in contrasting fabric or color look like afterthoughts. Cut small 1.5-inch circles of fabric, wrap around the button form, snap closed per button-covering kit instructions.
Tufted velvet panel with diamond grid — dimensional shadow reading as professional upholstery quality. See also: bedroom-cozy-ideas
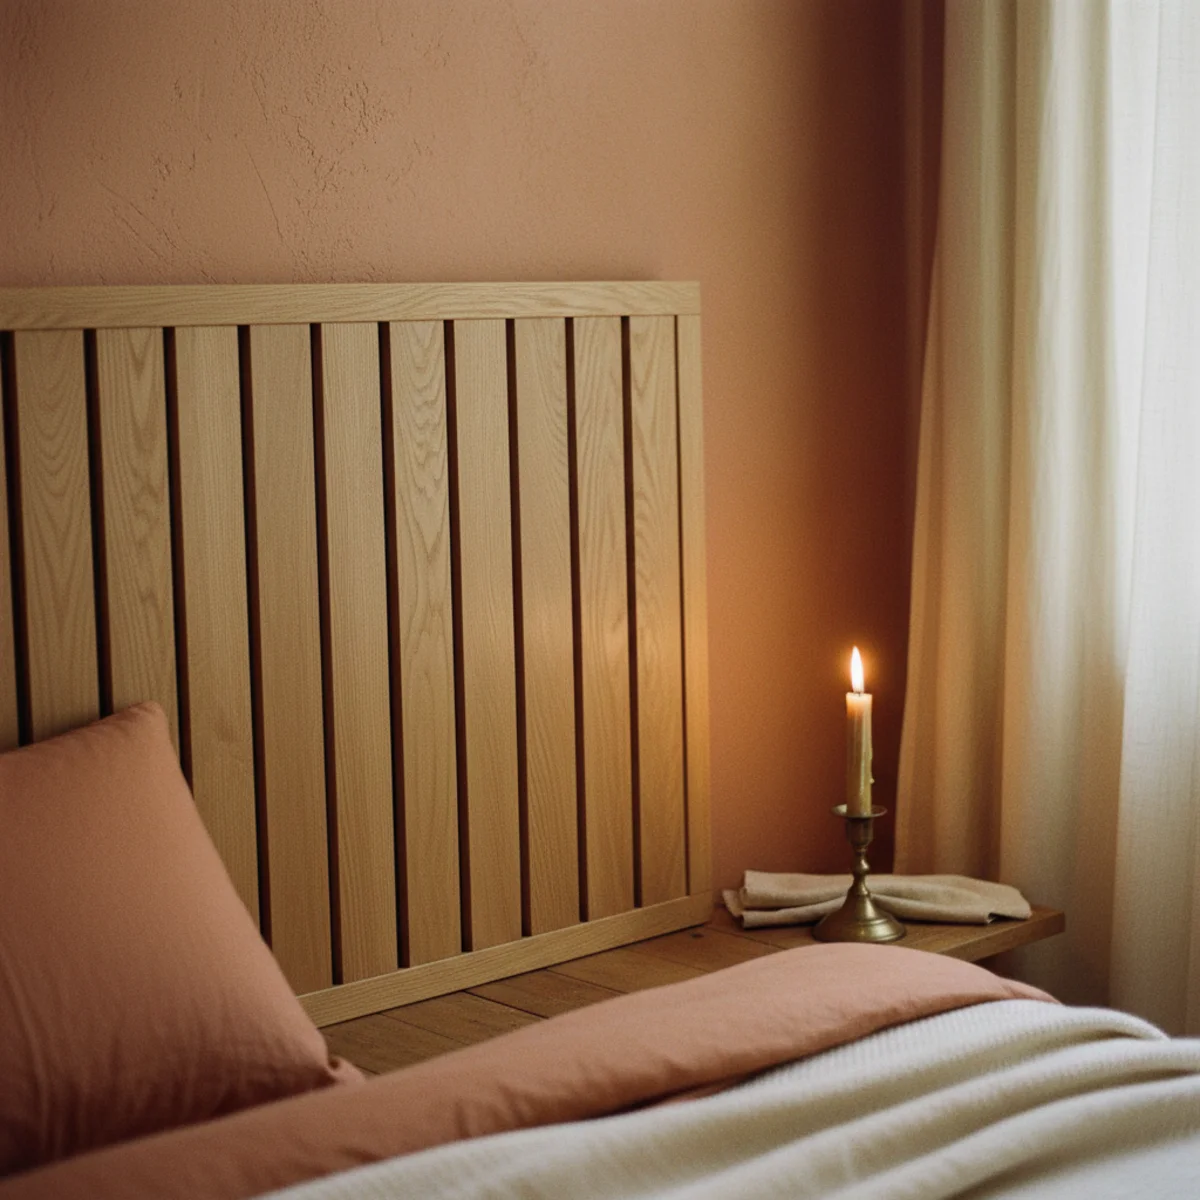
07A Slatted Wood Headboard
A slatted wood headboard — vertical or horizontal wood slats mounted to a horizontal rail or directly to the wall — produces Scandinavian warmth and craft character. The visible joinery and wood grain read as considered rather than as decorative, and the slat gaps create visual texture that solid headboards miss. Cost: $80-200 for materials. Build time: one full day.
Slatted wood headboard build: MATERIALS — 1x3 or 1x4 poplar or oak boards ($15-40 for the full headboard quantity at hardware store), 2x4 horizontal rails for top and bottom ($5-10), wood screws ($5-10), sandpaper (120-grit and 220-grit). DIMENSIONS — headboard width = bed width + 4-6 inches each side. HEIGHT: 30-48 inches for slat headboard. SLAT SPACING — 1/2 to 1-inch gap between slats. For a 60-inch wide headboard with 2.5-inch wide slats and 3/4-inch gaps, you need approximately 17 slats. NUMBER OF SLATS — calculate by: (total width) ÷ (slat width + gap width). PROCESS — cut all slats to identical height. Sand all surfaces starting with 120-grit, finishing with 220-grit for smooth surface. Attach top and bottom horizontal rails to wall into studs. Attach slats to rails using wood screws from the rail back (hidden screws). FINISH — Danish oil for warm matte grain enhancement, or chalk paint for painted finish, or leave natural sanded for light wood. ORIENTATION — vertical slats create taller more formal look; horizontal slats create more casual farmhouse look.
AFFILIATE SLOTPROJECT1x3 or 1x4 oak or poplar slats with 1/2-1 inch gaps on horizontal rails; 30-48 inches tall; Danish oil or chalk paint finish; $80-200, one full dayAdd affiliate URL when configuredWhy it works
Because slatted wood construction is foundational to Scandinavian furniture tradition — the visible joinery, the natural wood grain, the simple functional construction without ornamentation are all hallmarks of Danish and Swedish furniture design from mid-century through today. A slatted wood headboard references this tradition directly, producing the warm-natural-simple character that Japandi and Scandinavian-inspired bedrooms specifically benefit from. The material craft is what carries the warmth.
Pro tip — Use poplar for the headboard slats if painting, and oak or walnut if using Danish oil finish — poplar is lighter in weight, easier to work with, and takes paint smoothly; oak and walnut have more interesting grain and richer warmth with oil finish. The material choice should follow the intended finish.
Vertical oak slats with Danish oil and half-inch gaps — Scandinavian warmth from visible natural wood construction. See also: scandinavian-living-room
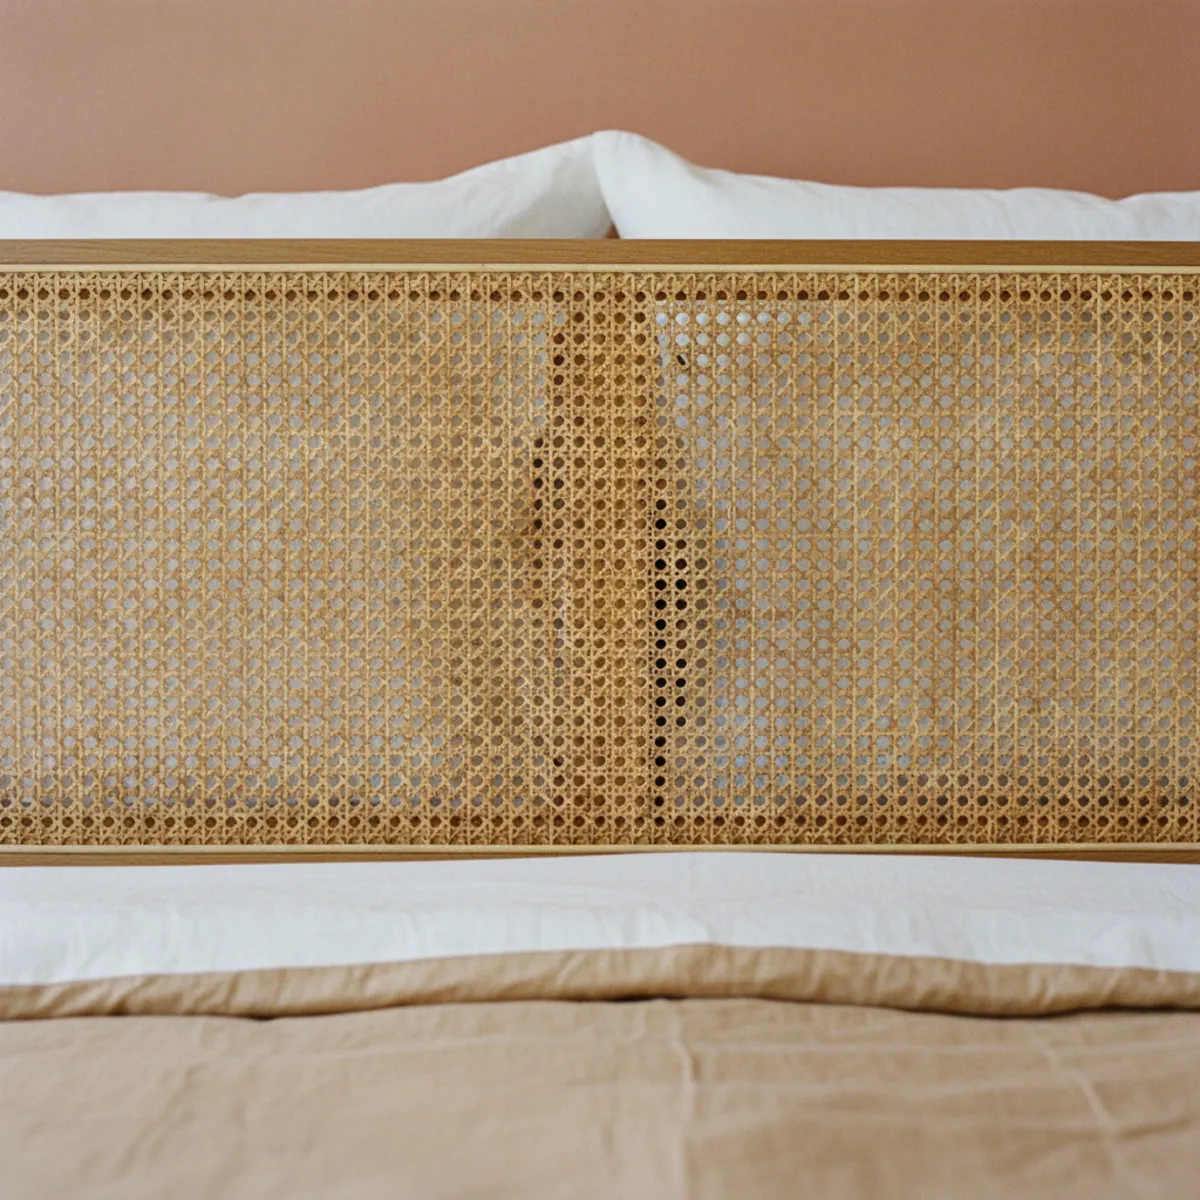
08Pegboard or Cane Panel
A cane-webbing panel or pegboard panel mounted behind the bed creates a distinctive textured headboard with significant visual interest. Cane webbing specifically references mid-century and Japandi furniture traditions; pegboard creates the workshop-aesthetic functional headboard that stores small items alongside its decorative role.
Cane panel headboard: MATERIALS — pre-woven cane webbing ($15-40 per roll from Cane and Basket Supply or Amazon), 1x2 or 1x3 wood border frame ($15-30), wood glue and staples. PROCESS — build a wood border frame at headboard dimensions (2 to 4-inch wide wood strips forming the rectangle). Stretch and staple cane webbing to the frame interior, pulling tight for even weave pattern. Mount frame to wall. DIMENSIONS — 4-6 inches wider than bed per side, 24-40 inches tall. CANE APPEARANCE — natural warm honey-tan color with visible weave pattern. Takes Danish oil for warmth or can be left natural. PEGBOARD HEADBOARD ALTERNATIVE: Materials — standard pegboard ($15-25 per 4x4 sheet from hardware store), painted in warm cream or sage. Mount pegboard panel behind bed. Insert pegboard hooks for hanging plants (air plants or small hanging planters), small lights, jewelry, reading glasses, books in small shelves, or a small reading lamp. THE FUNCTIONAL HYBRID — the pegboard headboard provides vertical storage and display within the headboard zone, eliminating the need for bedside tables for households that want to minimize furniture.
AFFILIATE SLOTPROJECTPre-woven cane webbing stretched on wood border frame ($40-70 total) OR painted pegboard panel with hooks for functional storage; 24-40 inches tallAdd affiliate URL when configuredWhy it works
Because cane is a natural material woven by hand in a pattern with centuries of furniture-making tradition — it appears in Scandinavian furniture from the 1950s, in Japanese-influenced woven furniture, and throughout mid-century modern design globally. The visible weave pattern, the warm honey-tan color, and the natural plant-derived material all signal warm-natural craft character. The same headboard area in white-painted drywall reads as backdrop; in cane webbing it reads as furniture.
Pro tip — Soak cane webbing in warm water for 15-20 minutes before stretching across the frame — wet cane stretches more easily, minimizes cracking during stapling, and tightens to a drum-taut surface as it dries. Dry-stretching cane risks cracking along the weave and uneven tension across the panel.
Natural cane webbing in wood border frame — mid-century warmth from the honey-tan weave's furniture tradition. See also: what-is-japandi-style
09A Fabric Panel on a Curtain Rod
Hanging a fabric panel (or 2-3 panels) from a ceiling-mounted or wall-mounted curtain rod behind the bed creates a draped headboard effect that's especially suited to bedrooms with high ceilings. The fabric panels can be pulled aside during the day and arranged behind the bed for the headboard effect in the evening. Cost: $50-150. Time: 1-2 hours.
Fabric panel headboard specifications: ROD TYPE — CEILING MOUNT: mount a 1-inch diameter rod or rail on the ceiling 8-12 inches from the wall above the bed headboard position. The ceiling mount allows panels to hang straight down from ceiling to near-floor. WALL MOUNT: standard wall-mounted curtain rod 12-18 inches from ceiling, angled to hold panels draping down behind the bed (similar to wall-mounted curtain rod, just positioned over the headboard zone). PANEL WIDTH — 2-3 panels each 50-60 inches wide (standard curtain panel width) for a queen bed. 3-4 panels for a king. FABRIC OPTIONS — sheer linen panels (translucent, romantic, warm cream) for flowing effect, heavier linen panels for more structured reading, vintage cotton panels with character, printed or embroidered panels for pattern. HANGING METHOD — standard ring-clip curtain rings on the rod. ARRANGEMENT — panels centered behind bed, hanging from rod to 6-12 inches above floor, slightly gathered for full appearance. STYLING — position the fabric panels so they frame the bed's top zone (from rod to below pillow level), creating a partial canopy effect. Pair with pendant light or wall sconce to complete the bedded-alcove effect.
AFFILIATE SLOTPROJECT2-4 linen panels on ceiling or wall curtain rod behind bed; ring-clip hanging; $50-150; 1-2 hours; especially effective for high-ceiling bedroomsAdd affiliate URL when configuredWhy it works
Because high ceilings create the scale challenge that short traditional headboards fail to address — a 48-inch headboard in a 12-foot ceiling room reads as proportionally mismatched. Fabric panels hanging from near-ceiling level use the vertical dimension correctly: the panels' height fills the vertical space between the ceiling and the bed in a way that any horizontal-format headboard can't. The draped fabric also adds warmth and movement that horizontal headboards lack.
Pro tip — Use panel weights ($5-10 for a set of chain weights sewn into hems) in the bottom of the fabric panels to ensure they hang straight rather than billowing — fabric panels near beds in rooms with air circulation tend to billow unless weighted. Sew a strip of chain weight into the hem before hanging.
Cream linen panels from ceiling-mounted rod — the draped headboard that uses high-ceiling vertical space correctly. See also: bedroom-cozy-ideas
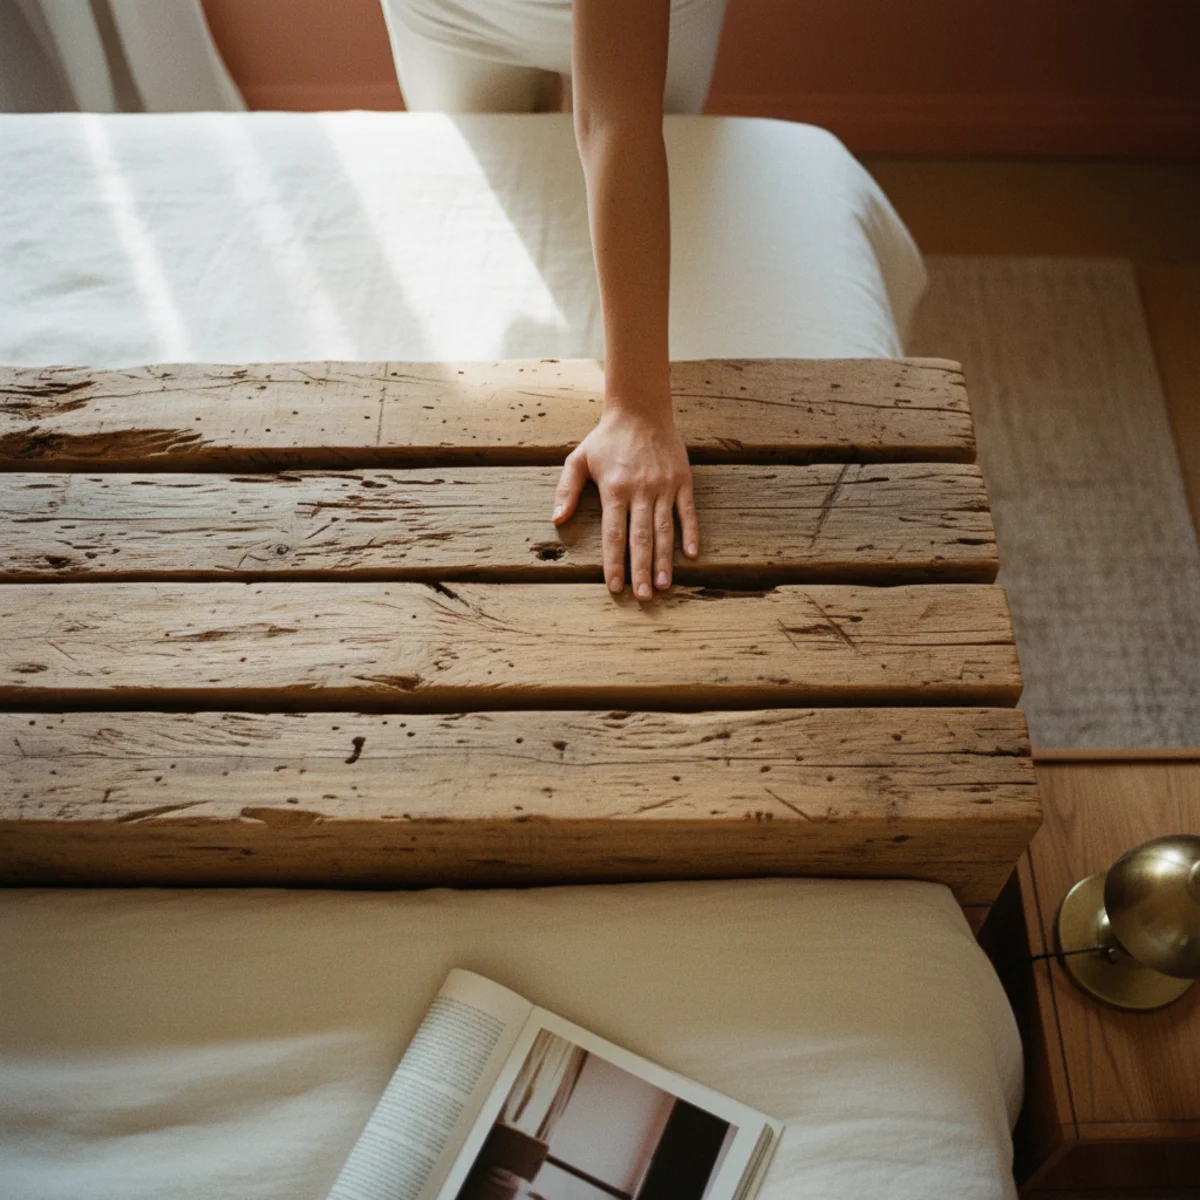
10Stacked Wood Beam
Stacking 3 to 5 large wood beams or thick timber lengths horizontally against the wall behind the bed creates a sculptural organic headboard that reads as architectural rather than as constructed furniture. Best for beds positioned against a feature wall in industrial-farmhouse or warm-modern bedrooms. Cost: $80-200 for salvaged beams. Time: 2-3 hours.
Stacked beam headboard specifications: BEAM SOURCING — reclaimed timber beams from architectural salvage yards ($5-15 per linear foot), rough-cut lumber from lumber yards ($3-8 per linear foot), fallen tree sections from property or neighbor ($0 with chainsaw access and time). DIMENSIONS — beams at 4x4 inch to 8x8 inch cross-section, length matching or slightly wider than the bed. Rough-cut timber with bark intact on one side reads more rustic. STACKING HEIGHT — 3 to 5 beams creates 12 to 24-inch stacked height. Larger cross-section beams create taller stacks with fewer beams. STABILITY — the stacked beams need to be secured to prevent movement. Simplest: run two long threaded rods vertically through pre-drilled holes through the stack, secured with nuts at top and bottom. More complex: mount a 2x6 backer plate to wall, attach beams to backer plate with wood screws from behind. FINISH — wire brush to clean loose debris, apply Danish oil for warm grain enhancement or clear matte sealer for protection while preserving the rough character. WEIGHT — stacked heavy timber beams are heavy (a 6x6 x 60-inch beam weighs 60+ lbs). Ensure the wall mounting is into studs or with appropriate anchors rated for the full stack weight.
AFFILIATE SLOTPROJECT3-5 reclaimed timber beams (4x4 to 8x8 inch) stacked horizontal, secured with threaded rod; Danish oil finish; $80-200, 2-3 hoursAdd affiliate URL when configuredWhy it works
Because the stacked timber form references traditional Japanese log construction, the horizontally-layered quality of dry-stack stone walls, and the simple honest construction of working agricultural structures — all of which are warm-architectural references. The stacked beams also add genuine physical mass and texture to the headboard zone that flat plywood or upholstered panels lack. The organic roughness of reclaimed timber (knots, grain variation, bark on edges) reads as genuinely warm material where smooth manufactured surfaces require additional surface treatment to approach the same warmth.
Pro tip — Source reclaimed timber beams from demolition projects through your local Habitat for Humanity ReStore or architectural salvage yard before purchasing new material — old barn beams, bridge timbers, and industrial flooring beams all make excellent stacked headboard material at $3-15 per linear foot versus $15-30 for new architectural-quality timber.
Four stacked reclaimed beams with grain and knots — sculptural organic headboard referencing warm-architectural traditions. See also: diy-coffee-bar
11Upholstered Wall Panels
A set of 3 to 5 smaller individual upholstered wall panels arranged as a modular headboard creates the upholstered warmth of a full panel (item 1) with more visual interest from the grid composition and panel gaps. The modular arrangement also allows partial replacement if a panel is damaged, easier installation logistics, and more flexible sizing. Cost: $100-250 for 4 panels.
Modular upholstered panel headboard: PANEL DIMENSIONS — each panel: 12x18 inches (for portrait-orientation panels in 3-panel grid), 18x18 inches (for square panels in 2x2 or 2x3 grid), 24x24 (for fewer larger panels). MATERIALS PER PANEL — small plywood piece cut to size (hardware store cutting), 2-inch foam cut to size, 1 layer batting, 0.5 yards fabric per 12x18 panel. PROCESS — same as full upholstered panel (per item 1) but at smaller panel scale. More individual cutting and stapling repetitions. MOUNTING — D-ring hardware on each panel, hung on wall screws in stud or with drywall anchors. GRID ARRANGEMENT — 3 panels in a horizontal row (panoramic feel), 4 panels in 2x2 grid (balanced), 6 panels in 2x3 grid (taller, more dramatic), 3 panels in vertical column (dramatic height). SPACING BETWEEN PANELS — 1 to 3 inches between panels for visible gap that reads as intentional grid. FABRIC VARIETY OPTION — use different but coordinated fabrics on alternate panels for pattern variation (two shades of linen, alternating linen and velvet, different textures within same color family).
AFFILIATE SLOTPROJECT3-6 individual upholstered panels (12x18 or 18x18 inches) in grid arrangement with 1-3 inch gaps; same materials as full panel, modular installationAdd affiliate URL when configuredWhy it works
Because the modular grid introduces visual structure and rhythm that a single flat panel lacks — the panel gaps create geometric interest, the grid composition adds dimensionality, and the individual panels' edges create shadow lines that vary through the day. For bedrooms wanting visual texture in the headboard zone rather than simple upholstered warmth, the modular approach produces more interesting long-term viewing. The installation logistics are also more manageable for solo DIYers since each small panel is lighter and easier to hang precisely than a single large panel.
Pro tip — Mark all panel mounting positions on the wall with painter's tape (tape the exact rectangle where each panel will hang) before driving any nails — the tape templates let you adjust the grid spacing and confirm the arrangement reads correctly from bed and from room entry before committing to hardware.
Six cream linen panels in 2x3 grid with 2-inch gaps — modular headboard with geometric shadow-line texture. See also: master-bedroom-ideas
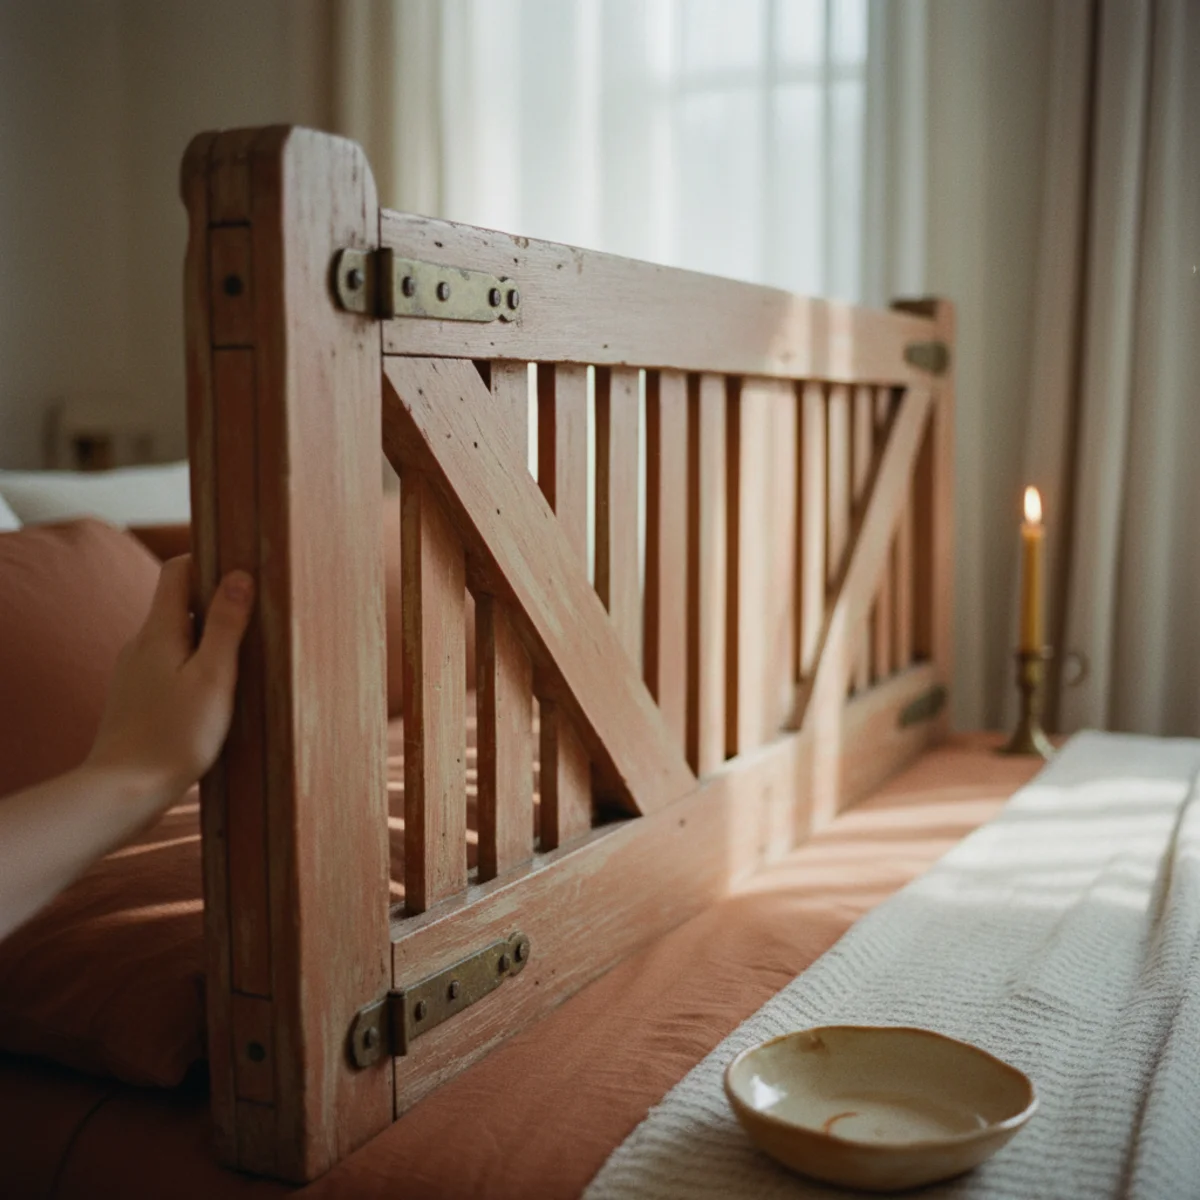
12A Headboard From a Bench or Gate
Converting a vintage garden gate, wrought-iron fence section, carved wooden bench back, or architectural panel into a headboard produces the most-unique, most-characterful, and often most-affordable result from any headboard category. The original-purpose object brings history, craft, and visual interest that purpose-made headboards rarely achieve. Cost: $20-150. Time: 1-2 hours to mount.
Architectural element headboard options: VINTAGE GARDEN GATE — old wooden garden gate with original hardware at $20-80 from estate sales, salvage yards, or Marketplace. Mount horizontally or vertically depending on gate dimensions versus bed width. WROUGHT-IRON FENCE SECTION — ornamental iron panel at $30-100 from architectural salvage. CARVED WOODEN BENCH BACK — the back section removed from a deteriorating vintage bench ($15-50 from estate sales). The carved spindles or rails create a classic headboard form. OLD WINDOW FRAME — vintage multi-pane window frame (empty of glass) mounted horizontally ($20-60 from architectural salvage). CARVED PANEL OR SCREEN — ornate carved wooden panel or Asian-influenced folding screen section ($30-200). SALVAGED DECORATIVE RAILING SECTION — a decorative railing from an old porch or staircase at $20-80. MOUNTING — secure to wall with L-brackets to studs or with heavy-duty wall anchors for heavier iron pieces. Ensure all sharp edges or points on wrought-iron pieces are filed smooth for bedroom safety. FINISH — leave original patina for most authentic character. Repair original paint where needed rather than repainting entirely.
AFFILIATE SLOTPROJECTVintage garden gate, wrought-iron fence section, carved bench back, or architectural panel; mount with L-brackets to studs; preserve original patinaAdd affiliate URL when configuredWhy it works
Because they carry the double authenticity of real history and real purpose — a vintage garden gate was made to keep something in or out; a carved bench back was made to support sitting for years or decades; a wrought-iron fence section was made to define a boundary. When repurposed as headboard, these histories become part of the bedroom's character and story. No purpose-made headboard can carry this second-purpose narrative. The aesthetic richness of the conversion — transforming something built for one purpose into something serving another — produces warmth that requires both material character and story.
Pro tip — Look specifically at Habitat for Humanity ReStore for salvageable bench backs, gate sections, and architectural panels — ReStore receives significant architectural salvage donations from home renovations and often has exactly the right type of carved wooden or metal element for architectural headboard conversion at $10-50.
Vintage garden gate mounted as headboard — real history and original purpose converted to bedroom character. See also: thrifted-decor-ideas


How to build an upholstered headboard step by step
The most popular and forgiving DIY headboard. Four steps, one afternoon.
- 1Cut the plywood to size
Cut a plywood panel to your bed's width and your chosen height. Many hardware stores will cut it for you.
- 2Add foam and batting
Glue foam (two to three inches) to the panel, then wrap it in batting for a soft, rounded edge, stapling the batting to the back.
- 3Wrap with fabric
Lay your fabric face down, set the panel on it, and pull the fabric taut, stapling to the back. Fold the corners neatly like wrapping a gift.
- 4Mount it securely
Attach the headboard to the wall or the bed frame, into studs or with sturdy brackets, so it's stable to lean against.
Quick tips
- Have the hardware store cut the plywood to size to save tools and effort.
- Pull upholstery fabric genuinely taut and fold the corners like wrapping a gift.
- Use two to three inches of foam for a comfortable, substantial upholstered headboard.
- Oil reclaimed wood rather than lacquering it for a warmer, repairable finish.
- Mount any wood or heavy headboard into studs; they're heavier than they look.
- Choose a no-build option — a hung rug or painted arch — if you lack tools.
DIY headboards by skill and style
A hung rug or quilt, a painted arch, or leaning shutters — a headboard with zero construction.
An upholstered plywood panel — foam, batting, and linen stapled on, mounted to the wall.
A slatted or planked wood headboard, or a tufted upholstered panel, needing a saw and more patience.
A leaning or hung headboard that needs minimal or no wall mounting and moves with you.
A headboard finishes a bedroom like a frame finishes a picture — and it's one of the easiest, most forgiving things to make yourself.
Frequently asked questions
How do I make a DIY headboard?+
What's the easiest DIY headboard to make?+
How do I make an upholstered headboard?+
How much does a DIY headboard cost?+
Can I make a headboard without drilling?+
What fabric should I use for an upholstered headboard?+
A DIY headboard finishes a bedroom for a fraction of the store price, and because it's essentially a flat panel, it's one of the most forgiving builds there is. Start with an upholstered plywood version — foam, batting, and linen stapled taut — or skip construction entirely with a hung rug or a painted arch. We'd obsess over taut fabric and neat corners; that tension is the difference between a headboard that looks bought and one that looks botched. Forty dollars and an afternoon, and the bare wall behind your bed is finally finished.